

How To Create Cinematic Looking Photographs
Over the past few years, there has been a real shift towards photographers wanting their images to look more cinematic. It’s not necessarily something you will see in commercial photography but on social media, there are countless accounts dedicated to the cinematic aesthetic, and they are incredibly popular! So how do you make your images look cinematic? I took an evening stroll to see what I could create.
Over the past few years, there has been a real shift towards photographers wanting their images to look more cinematic. It’s not necessarily something you will see in commercial photography but on social media, there are countless accounts dedicated to the cinematic aesthetic, and they are incredibly popular! So how do you make your images look cinematic? I took an evening stroll to see what I could create.


It’s important to understand that this look isn’t for everyone and it will not make a bad photograph look better, it’s very much just a matter of taste. The good news is that the look is very desirable and even better, it can make very mundane scenes seem, well like a still from a gritty Hollywood movie, what’s not to like!


At this point, I’m sure many photographers will be rolling their eyes and thinking ‘it’s all been done before’ and I’ve certainly been guilty of wishing an early demise of the ‘Social Media’ fad of basically, trying to make images look like something they are not! However, maybe it’s my old age or my general love for any type of photography, but I’ve actually come around to quite like the cinematic look. So with my camera, a warm coat and a healthy dose of optimism - I set out around the dark streets of Birmingham to get some film-like photographs.

In all honesty, I’ve received compliments on my photos in the past, ‘Looks like something from a film’! Which is always nice to hear, but I really wanted to be more intentional and delve even deeper into the cinematic feel. I knew that there are certain elements that give an image a more ‘film scene’ feel. As I roamed the streets, looking for the perfect subject matter, those elements were running around my mind!
Getting the right Colour Grade
It is impossible to talk about cinematic feeling images without speaking about the most predominant element that gives an image a cinematic feel, the colour grade. Many photographers, both amateur and professional alike, will be very aware of the importance of colour and the potential that editing software can give us to manipulate those colours. Before anyone attacks me, yes black and white photography is by its nature, the absence of colour - but even black and white can look very cinematic!

However, we will be focussing on colour photography here and referring to the art of adjusting those colours as colour grading. The term itself can be applied to still or moving images, but more commonly used in the world of cinematography. Grading simply means the ‘feel’ that is given to a video or image in post production by using certain colours to elicit certain emotions. OK, so that’s a lot to wrap our heads around, let’s be a bit more specific.
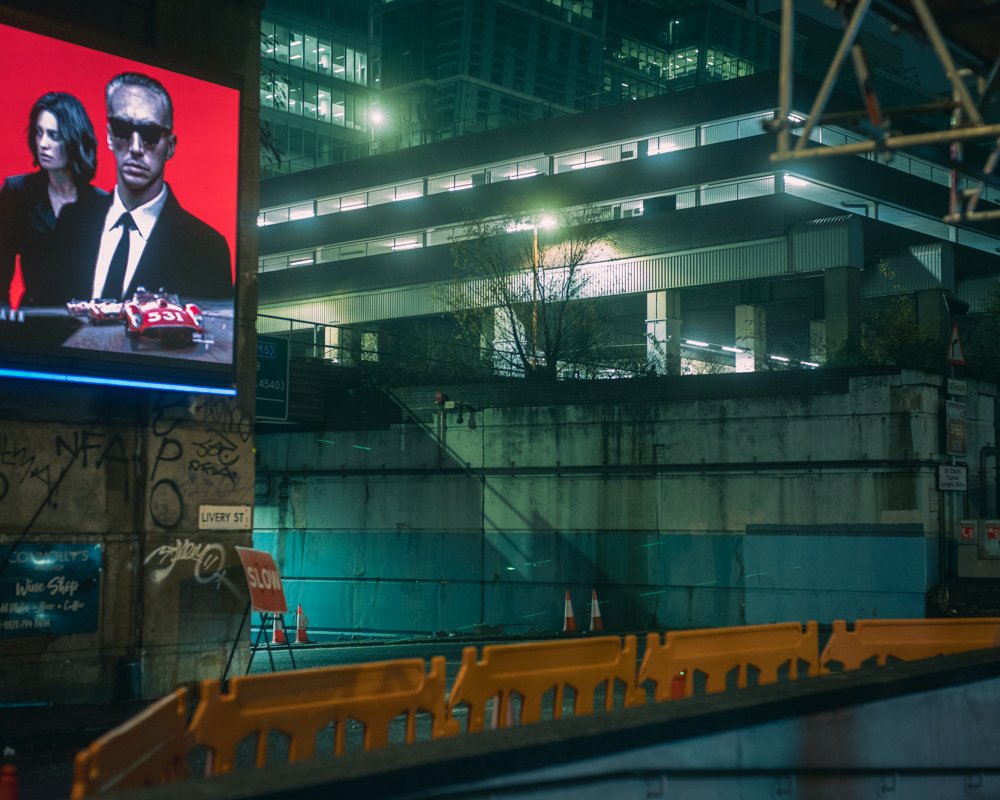
Basic colour theory can tell us how certain colours may affect our emotions and perceptions of a scene. For instance, it’s pretty common to depict a warm scene using oranges and yellows, to imply heat and a cold scene - you guessed it, blues. Colours such as red can imply danger and greens can be calming and relaxing. We can also use multiple colours together to add interest to a scene, splashes of red in a blue scene will draw the viewer's interest to that point. The same red accents may be lost in an orange scene or lose impact.

The art of grading is, in its most simple essence, the choice the creator makes to convey the overall feeling of the narrative for that image or video. But why is grading our images so popular these days? Surely we want to create a true representation of the scene in front of us? Well, my very unscientific take on this is ‘blame social media’. Many of us can list our inspirations not just in the photography world, but that of the world of cinema and social media is awash with people claiming inspiration from the likes of Wes Anderson, Roger Deakins and countless other directors and cinematographers.
Possibly the most enduring ‘grade’ of modern times is the Teal & Orange look - no prizes for guessing the primary colour scheme there and a quick Google search will show thousands of examples of it! This particular look creates depth and can draw the viewer's attention to important aspects of a scene. However, it’s important to remember that just because this is the most popular, doesn’t make it the only scheme we can use and neither does it imply that we need to use such extreme grades, as with everything, less is often more.

So we have established the importance of colour and its impactfulness of setting a mood for our image. But there is more to creating a cinematic feel than simply ramping up certain colours and hoping for the best! Next we will look at choosing the right subject matter in the first place and making the seemingly mundane, well, look magnificent!
Choosing Cinematic Feeling Subjects
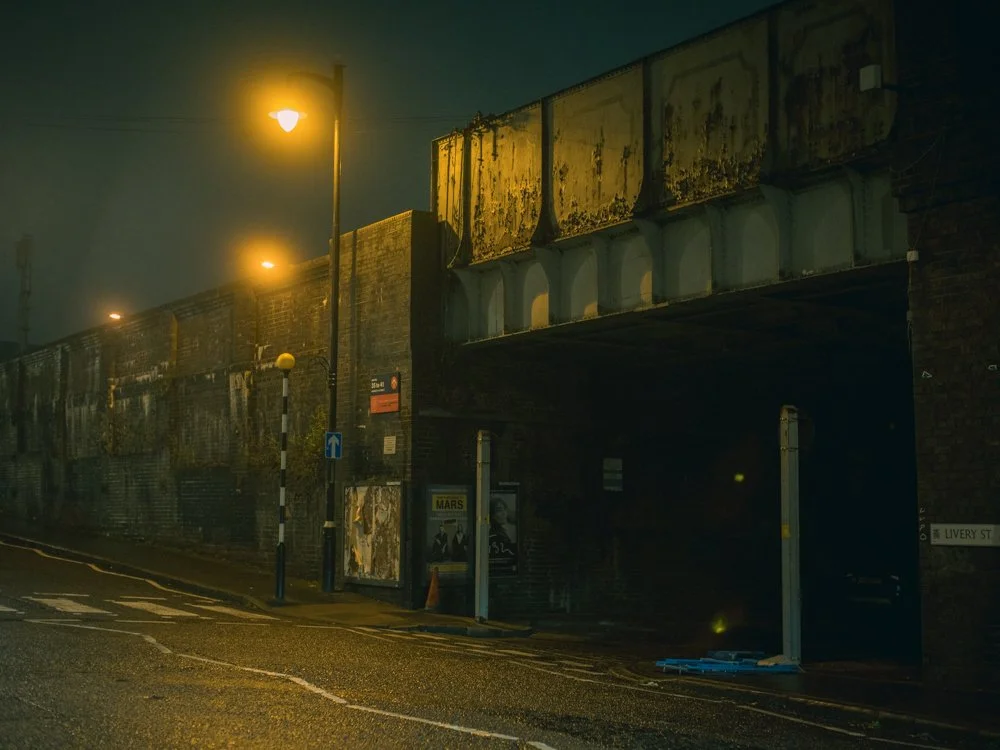
As I continue my walk around Birmingham, I find my eyes are constantly drawn to construction yards, car parks, street lights and any pools of light in the otherwise dreary night. This is where personal taste and opinion play a huge part in choosing the right subject (and where my particular love of the Sci-Fi and moodier feeling films comes into play!) but the mix of metal, flood lights and concrete give me very ‘Blade Runner’ like feels! It’s a stretch, but I did say I was venturing out with a healthy dose of optimism!

Finding scenes that feel cinematic is no easy feat. For a start, one person’s cinematic scene is, well, another’s ‘picture of a crane in rainy Birmingham on a cold, wet Tuesday night’. If cinema has taught us anything, it’s that almost any scene can look cinematic, it is all in the vision of the person creating it. I’m certainly not adverse to photographing on warm sunny days, but I do find I lean towards darker, moodier settings on a regular basis so choosing what time of day and in what weather conditions, is equally as important.
Unless we are heading out with the intent to create one single image, we usually will have a series of images in mind. This can again have an impact on choosing what and where we shoot. Thinking in even broader terms, we will normally be trying to add images to a portfolio and will want to keep a consistent look and feel across those images, this again will influence the kind of subject that we choose to shoot on a regular basis.
Seeing the light
As I loop around the dark streets and start to head home, I find I’m drawn even more towards the dark corners, single points of light and the soft puddles of illumination glowing on the wet streets. This is no accident, with cinematic feeling images, it’s often what we choose to leave in the shadows that help create mystery and can give the viewer a slightly uneasy feeling of what might be lurking there.


After years of shooting with film cameras and having a particular love of Cinestill 800T (a derivative of a film stock used in motion pictures) I’ve learnt to seek out artificial lighting and to try to replicate the subtle glow or halation created by such film stocks. This certainly was my intent as I walked around, crown to the lamppost and lights from buildings like a crazed photography moth!
Light is the most fundamental part of any photograph but using light to create a cinematic feel is often about the subtraction of that light. I’ll have a friendly bet with you that if you Google the word ‘cinematic’ the kinds of images you find will lean towards the darker, rather than bright sunny days. Again, it’s not to say that bright and light can’t be cinematic, that’s simply not true. But there is definitely a skew towards the notion of a cinematic image having a darker, moodier overall feel.
Bringing the elements together
As I get home, make myself a drink and sit down to edit the images, I feel engrossed in how all of the elements actually come together to create a look, feel and emotion. I frantically move sliders in Lightroom, a little here, a lot there and slowly concoct my interpretation of something I feel has a cinematic feel. Though it won’t be to everyone's taste, for a brief stroll around the streets of the second city, I feel quite happy with the overall impact of the images.

The choice of subject matter, the light and most importantly, the colour grade all come together to give the images a certain feel. Now I am not saying they are anything special, they’re no ‘In the Mood for Love’ - Wong Kar-Wai’s masterpiece! But they have very distinct stylisation that helps the viewer imagine that they could be a still from a film, and I think that is the goal here.

Yes, there are certain aspects that don’t fit so simply into a ‘cinematic’ feel - for instance, I've still stuck with my love of the 4:5 aspect ratio, where a more widescreen ratio would have helped sell the cinematic look. However, photography is all about compromises and I’m afraid I am a little too stuck in my ways!

I hope you found some aspects of this useful - there are no groundbreaking techniques here and nothing that hasn’t been done a thousand times before. However, even for someone as stubborn as I am, it’s still nice just to spend an evening trying something a little different and broadening our photographic horizons!


About the Author - Ross Jukes is a professional Photographer and Videographer with over a decade of experience. Working in both Digital and Analogue formats, Ross has worked with international clients, had his worked published numerous times and exhibited his work extensively. With a passion for all things photographic, Ross combines his experience, enthusiasm and dedication to his art form to create engaging and educational content for the photographic community.
CAR PHOTOGRAPHY – 10 TIPS FOR TAKING BETTER PICTURES
Have you ever wanted to improve your Car Photography skills? For many of us, cars are things of beauty but trying to turn our ’snaps’ into eye-catching masterpieces is quite the challenge! Whether you want to take shots of your pride and joy or are actually looking to make a career out of Automotive Photography - I have an essential resource for you!

Have you ever wanted to improve your Car Photography skills? For many of us, cars are things of beauty but trying to turn our ’snaps’ into eye-catching masterpieces is quite the challenge! Whether you want to take shots of your pride and joy or are actually looking to make a career out of Automotive Photography - I have an essential resource for you!
I recently teamed up with online motoring website Motor Verso to compile ten tips for taking better car photos. However, the resource itself compiles years of experience from multiple photographers and covering everything from pre-shoot planning all the way through to editing your images and publishing them. It really is a fantastic resource for anyone looking to get into Car Photography and I only wish I’d had something like this available when I was starting out!
REVIEW: Mamiya 645 Pro - The perfect Medium Format Film camera for beginners?

There is no doubting the allure of film photography. For a number of years it has been in a form of ascendency amongst the photography community. It still struggles to shake off the ‘Hipster’ tag but in truth, there is a lot to love about the format. However, in more modern times, many of us crave better resolution, better aesthetics to the image and just the ‘feel’ that Medium format can give you - step up, the Mamiya 645 Pro!
Once the ‘go to’ camera for working studio professionals, this beast of a camera has been refined over the years and now offers all of the mod-cons you would expect from a modern DSLR. More importantly, it allows you to capture a look & feel to your images that just can’t be replicated by it’s digital counterparts. In the video below, I describe what it’s like to shoot with and who I think it’s for, enjoy!

Why shoot Film Photography in 2020?

The Corona Virus Pandemic has undoubtedly been a terrible time for a lot of people. Personally, I have seen all of my work cancelled which has left me with a lot of free time. Rather than simply binge on box sets, I have tried to use this time productively. One of the things that I’ve wanted to do for a while now is to get back into shooting film. On a side note, I will be making a series of videos about this on my YouTube channel, so keep an eye out for them.
Why Film?
The obvious question for a lot of people, is why shoot film when you have a perfectly good digital camera? The simple answer, for me at least, is to achieve a look & feel that has eluded me for years. Looking at my images, it’s fairly clear that I always try to achieve an element of nostalgia, shooting in soft light and adding grain etc. to make the images feel older than they actually are.
That’s all well and good apart from the fact that digital images tend to be over sharp and well, are clearly digital images. This might sound counter-intuitive to a lot of photographers, ‘you don’t want sharp images?’ - in a way, no. You only have to look at any family album with 70’s, 80’s or 90’s and look at those blurry images to get an instant nostalgia fix! The brain seems to make a correlation between those images and something in our past that always seemed to feel like a ‘better time’. Now, this is obviously not factual, but something in those images makes us feel a sense of comfort - and that is something that I’m always striving to achieve.
OK, so get an old 35mm Camera…
Well, again, things are never quite that straightforward. I’ve shot enough 35mm in the past to understand it’s benefits and limitations. So straight away, I knew it wasn’t going to cut it. So I did what any ‘want-to-be’ hipster photographer would do and went straight to medium format and in particular, the Mamiya 645 Pro. Again, I will make a separate video on the perks & quirks of this particular camera but the simple benefits are that it feels modern enough that I could use it without thinking too much and more importantly, it’s a 120mm film camera - and I want that medium format goodness!
I was always sceptical over people saying that you ‘just can’t replicate the medium format look’ and I still don’t fully subscribe to it, but I do agree that the extra negative size has its own benefits over its 35mm counterpart. Most notably, I love the fall off in the out of focus areas that are very difficult to replicate on 35mm. That combined with the go-to Kodak Portra stocks, is a winning combination for me.

OK, so you just want to be a Hipster?
Well, I do have a beard and more than one check shirt. However, the truth is no. The camera, the medium and even the subject matter are all just ‘tools’ to provoke an emotion. I am not trying to get ‘Insta famous’ - far from it. I have simply found a way to translate the feelings of nostalgia that I want to achieve into an image in the most natural way.
That being said, there is obviously a bit of a trend for photographers turning to film in an attempt to show their credentials as a fully-fledged master of light! Again though, it is not about achieving any acclaim for me, it is simply to understand the process better and to take full control, from start to finish, of the images that I create. So that means I am also developing my own film and scanning my own images - again, more videos on this soon on my YouTube channel.

So no more digital then?
Far from it, I actually still carry my digital camera even when I am shooting film. I will obviously be shooting digital for client work - though I am interested in offering commissions on film, that would be fun! The whole process of shooting film is merely to help convey a metaphor in my images, in the same way, that some might choose to shoot purely black & white because it makes their images feel more ‘honest’. Digital is still absolutely a necessary tool but film simply allows me another option, depending on the subject matter.
What’s next?
I will be shooting a lot more film in the interim and will also be travelling to some of the lesser shot areas of Birmingham to find the kind of gritty, run-down scenes that I like. As previously mentioned, I am developing and scanning at home so I will be looking at simplifying and improving that process too.
Overall, shooting film in 2020 is a great new area for me to explore and allows me to keep developing my own skills. It allows me to slow down a little and work on my composition skills and also improve my ability to meter and read light. All of these will hugely benefit my commercial work and throughout the process, I will, of course, bring you with me to share my experiences and knowledge. I am really excited and glad that I can take at least one tiny positive from the crazy times that we are living in.
The Ultimate Canon EOS-R Cinema Rig

If you want to get the most from your Canon EOS-R for filmmaking, then look no further. Whether you use the EOS-R for cinematic short films, corporate work or simple talking heads, I have compiled what I believe to be the ultimate EOS-R Cinema Rig. These items will boost your cameras abilities and supercharge it to handle almost anything that is thrown at it.
Check out the video and see the links in the description below the video if you wish to purchase any of the items yourself.
10 Useful things Photographers can do during Lockdown!!!

The Corona Virus pandemic has well and truly turned our lives upside down and whilst the health and safety of friends & family is the absolute priority, it can also cause real problems for those working in creative fields. Not only is it hugely damaging to income, but it can also destroy any form of creativity and motivation. However, there are still things that we can be doing to keep ourselves active.
Here are ten things that you can be doing during Lockdown to keep your Photography passion going in the right direction!
VIDEO: MY DREAM DESK/STUDIO SETUP FOR 2020!!!

Being a Photographer & Videographer - I need a space for editing and to store my gear. I also need a space for creating my YouTube videos (don’t forget to Subscribe!) and therefore, I think I have finally created my dream desk/studio setup! Watch the video below for more ;)
5 Tips for Photographers - Making the Most of Autumn

Ask any landscape photographer what their favourite season is and there is a pretty good chance they will say ‘autumn’. There is just something about the golden colours, the low sun (if we’re lucky) and the cool crisp mornings that makes everything better, and more importantly, more photogenic! So how can you make the most of autumn? Well, I have compiled five tips that will allow you to take your photography one step further this year.
1) Make the most of ‘Golden Hour’
Let me just get the most obvious tip out of the way first. By now, I’m sure most photographers understand the sense of shooting at ‘Golden Hour’ to make the most of either sunrise or sunset. During the summer months, sunrise in particular is a bit of a nightmare, as it can mean a 4.30am start or earlier. However, the sunrise times in autumn return to far more reasonable times making it much easier to be motivated to get out and shoot. It goes without saying that the thing we all love most about this time of year is the beautiful colours of the trees, but throw in the warm glow of sunrise/sunset and it can really elevate your images.
2) Get experimental!
Autumn is a fantastic time of year to shoot but many of the images can be lost in the crowd of very ‘similar’ images. This offers photographers a great opportunity to get experimental. Composition is one area that can be great to play with, shooting low to the ground and making the most of the blanket of leaves, for instance. One area that I will be looking to experiment with is ‘off-camera flash’. Having recently used the PocketWizard flash triggers, which I normally use for my automotive work, I see lots of potential for illuminating backlit subjects using off-camera flash whilst shooting into the sun. Hopefully, this will create some really unique images and offer a lot of versatility in terms of lighting subjects.

3) Make use of planning tools…
Planning at this time of year is essential, in particular as the weather can be very hit or miss so every opportunity needs to be grasped. There are several tools that I utilise to make sure I have planned ahead before going out to shoot. The most obvious is a decent weather app. I have used Yahoo Weather for years and found it to be fairly consistent. However, I have also used apps such as AccuWeather and Dark Sky. One particularly useful tool is the Photographers Ephemeris - which allows you to see the angle of sunlight at any particular time of day - essential for understanding what will be bathed in beautiful light and what will be in shade. Finally, I use Google Maps and in particular, Street View to explore different areas, especially if they are further afield so that I have a good idea what to expect when I get there!

4) Expand your editing skills
One of the best ways to take your images to the next level is to improve your editing skills. It’s always really important to capture a scene as well as possible ‘in camera’. However, it’s about what you do with it next that is equally important. Paying attention to the warmer hue’s and the saturation can really help your image ‘pop’. I do the majority of editing in Lightroom and will often make a few final adjustments in Photoshop. With regard to autumnal images in particular, I like to bring out the orange and red tones to make the most of the autumnal feeling. I also like to adjust the tone curve to add a softness to the image, but it is always better when Mother Nature adds a bit of mist! A great place to learn new skills is YouTube and I will be uploading new videos on my own YouTube channel soon.

5) Print your work…
This may not seem like the most obvious tip at first. However, by printing your photos, you are committing to an image and ensuring that you are producing your best possible work. I never feel that an image is complete until it is printed and you can see the fruits of your labour. It also helps you pre-visualise an image and make sure you are making the most of a scene and envisaging the final image, hanging on your wall. More importantly though, it is the warm fuzzy feeling you get weeks, months or years after taking an image you are particularly proud of and you happen to glance back at it and get that satisfied feeling. Autumnal images always feel the most sentimental to me and many others and therefore, make a great option for printing and hanging.

In conclusion, whether you’re experimenting with PocketWizards, planning a trip to the countryside using the Photographers Ephemeris or simply printing a few images you are particularly proud of -autumn is a great time of year to be out shooting! Good luck!

VIDEO - Landscape Photography Wales - Fail!
I know that Landscape Photography isn't really that easy. However, on a recent trip to Wales, I found out just how frustrating things can be. In particular, when you fail to make the correct preparations!
I take a pretty 'common sense approach to all of my photography, checking weather, looking at maps and generally trying to pre-visualise shots before I go out. However, for someone completely ridiculous reason, I did none of that on this trip!
As this video shows, not only did I fail to 'scout' locations and pre-plan some shots that I think would have been worth capturing, but I completely underestimated the weather and the terrain. This was quite silly as it left both me and my girlfriend cold and frustrated with the lack of 'good' images.
Whereas the weekend itself was fun and the landscape was particularly beautiful, the lack of the real 'wow' images, left me a bit underwhelmed. Ultimately, this only came down to poor planning on my behalf and with a little bit of effort, things could have been really different.
The moral to the story? Well, it just goes to show that a little bit of preparation goes a long way. In the future, I will make sure that I have more of a plan... and more warm clothing!

VIDEO: REVIEW - FUJI X100F
I was very fortunate recently to spend a bit of time with the Fuji X100F. It’s a small camera that packs a big punch and you can read about it HERE - but if video is more your thing, then grab a cup of tea, sit back and watch the video below to see my full thoughts on the camera!
You can find more info about the camera at - Fuji X100F
If you are interested in purchasing, please find an affiliated link below. This will not cost you anything extra but I will receive a tiny percentage which will help me continue to make these reviews, thank you.