

REVIEW: Peli Case Air 1535 - A Proper Hard Case!
One thing that you soon learn with photography and videography is that there are a lot of ways to waste your money. I have shelves full of gadgets and gizmos that were all intended to make my life as a photographer better and you can already guess, most of them are just gathering dust. However, some products are a ‘no brainer’ when it comes to investment and I class the Peli Air 1535 in that category.
One thing that you soon learn with photography and videography is that there are a lot of ways to waste your money. I have shelves full of gadgets and gizmos that were all intended to make my life as a photographer better and you can already guess, most of them are just gathering dust. However, some products are a ‘no brainer’ when it comes to investment and I class the Peli Air 1535 in that category.
Peli is the go to brand for many people when it comes to hard case protection for their camera gear as well as many other industries. So much so, we almost forget that Peli is just the brand name, yet we refer to these styles of hard cases as ‘Peli cases’. So when I had the opportunity to try one out for myself, I jumped at the chance.
PLEASE NOTE: I WAS SENT THIS ITEM FOR REVIEW BUT NO OTHER PAYMENT OR CONTROL WAS EXCHANGED FOR PUBLISHING THIS UNBIASED REVIEW

The Peli Air 1535 was the option that I plumped for as it offered the best mix of portability and protection as well as plenty of storage space. You may have guessed from the name, the ‘Air’ indicates that it is indeed travel friendly, being the maximum size that can be taken as carry-on luggage and TSA approved. This is often an area of pain for photographers as we daren’t let our precious gear be stowed anywhere else, so being cabin ready is the perfect size.


Furthermore, the most obvious selling point of a case like this is the insane levels of protection that it offers us. I for one have had bad experiences with other camera bags in terms of damage not just from bumps and bags, but also gear shifting around inside the bag which still fills me with dread to this day. Peli cases are renowned for their toughness and the super-light proprietary HPX² polymer construction offers crazy levels of protection whilst not weighing you down - the case weighs 3.94kg when empty.

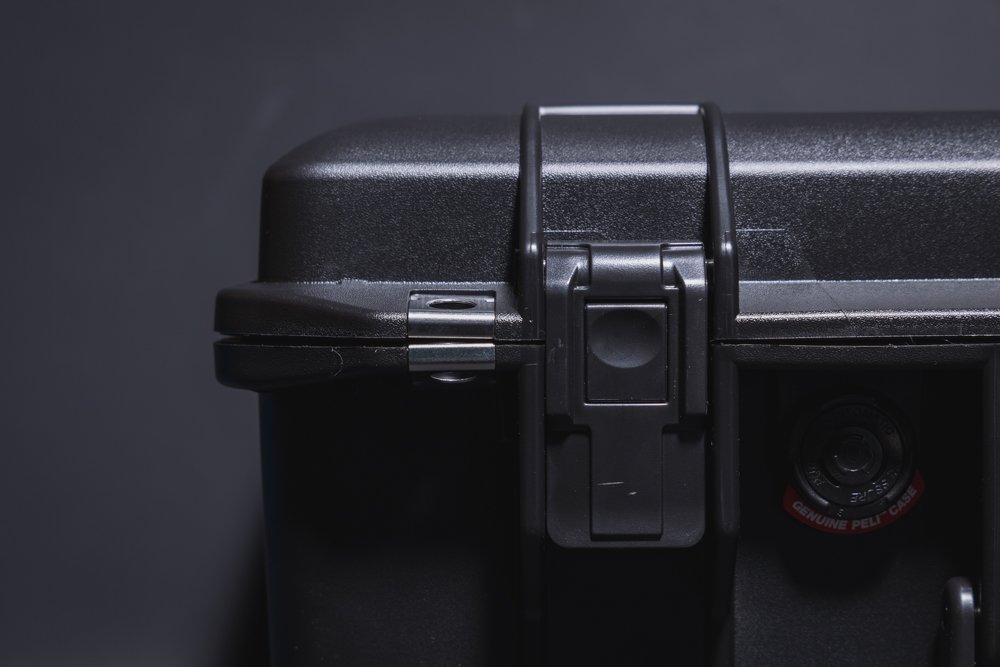
The cases are not just built tough though, they are also waterproof, dustproof and crushproof which if you are as clumsy as I am or just prone to getting stuck in inclement weather, like I am - makes for great peace-of-mind. The good stuff doesn’t even end there though, the cases has wheels, rugged handles, excellent hinges, awesome locking mechanisms and that’s before we even look at the countless options available for the interior.

Features, Features and more Features
Looking closer at some of the main details of the Peli Air 1535 and the first thing you notice when picking up the case is the incredible build quality. It feels robust but very light and portable. I’m not ashamed to admit my first instinct was to throw it down some stairs! I didn’t, not for fear of the case breaking but for what damage it would do to everything else! The handles feel solid and the hinges are firm and reassuring.

This case has some very cool tricks up it’s sleeve! The O-ring seal around the lid of the case means that this thing is waterproof and not just ‘OK in a light downpour waterproof’ - like drop it in a lake waterproof. I’m obviously not advising that and certainly wasn’t going to test it out but I believe it - it is IP67 rated! It even has an automatic pressure equalisation valve that keeps water out and means that the case won’t just explode open with pressure changes - I mean, that’s something I’ve never worried about but now I can worry even less!

The stainless steel padlock protectors and ‘Push and Pull’ latches feel robust and give a satisfying click! The wheels are smooth and glide along pavements and the retractable trolley handle is sturdy and reassuring to use. However, the biggest benefits to us photographers is what lies inside it’s spacious 27 litre interior and the differing methods of organising our gear.
Tough on the outside, soft in the middle
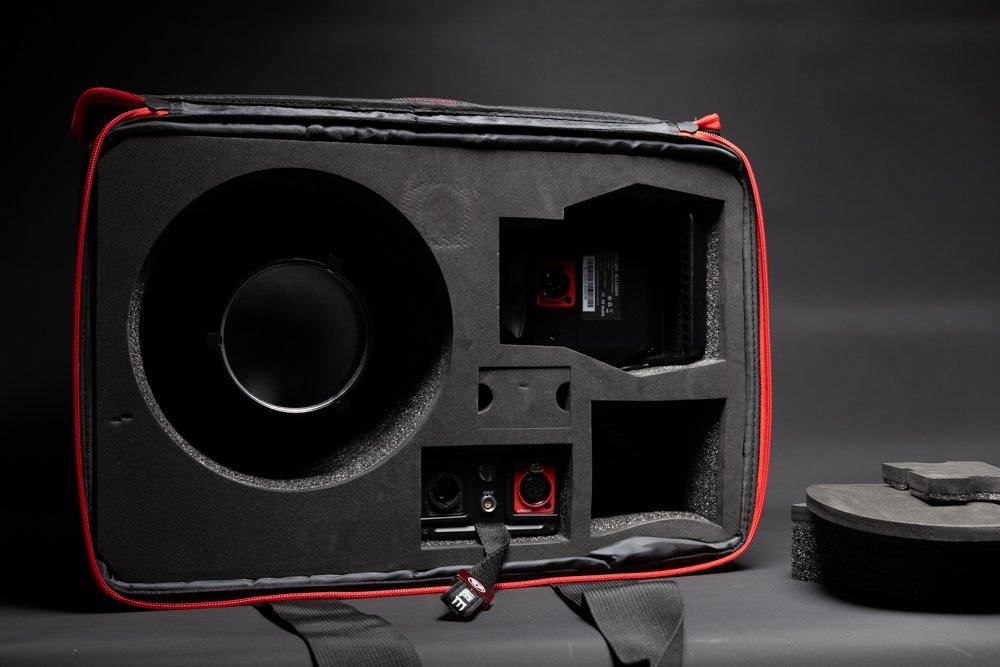
So we know the exterior is pretty well protected but what about the interior? Well there are multiple different options for ‘padding out’ your Peli Case. One of the simpler yet more effective options is the foam insert. You can cut and modify this to suit your own desire and if I was lucky enough to be carrying an Arri or super-high end cinema camera, this is how I would do it - offering maximum protection!


However, most of us will be carrying at least one or two camera bodies, multiple lenses and a host of other accessories. For this, there are two great options. Firstly, there are the padded dividers. They are similar to what you may find in a traditional camera bag but they feel a bit more sturdy and are very versatile in how you can configure them to suit your needs. One tip is to lay your gear out in the case so you get a feel for how it will all fit before adding the dividers.


Secondly, there are the awesome ‘TrekPak’ dividers. This is a really neat solution that you cut down to size using the supplied blade tool and use pins to join sections. It works really well and still offers some degree of versatility. However, as you are literally cutting the dividers down to size, it pays to thoroughly plan out your storage needs as this feels like a more permanent solution. If you do similar jobs and use the same gear frequently (such as weddings or portraits etc) this is a really great option.


One thing to mention here is to really take the time to plan out where your gear will go within the case. It’s very easy to make a mistake and end up wasting valuable ‘TrekPak’. Even worse, you may plan it all out meticulously only to find that you are just short! So it is really worth planning accordingly before cutting away and costing yourself a fortune! Even the note that comes with the TrekPak reminds you to ‘Measure twice, cut once!’ sage advice…
Video Source - Shane Bethlem via YouTube
Cons
I clearly have a lot of good things to say about this case so I thought I would start with the negatives, as let’s face it, that’s what most people will want to hear about! In complete honesty, I really struggle to find any. That’s a bit of a copout answer so I will offer a few but again, it’s a bit tough to say they are absolute negatives when this case offers so much.

Firstly, there is the price. Depending on what divider system you plump for, this case could set you back anywhere between £290-£450 and there is no getting away from the fact that it is expensive! It is easily countered with the fact that the case is virtually indestructible in everyday use and Peli’s limited lifetime warranty should have you covered in most ordinary situations. However, as an initial outlay, it feels steep and many will be tempted to source a cheaper alternative. This may end up being a false economy if those cases are not built to the incredible quality of the Peli’s

Next up is the somewhat limited versatility of the case. I’m going to contradict myself massively here, in particular when we look at the interior options later. However, I feel these cases are aimed more at people who have specific needs for a hard case, they travel a lot or are in busy production environments where gear isn’t exactly looked after. For most photographers in a studio scenario or landscape photographers, lugging a hard case around doesn’t really seem logical - so again, what is your use-case for a hard case?
Pro’s
As mentioned, I really struggled to find any cons but for the Pro’s - I could be here a while, so I’ll keep it brief. As you would expect from a brand with a reputation like Peli’s - the case does exactly what you expect it to. It is built like a tank and I have had to resist the urge to try to destroy the case for two simple reasons, the cost and the sheer embarrassment of probably not being able to! So I will spare my blushes and just say it’s very tough!

One of the biggest benefits to me was the fact that it has wheels! As a non-driver, I find myself lugging gear around on my back and at the tender age of forty-something, that is starting to take it’s toll. However, getting the weight off my back and onto the ground is a gamechanger. One word of caution though, the wheels glide smoothly along pavement and airport concourses but the case does feel ‘bumpy’ on rougher terrain. It’s a good thing the interior is so well padded!


That interior is maybe the biggest pro of all, the versatility of foam, padded or the exceptional ‘TrekPak’ dividers make this almost ideal for any type of photographer or videographer. I struggled to commit to the TrekPak purely on the basis that my gear needs to change considerably from shoot to shoot. However, the padded option allows you to construct the interior to suit whatever gear you are carrying and has been my default when using the case.
I added the additional lid organiser and for me, this elevated the Air 1535 to another level as it gave me dedicated spaces for the kind of gear that always seems to get lost in my other bags. In particular for video shoots, having pockets for cables, audio accessories, batteries, memory cards and smaller items was perfect. Knowing that they wouldn’t just be rolling around in my bag was great peace-of-mind and not having to worry that I would lose something every time I opened the bag was a real relief.

Video Source - RA Visuals via YouTube
SUMMARY
So would I recommend this to other photographers and videographers, well it’s a pretty easy ‘yes’ but I would also offer a word of caution. There is absolutely no doubt that the Peli case offers unparalleled levels of protection for your expensive camera gear. But much like everything in life, that comes at a cost and in this case, it’s that initial outlay of cash. I would say, as someone who has suffered the agony of breaking camera gear that I believed to be well protected in a traditional camera bag - that cost is justified by the levels of protection offered and much like insurance, you’ll only really understand its true value when you need it!

The other piece of advice that I would offer is to have a clear goal in mind of why you need a case like this. Are you going on a particular trip where you need the extra protection? Do you work in environments that can leave your gear particularly vulnerable? Or, like me, are you just cursed with the clumsy gene that makes you a danger to camera gear! If any of those are true, then it’s probably a good investment!
I have been very impressed with the Peli Air 1535 and can already see a future where I pick up a couple of different cases from the extensive Peli line-up.

Tilly approved…

About the Author - Ross Jukes is a professional Photographer and Videographer with over a decade of experience. Working in both Digital and Analogue formats, Ross has worked with international clients, had his worked published numerous times and exhibited his work extensively. With a passion for all things photographic, Ross combines his experience, enthusiasm and dedication to his art form to create engaging and educational content for the photographic community.
Disclaimer: All links to Amazon UK/US are affiliated links - you will still pay the same price but I will receive a small commission. All information provided in this blog is intended either for educational or entertainment purposes and is accurate to the best knowledge of the author. However, further research/professional advice should be sort before making purchases/implementing any advice given and no responsibility is taken by the author or parties mentioned here within.

REVIEW: Matador BetaLock - Every Photographer needs one!
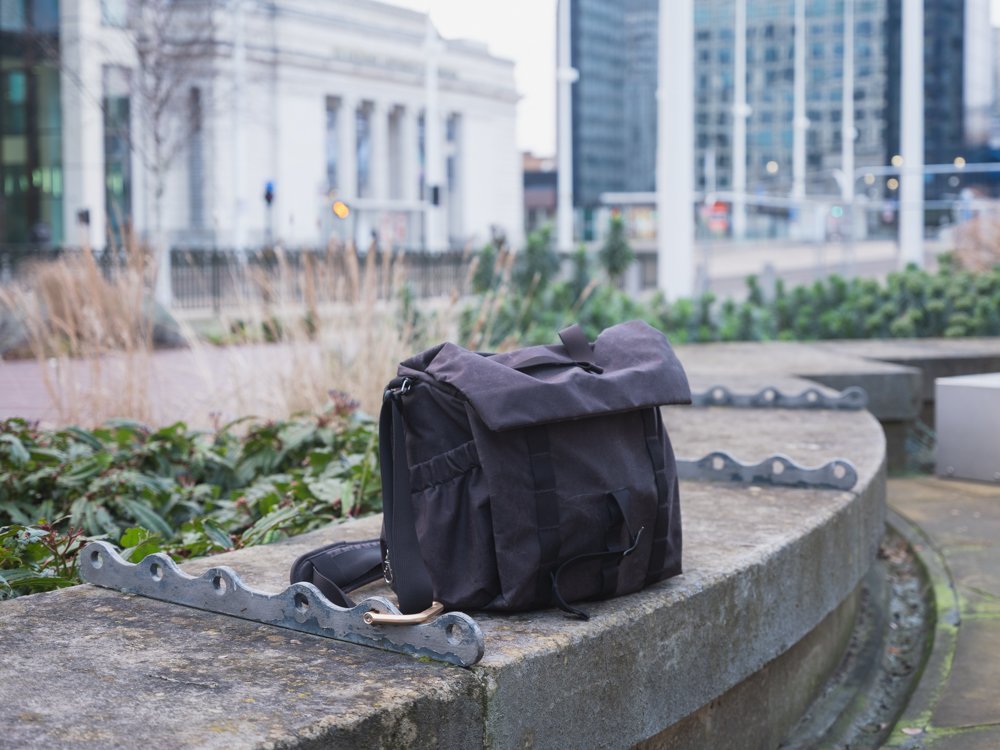
Every now and then, I stumble across a product that stops me in my tracks and the Matador BetaLock is exactly one of those products! It’s an incredibly simple idea, a lockable carabiner but it solves a huge problem that terrifies me and something that I am sure will concern countless other photographers and videographers, let me explain.
Every now and then, I stumble across a product that stops me in my tracks and the Matador BetaLock is exactly one of those products! It’s an incredibly simple idea, a lockable carabiner but it solves a huge problem that terrifies me and something that I am sure will concern countless other photographers and videographers, let me explain.
I was in a recent YouTube rabbit hole, searching for bikepacking related gear in preparation for some trips in 2024 and as always, I seemed to find myself in one of the obligatory ‘top ten accessory’ videos. These are Kryptonite to me and I can waste hours digging through lists and watching videos on things that I really know that I do not need. However, buried deep in one of those videos, I stumbled across the Matador BetaLock.
PLEASE NOTE: I WAS SENT THIS ITEM FOR REVIEW BUT NO OTHER PAYMENT OR CONTROL WAS EXCHANGED FOR PUBLISHING THIS UNBIASED REVIEW

As soon as I saw the BetaLock, I knew exactly what problem it would solve for me and instantly knew that this product would be of high-value to other professionals in this sector. The product is simple, it’s a large carabiner but what makes it unique (well, as far as I can see from a very quick online search!) is that it actually locks using a key! I know, it doesn’t seem earth-shattering but this simple addition is a complete game-changer!

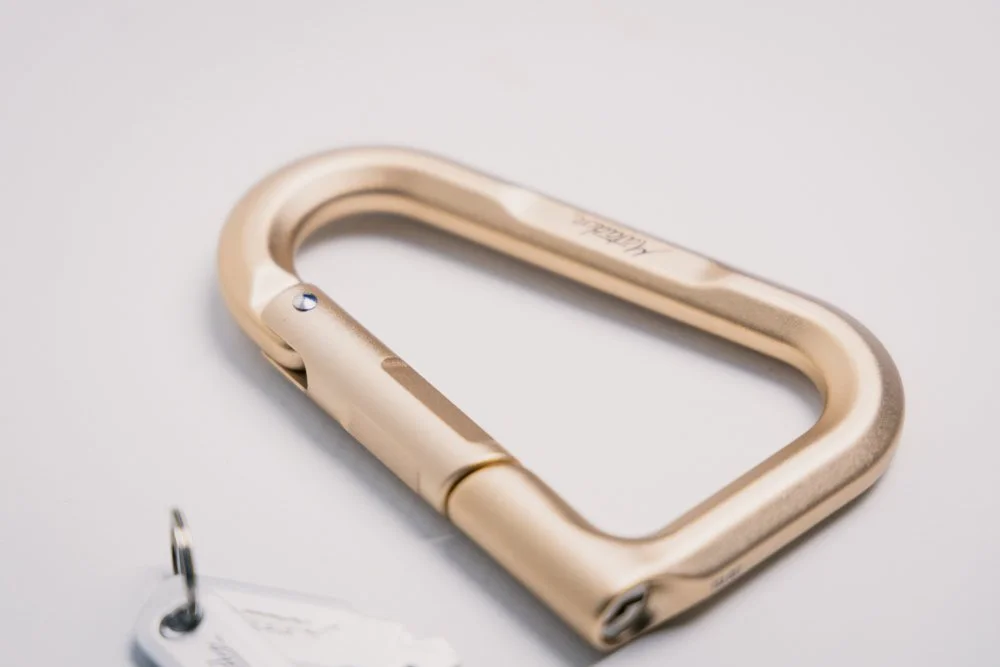

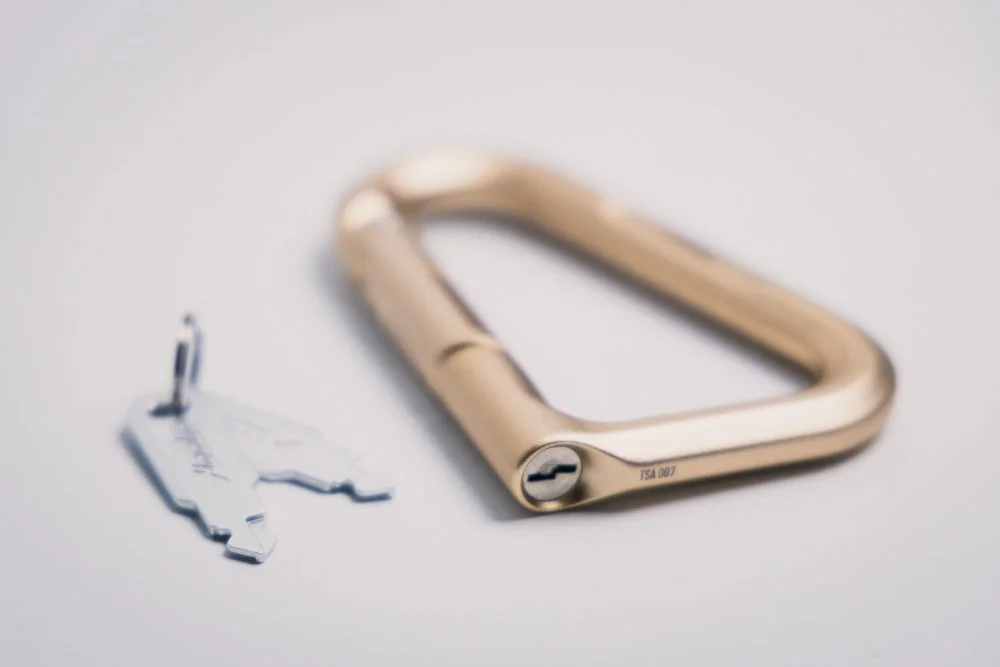
I own plenty of carabiners and that includes many with ‘locking’ clasps. Usually, this involves a simple screw that means that the clasp can not be easily pushed open. Where the BetaLock rises above is the addition of that small key (two supplied) that means the carabiner actually locks! You need the key to open it! Better yet, it is so beautifully integrated that you really can’t tell it’s locked by glancing at it, it’s only on close inspection that you realise it’s genius.
Video Source - Pack Hackers Reviews via YouTube
The aircraft grade Aluminium is beautifully finished in a range of colours and the deadlock feels solid and for those that travel, it’s also TSA approved so no worries there. As an item of ‘Everyday Carry’ it works perfectly as a normal carabiner and is just as rugged and as useful as any other larger carabiner that I have used.
So why am I so excited about it? Being a Photographer & Videographer in Birmingham (United Kingdom) I understand that it’s a large, modern city and unfortunately, not every single residents moral compass is pointing in the right direction. Therefore, I always have to keep a close eye on my gear as all professionals should be doing, no matter where they live. One of my biggest fears is the simple opportunist thief who basically snatches the bag whilst I am unaware.

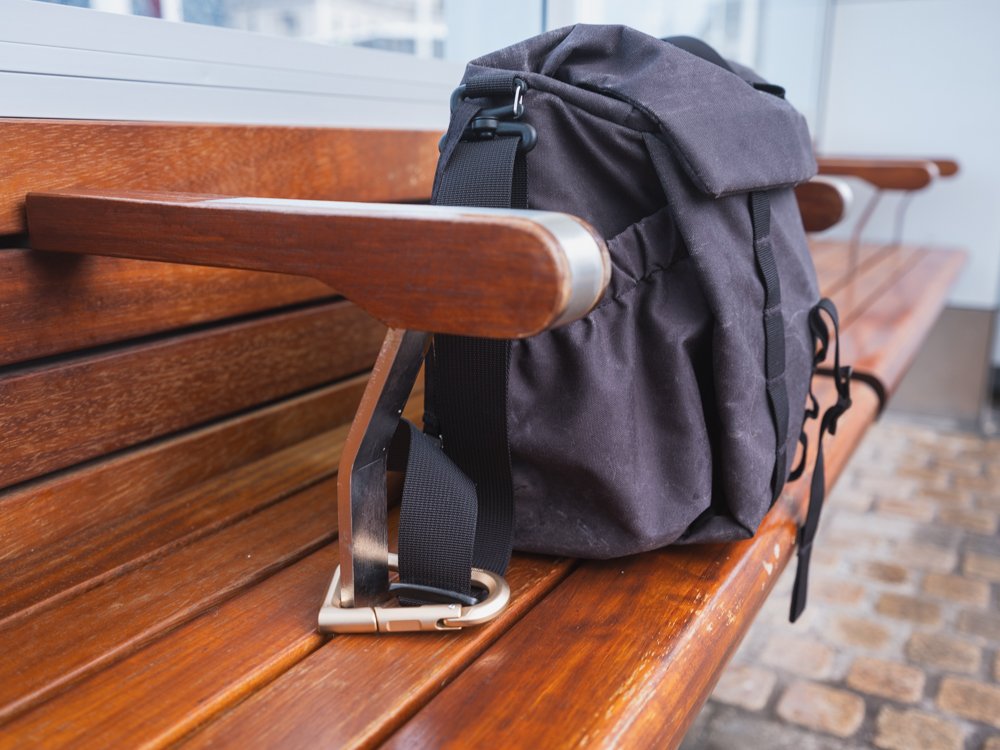
When I saw the BetaLock, I instantly knew that I wanted one on every single camera bag I own with the simple plan of leaving them attached. I travel a lot on trains and have been known to spend a little time in coffee shops (or even pubs!). Having a locking carabiner allows me to attach my precious camera gear to rails, tables or whatever I can find that is reassuringly secure. Trains are a constant cause for concern as they are often busy and you usually end up standing away from your bags which should really be on racks!
Using the BetaLock, the opportunity for someone to simply snatch your bag and walk off with it is significantly diminished! Having grown up on a Council Estate, I’m sure with a screw drive, a hammer and a few minutes I could ‘open it’ without a key. However, it would certainly take some effort and you certainly wouldn’t be able to do it discreetly! Like I mentioned, such a simple idea but it certainly solves a problem that I have faced for many years.


Even better, Matador also offers an accessory cable that allows you to lock the carabiner (and your precious gear) to even larger items or locking up multiple items. The stainless steel braided cable is certainly tough and would not easily be removed. I don’t think it would stand up to a decent pair of bolt cutters or an angle grinder (and yes, as a cyclist I can confirm that thieves do go to that extreme!) but as previously mentioned, the cable is plenty tough enough to deter most would-be pilferers.

It’s a shame that we live in a world where we have to go to such extremes to protect our camera gear and it certainly doesn’t solve every security issue, but it is such a neat and elegant solution that it really should be something we all consider. I have even considered locking the carabiner to my jeans whilst out to allay the fear of the moped snatchers - if they want my gear so badly that they are prepared to pull my jeans down then they really are desperate!

The key is small and discreet and with the different colour options for the carabiner, the BetaLock will match even the most expensive of camera bags. I was initially a bit put off by the Gold of the lock that I received but I must admit, once I put it on my bag I really liked the way it looked and would seriously consider buying more in that colour! But the other options also look great!
Matador has a fantastic range of products that I really think are well worth checking out but with the BetaLock, I think they have really hit gold. As I mentioned, it’s such a shame that we have to protect our gear like this but if it happens to deter an opportunist thief then the $30.00 plus shipping will instantly pay for itself! It may seem expansive on first look but seriously, it only needs to save your gear once to be well worth the investment!


On a side note, the BetaLock can’t solve all of the ways that thieves can relieve you of your gear so please do make sure you insure your camera gear. With knife crime a constant issue in the UK, it’s certainly not worth getting into an altercation to protect your gear and that camera insurance will mean that you will have the option to walk away from what is a horrendous situation.
I started by saying how much I love a simple product that solves an issue and I really believe BetaLock does that so well. I wish I could stumble across more products like this that I truly believe in so I guess I will find myself down yet more YouTube rabbit holes. However, I will be able to do so on the train without the fear of someone running away with my bag without noticing!
About the Author - Ross Jukes is a professional Photographer and Videographer with over a decade of experience. Working in both Digital and Analogue formats, Ross has worked with international clients, had his worked published numerous times and exhibited his work extensively. With a passion for all things photographic, Ross combines his experience, enthusiasm and dedication to his art form to create engaging and educational content for the photographic community.
Disclaimer: All links to Amazon UK/US are affiliated links - you will still pay the same price but I will receive a small commission. All information provided in this blog is intended either for educational or entertainment purposes and is accurate to the best knowledge of the author. However, further research/professional advice should be sort before making purchases/implementing any advice given and no responsibility is taken by the author or parties mentioned here within.

My Top 10 Cameras of 2023!
I carry a camera everywhere, whether I am walking to the shops or on a day trip out to some new location, I generally have some kind of camera on me. After I posted my favourite cameras of 2022, I received lots of emails asking details about some of the cameras I listed and it was apparent that plenty of the readers were intrigued by what did and didn’t make the list, so I thought I would give you an insight into some of my favourite cameras that I have used in 2023.
my favourite cameras in 2023
I carry a camera everywhere, whether I am walking to the shops or on a day trip out to some new location, I generally have some kind of camera on me. After I posted my favourite cameras of 2022, I received lots of emails asking details about some of the cameras I listed and it was apparent that plenty of the readers were intrigued by what did and didn’t make the list, so I thought I would give you an insight into some of my favourite cameras that I have used in 2023.
It’s fair to say that I am very fortunate to get to use a lot of different cameras and I appreciate how lucky I am to do so. The vast majority of these cameras are purchased with my own money (I will have a post coming up in the New Year about my process for buying and selling cameras!) but some are loaned to me from camera manufacturers. However, this does not cloud my judgement, I will always give an honest opinion and never feel pressured into saying something I don’t believe to be true.
The only other thing worth keeping in mind as we run down the list is that some of these cameras are there to do a job and some purely for pleasure - that’s not to say that one is better than the other and you should run out and buy it! This list is purely from my own perspective and I will be explicit over whether it is a practical choice or simply something that puts a smile on my face!
PLEASE NOTE: I PURCHASED MOST OF THESE ITEMS WITH MY OWN MOMEY AND NO PAYMENT OR CONTROL WAS EXCHANGED FOR PUBLISHING THIS UNBIASED REVIEW

10 - Fuji X10
I picked this camera up in 2022 as a viable alternative to the X100V and as I mentioned in my review, I feel like it gets most of the way there. The small form factor is everything the X100V should be but I’m not going to sugar coat it, the image quality is never going to be as good as its more modern relative.

With patience, you can really get the most out of the X10
That said, it’s still more than possible to get a great image out of this camera and with a bit of patience and understanding, the files can be wrangled into something more than usable. I didn’t find myself using this camera as much as I hoped this year but every time I see it, it puts a smile on my face and I sincerely hope Fuji makes a return to this pocket friendly form factor when they release the latest iteration in their X-series line-up.
9 - Sony A7RV
OK, before anybody calls me a troll or accuses me of losing my mind, let me explain why Sony is so far down the list! It is a stellar camera, arguably the best camera on the list from a technical point of view. It has the best autofocus, a seriously impressive sensor, decent handling and video functions that wouldn’t be out of place on a Hollywood movie set.

It doesn’t take much to get the most out of the A7RV files :)
Therein lies the problem though, it's a technical masterpiece and for me at least, it feels a little too clinical. The image quality is sharp and precise, the autofocus is snappy and fast - but it lacks that ‘something’ that makes me want to pick the camera up. I know how ridiculous it sounds to prefer a ‘worse’ camera, but the camera is not just a tool, it needs to inspire you and that’s where I find this camera lacking! That’s jus me though, it really is a camera of the highest quality.
Video Source - DP Review TV via YouTube

8 - Canon EOS-R
I’ve said it before and I’ll say it again, I think the original EOS-R is one of the best bargains in modern cameras. It got hammered when first released and in some parts, with good reason. However, the autofocus is good enough for most normal scenarios, the build quality is good and personally, I find the handling a treat.

The Canon Eos R once again proving why its one of my secret favourites!
Put that together with decent image quality, respectable dynamic range and video quality that, in 1080p at least, is plenty good enough and you have quite a package. Sure, there are much better options out there but for the price and the lens availability, I can’t think of many cameras that I would recommend over it. To coin a phrase from the youngsters, I think way too many people are ‘sleeping on’ the EOS-R!

7 - Yashica Mat 124G
What can I say about this camera, I absolutely adore it. It certainly doesn’t have the grace of a Rolleiflex and not as reliable as a Hasselblad - but it is cheap, easy to use and creates wonderful images. There really isn’t much negative to say about this camera and even if it goes wrong and let’s face it, most old cameras will go wrong! They are still affordable and abundant enough to pick up another one.

The Yashica Mat 1244G is the perfect street companion…
I didn’t get as much opportunity to use it as I may have liked but that is not to say that it isn’t a wonderful camera. In fact, I seriously considered taking this as my ‘only’ film camera to Japan, such is the reliability of it and the simple pleasure of use. However, with rising film prices and developing costs, I’m a little concerned about how much use it will get in the coming year…

6 - Leica M8
Ah the Leica M8, I love this camera. The shooting experience with this camera is incredible and can make even bang average photographers like me feel like Cartier-Bresson! The 10 megapixel CCD sensor is a thing of beauty as long as you feed it lot’s of light! In anything other than bright sunny days, the image can fall apart and in low light it’s almost unusable.

The Leica M8 has some serious nostalgic vibes!
When used in fair conditions though, this little lump of Leica can produce beautifully rich images that almost feel like you are shooting with Kodachrome! The body feels rugged and premium and knowing that it will ‘brass’ over the years, it just makes you want to hold it and use it as often as possible! The only problem being is that as a resident of the uL, sunny days are too few and far between! Hopefully it will get more use in 2024!

5 - Fuji X100V
What can I say about the Fuji X100V that hasn’t already been said a thousand times before. This camera is a marvel of the modern camera world. It’s fantastic to use in almost any scenario and deserves the praise that gets regularly heaped on it. It creates beautiful images and is so simple and enjoyable to use that it’s really difficult to recommend any other cameras over it.

The Fuji X100V is just a great Everyday Carry, for those with big and deep pockets…
However, as I said in my long term review, there is one issue that I struggle to look past from time to time. It’s just a touch too big to call pocket size! If this camera was about 20% smaller, it would be the perfect camera, hands down. You simply can’t easily fit it into a pocket and that means that you have to make a choice - if you need to carry a camera bag, well there are plenty of better cameras to carry. Yes, I understand it’s unfair to pitch it against interchangeable lens cameras or Medium Format! However, if I’m taking a bag out, I’m probably reaching for a different camera.
Video Source - Benj Haisch via YouTube

The 645Z dwarfs the already large Fuji GFX 50S II
4 - Pentax 645Z
OK, so I will be honest. This camera was bought on somewhat of a whim! It’s an outrageously expensive camera to buy without doing some proper research but having sold a few of last year's favourites, I had made up my mind that I wanted to delve into the world of digital Medium Format and this seemed like the most budget friendly way of doing so.

Even with a pro-mist filter in low light, the 645Z produces wonderful images
I will cut to the chase though, this is an incredible camera and I pretty much instantly fell in love with it. So it’s an easy recommendation then? Absolutely not. The camera is huge. I don’t just mean ‘it won’t fit in a pocket’ huge, I mean it won’t fit in some of my camera bags! It has one of the loudest (but also most satisfying!) shutter sounds that not only draw attention to you, but I’m sure would make people duck if you use it in public, it’s comical!
So why have I kept it? It’s an absolute joy to use. Once you get over the size, the layout of the camera is amazing and the images it produced are simply some of the best I have ever seen. The dynamic range is fantastic and when combined with the stunning DA645 28-45mm lens - which in itself is probably the best lens I have ever used, well it’s almost the perfect package. Unfortunately, that package is simply too big for everyday use!

3 - Bronica GS-1
Well, this is slightly awkward. Last year's number one camera has been dethroned, surely that means I’ve fallen out of love with it? Not in the slightest, in fact, I am still on the search for a second GS-1, just in case this one goes wrong! Everything I said last year remains true and it is still and incredible medium format offering that I think is too often overlooked in favour of the Pentax and Mamiya offerings.

I’ve created some of my favourite images with the Bronica GS-1
So why hasn’t it retained it’s crown? Well quite simply it’s just becoming more and more difficult to shoot regularly with it. Film and developing costs make shooting in 6x7 a luxury and one that I struggle to justify. It is a fantastic camera and one I would highly recommend. However, if it’s not a specific project or a once in a lifetime trip, I would have to reach for the Mamiya 645 Pro or the Yashica, purely based on economics if nothing else.
2 - Fuji GFX 50S II
I reviewed the 50S II earlier in the year and even though I really enjoyed using the camera, I didn’t think I would come to own one. The Medium Format bug had definitely bit me and the camera is just a well thought out, well built camera that is simple enough to use. However, the slower autofocus and higher price tag than a decent 35mm camera meant that it probably wasn’t well suited for my needs.

The perfect camera for a once in a lifetime trip…
However, as the year went on and plans of visiting Japan, probably the thing at the top of my bucket list - I found myself pondering what camera to take. No doubt pretty much any camera I owned would do a good job but I wanted to use something that I knew would do the trip justice. After hitting the credit card hard I was now the proud owner of a 50S II and let’s just say, I was extremely happy with my choice, this thing makes amazing images!

1 - Canon R5C
This camera sat at number 2 in last year's list so why has it taken the top spot in 2023? Well, put simply, I’ve started to understand this camera more and it’s an absolute beast! Taking brand preference out of the equation, I would struggle to think of a more fully featured ‘hybrid’ camera out there - maybe the new Sony A9 III but as I doubt I will be getting my hands on one of those any time soon, I really can;t compare.

Perfect for corporate work and general shooting pleasure…
What makes the R5C so special is its ability to transform from a fully specced Can R5, which is a fantastic stills camera, to an all out cine style camera that even gives it’s big brother, the Canon C70 a run for its money. The best part, it’s barely any bigger than an R5 and if you had to purchase an R5 and a C70, you’d been forking out at least a few thousand pounds extra! The R5C has come to represent excellent value to me considering its spec.

R5C fully rigged and ready for business…
However, the thing that really pushed it over the edge and into the top spot for me is simply how reliable it’s been - it literally hasn’t missed a beat. As a professional photographer and videographer, I have to be able to rely on my gear and apart from a few idiosyncrasies, such as the boot time when switching from photo to video or the Micro HDMI port (Canon!!) Once you get used to its little quirks, it’s a fantastic camera to use.

There you have it, that’s my round up for this year and I can’t wait to see what 2024 brings in terms of cameras. Hopefully I will get to try a few more flagship models and as always, I will share my honest thoughts with you guys! Let me know your thoughts in the comments below!
About the Author - Ross Jukes is a professional Photographer and Videographer with over a decade of experience. Working in both Digital and Analogue formats, Ross has worked with international clients, had his worked published numerous times and exhibited his work extensively. With a passion for all things photographic, Ross combines his experience, enthusiasm and dedication to his art form to create engaging and educational content for the photographic community.


Disclaimer: All links to Amazon UK are affiliated links - you will still pay the same price but I will receive a small commission for providing the link. All information provided in this blog is intended either for educational or entertainment purposes and is accurate to the best knowledge of the author. However, further research/professional advice should be sort before making purchases/implementing any advice given and no responsibility is taken by the author or parties mentioned here within.

REVIEW: iFootage SL1 220DN Video Light
The iFootage SL1 220DN is a top-tier studio light perfect for photography and videography enthusiasts seeking natural sunlight emulation. Featuring high CRI for true-to-life color accuracy, versatile lighting effects, and a durable build, it's a game-changer in studio lighting, making it a perfect choice for professionals and hobbyists alike.
Among the most consequential variables to consider in photography or videography is quite simply, light. It can, therefore, be pretty challenging to take good photos and videos when you don't have a good light source. Or, if you were thinking of capturing good photos or recording videos under nice sunlight, but the weather gods have turned against you. However, perhaps iFootage's daylight studio lights might help.
The iFootage SL1 220DN is a part of their Anglerfish series, marking a line of daylight-balanced, COB LED lights that are designed to best emulate natural sunlight. As I've countless times experienced before, not all studio lights are created equal! Some are better than others when it comes to faking sunlight within a studio or enclosed room. Meanwhile, others make it quite obvious that it's an artificial light source.
PLEASE NOTE: I WAS SENT THIS ITEM FOR REVIEW BUT NO OTHER PAYMENT OR CONTROL WAS EXCHANGED FOR PUBLISHING THIS UNBIASED REVIEW
Video Source - New Layer via YouTube
On the bright side (pun intended), the iFootage SL1 220DN is on the better end of the spectrum - arguably, it's one of the best studio lights that money can buy. It's aimed at both photography and videography pros alike. On the surface, the SL1 220DN aims to deliver industry-leading color accuracy and versatility in your studio, or on-location scenarios. In practice, it works wonders at replicating a true-to-life light source.

With its highly controlled blue light frequency and ability to match the color temperature of daylight, the iFootage SL1 220DN can emulate actual daylight and sunlight in your studio effortlessly and reliably. Plus, it even offers a vast array of distinct lighting effects, easy transportability, and is built like a tank. Yet, can the iFootage SL1 220DN outweigh all other options, as the only studio light you'll really ever need?
What Makes The iFootage SL1 220DN So Unique Among Studio Lights?
But, first off, let's first take a closer look at what makes this iFootage SL1 220DN so distinct in the market. Its most noteworthy feature is the SL1 220DN's supreme color accuracy, which boasts a near-perfect color fidelity. In fact, on the Color Rendering Index (CRI), the iFootage SL1 220DN scores a high 98, which shows its ability to handily recreate true-to-life colors, as well as emulate actual daylight and sunlight.

0.1%

25%

100%
Speaking of, the SL1 220DN even offers a variety of lighting effects like fireworks and strobes, which could be pretty handy if you're trying to set a unique scene and tune the lighting accordingly. On top of that, the SL1 220DN also has four dimming curve options for much more granular, accurate, and creative lighting control. Again, there's an abundance of versatility with how you can set the lighting for your needs.

It's not like it's even that chunky, either. The iFootage SL1 220DN is decently compact and lightweight for a studio light. It comes with a really nice, padded carrying case for easy transportation, which makes this ideal for photogs who need to ferry it around between location shoots. You don't need to baby it, as well. The SL1 220DN is well-built and robust, given that it's constructed from a durable aluminum alloy.

Furthermore, it's fairly easy to use and intuitive for calibrating and adjusting the light itself. The iFootage SL1 220DN has some large twist knobs for angle adjustments, in addition to tweaking the light source. It’s able to work reliably for a long time, to boot. The SL1 220DN comes with a passive cooling system, hence, making sure that this giant studio light is cool, even under prolonged operation, and without excess noise.
Is There Anything You Should Consider With The iFootage SL1 220DN?
With that being said, there are a couple of things that you need to take into account before setting up the SL1 220DN. First off, about that cooling system... Yes, it's pretty quiet, and the internal fans don't add that noise, bleeding into the environment. Nonetheless, there's still a tiny hint of sound. Thus, you need to take this into consideration for ultra-quiet environments, or if you're recording very sensitive audio clips.

Although, the SL1 220DN makes up for it with its wide-ranging compatibility with third-party accessories. The iFootage SL1 220DN is fitted onto a Bowens mount, which makes it adaptable with a diverse array of modifiers. This could easily further expand its versatility. With this, you can make better use of its massive power output. That light source on the iFootage SL1 220DN has a 220-watt output (hence, its name).
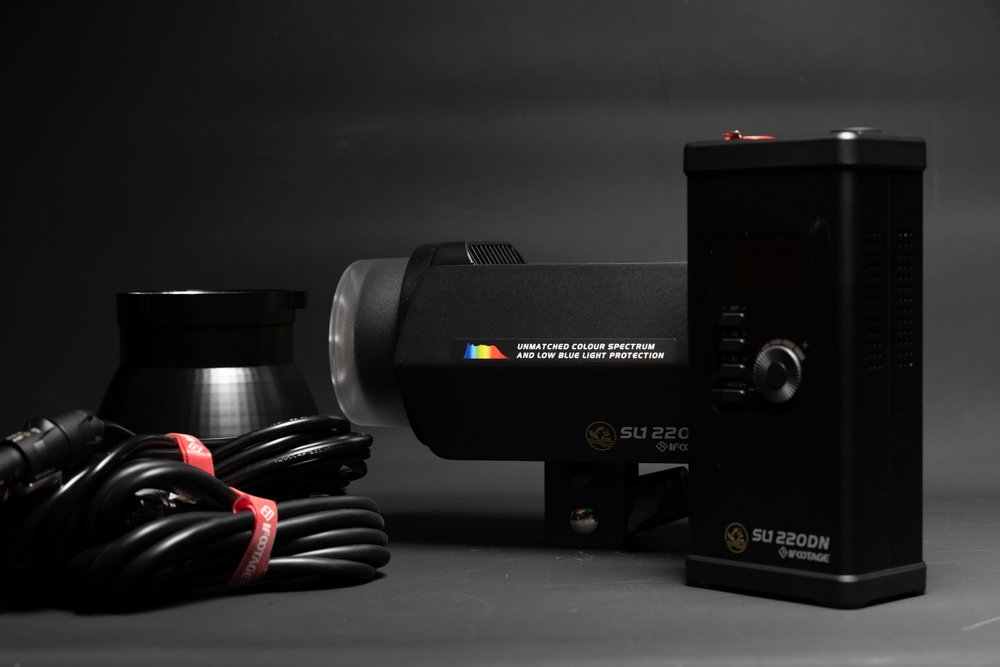
It's worth bearing in mind that iFootage also offers other, similar studio lights in its Anglerfish series that have a lower output, if 220 watts is too much or a bit overkill for your use case. Regardless, the SL1 220DN here could easily output and provide 42,000 lux of light at one meter, using the provided reflector. Seeing that this light source is fixed at 5,600 Kelvin, it thus matches the right color temperature of daylight.

With a convincingly natural sunlight look, it's perfect for shoots that require a natural, outdoorsy look for your images and videos. And, for those times when you need to quickly adjust the angle or light, there's a handy OLED display on the back of the unit. With those aforementioned knobs that I noted earlier, you're able to make easy adjustments on-the-fly, and have integration for DMX connectors for pro setups.
Video Source - Gerald Undone via YouTube
What Are The Best Aspects Of The iFootage SL1 220DN?
If you're on the fence about getting the iFootage SL1 220DN, here are some of the upsides and best things about it that make it well worth considering if you're shopping around for studio lights...
Superior Color Accuracy - The SL1 220DN's color accuracy is, once again, its standout feature. With a lot of testing done and high-tech spectrometer data to back this up, iFootage is deservedly proud of this fact. It's the perfect match for folks who value natural lighting in their shoots. This helps with cutting down time on post-production edits to fix the lighting, which is a situation that I'm all too familiar with. Moreover, on the day of the shoot itself, you can guarantee a more naturally lit background, with true-to-life skin tones, and casting more accurate and balanced color outputs.
Quiet Operation - While I mentioned earlier that the internal fans helping to cool the iFootage SL1 220DN do emit at least a bit of noise, this is fairly normal. If anything, there are studio lights out there that can emit much harsher and more unpleasant fan noise. Comparatively, the SL1 220DN is far quieter, almost a whisper-quiet sound, even when the fans are ramping up its internals are getting toastier. That'll come in quite handy for more noise-sensitive environments. Still, do be wary that there's still some noise.
Robust Construction - Another aspect of the SL1 220DN that I really like is its build quality. The design and engineering here are superb, making sure that it can withstand the rigors of constant and frequent use. Even the knobs on the rear of the device for auxiliary adjustments are tactile, with a solid feel to them. I'm more confident in the SL1 220DN's reliability and longevity the more I use it. On top of that, it's quite a bit more portable than some other studio lights as well, so you could more easily carry it around from one shoot to another.
High Power Output - Given its peak brightness of 42,000 lux at 1 meter, the iFootage SL1 220DN is more than capable of illuminating large areas, which is fantastic for bigger studios and outdoor environments. Moreover, with the extensive dimming controls, it'll ensure more precise lighting adjustments for various shooting scenarios without color shifts. What's more, remember that the SL1 220DN maintains a consistent color temperature of 5600K. This is crucial for any video and photo work to ensure that your lighting does not fluctuate much during shooting.

Are There Any Downsides With The iFootage SL1 220DN?
Still, nothing is ever perfect, and while there's a lot about iFootage's SL1 220DN that I really like, there are some downsides and flaws that you need to know before adding it to your shopping list...
Limited Power Supply - When you need to whip out the SL1 220DN and use it, it could be powered off the included power cord. Sounds easy enough, right? However, using it directly from the power cord will only allow you to use a fraction of the light's true capability. If you want to leverage its full brightness, it can only be done if you - 1) use a 100W (at least) USB-C cable, and 2) attach an external battery pack or your V-mount battery. Doing the latter two can now supply enough power to the SL1 220DN. Still, it's good to know that, if your batteries are running low on charge, you can readily plug in a USB-C battery bank to keep it topped up.
Missing U-Mount Stand - Unlike its higher-powered (and costlier) siblings in the iFootage Anglerfish line-up of studio lights, the SL1 220DN lacks a U-mount stand. This could've otherwise offered more flexibility in positioning the light. Speaking of mounts, remember that Bowens mount I mentioned earlier? Well, it's not included in the package, and it's sold as an optional accessory (at least, this was the case for most of the folks who bought the SL1 220DN). So, that's a bummer. But, if you are getting a Bowens mount from iFootage, do be careful to buy the right Bowens mount, as they also sell mini Bowens mount for the SL1 220DN's smaller siblings.
App Connectivity Issues - Although you can control the iFootage SL1 220DN from the auxiliary knobs and switches on the rear of the unit, you could also do this wirelessly. The SL1 220DN could be paired with an accompanying app from iFootage, called 'Lumin'. This gives you easy access to wireless controls, which is great for accessibility and simply makes it easier to fiddle around with. Unfortunately, this mobile app is liable to suffer from inconsistent connectivity to the light itself, as well as its general performance, which can be rather subpar at times.

How Much Does The iFootage SL1 220DN Cost (And Is It Worth It)?
The iFootage SL1 220DN is priced at $429. At this price point, it's positioned quite competitively in the oft-saturated studio lights market. Alas, as I mentioned earlier, $429 is a suggestive price, as you will need to shell out a bit more for additional accessories, like the Bowens mount. The latter of which would add quite a bit more value and functionality to the SL1 220DN, and depending on your needs, it might be essential.

When you compare the iFootage SL1 220DN to similar studio LED lights, such as the Godox UL150, the SL1 220DN shows far superior color accuracy. Additionally, it's able to control its blue light frequency in a way that outclasses most other studio lights that I've had the chance to work with. This is crucial for emulating true-to-life daylight and creating a scene that showcases more natural and convincing sunlight.

When looking at price-to-performance, the iFootage SL1 220DN is an incredibly attractive proposition. It's an even greater deal given the high color accuracy and build quality. iFootage has something special here, emerging as a strong contender in the LED studio light market, with exceptional color fidelity, ease of use, and solid construction. Naturally, the SL1 220DN is not without its fair share of faults to be wary of.

The usability of the accompanying mobile app for wireless controls needs a bit more time in the oven. Yet, it's not made any better given that you'll need to invest even more for its optional accessories, such as the Bowens mount and (really nice) battery grip. Still, I've gotten around those faults thus far, and as a whole, the iFootage SL1 220DN is a worthy investment for professionals looking for reliable studio lighting.
Specs And Details
About the Author - Ross Jukes is a professional Photographer and Videographer with over a decade of experience. Working in both Digital and Analogue formats, Ross has worked with international clients, had his worked published numerous times and exhibited his work extensively. With a passion for all things photographic, Ross combines his experience, enthusiasm and dedication to his art form to create engaging and educational content for the photographic community.

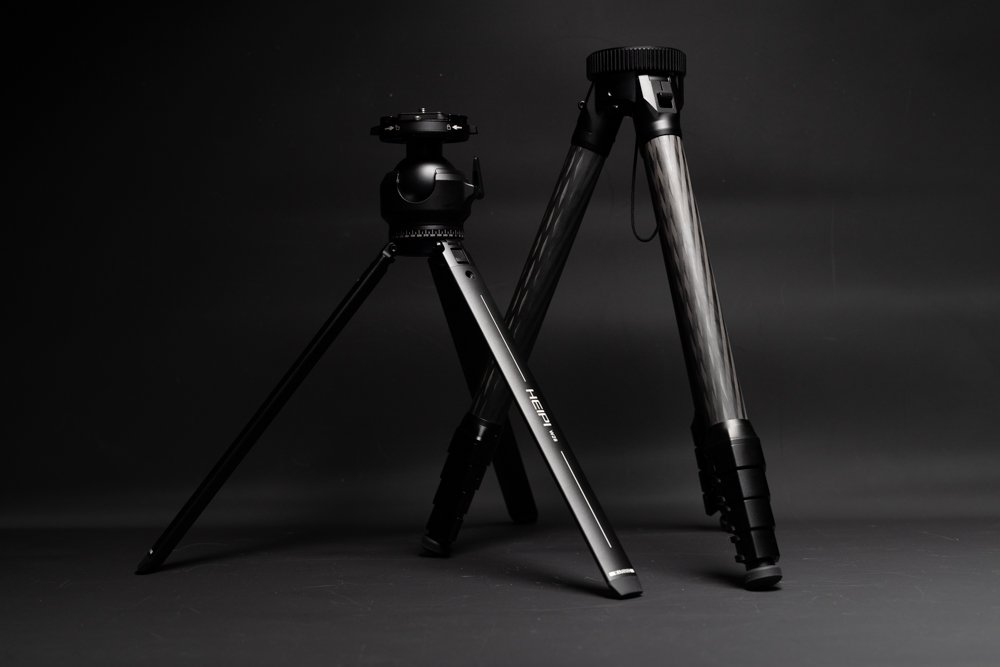
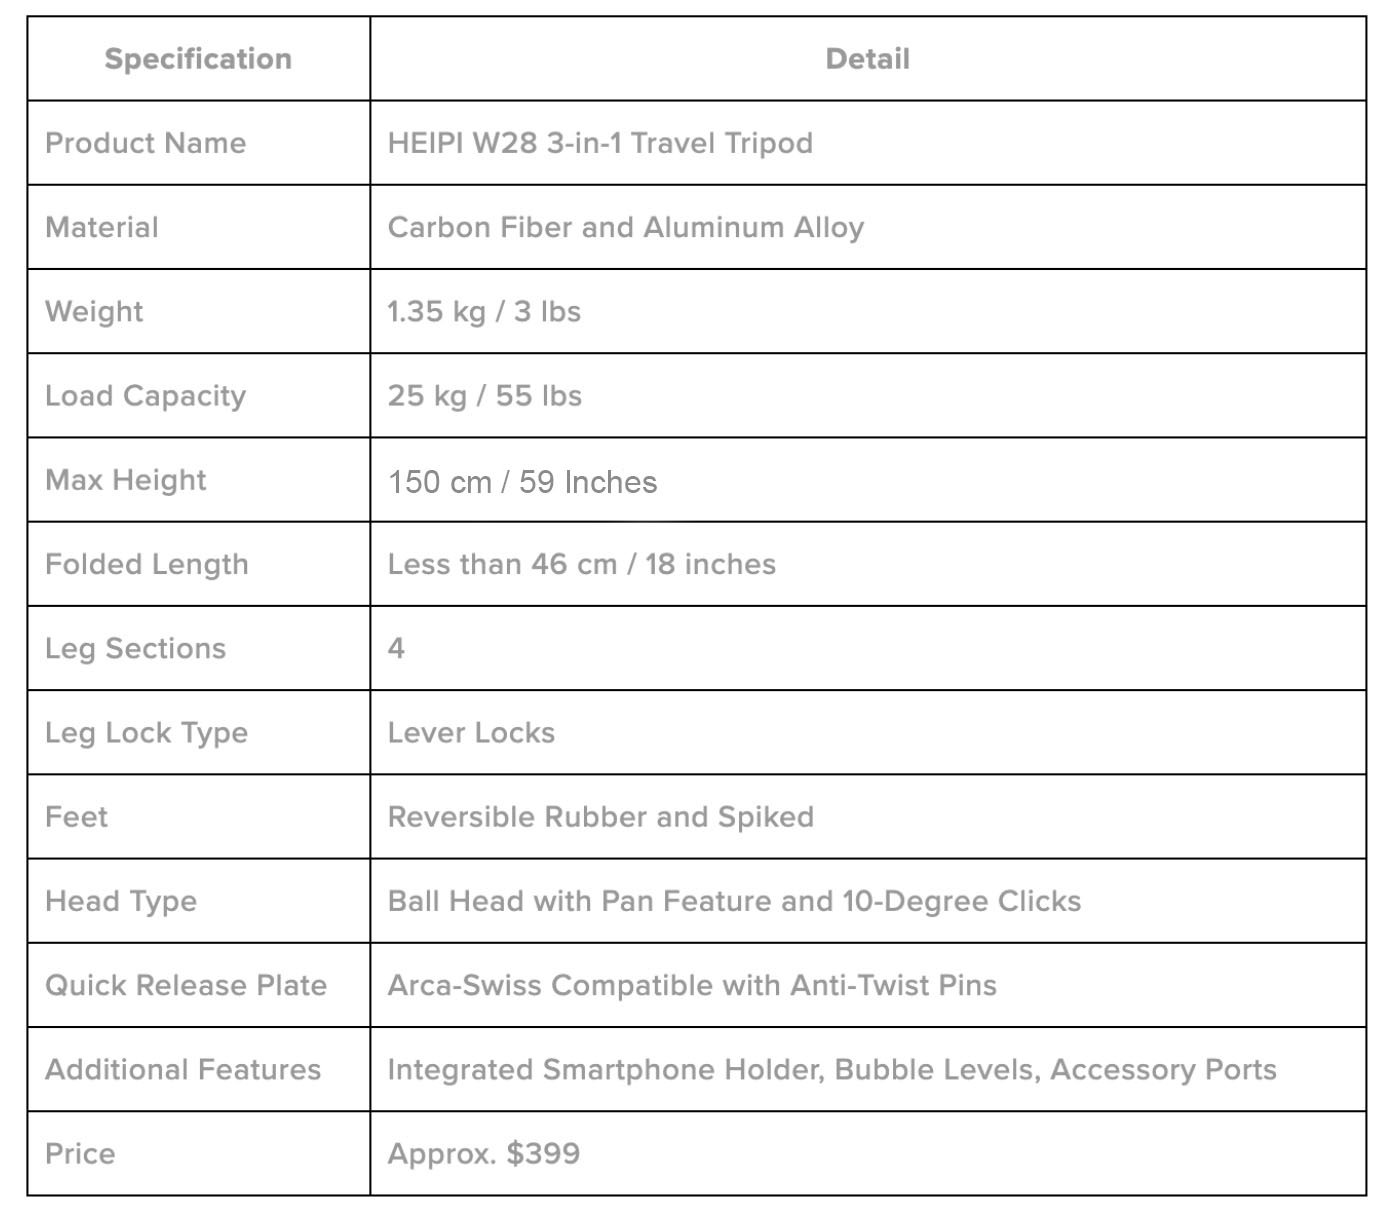
REVIEW: HEIPI W28 3-in-1 Travel Tripod
The HEIPI W28 3-in-1 travel tripod is a robust, versatile choice for photographers, featuring a 25kg load capacity, an integrated smartphone holder, and a unique sub-tripod design. Ideal for professional and amateur use, it combines stability with convenience. Despite its hefty weight and adjustment complexity, the HEIPI W28 offers exceptional value and functionality for aspiring photogs.
A solid, reliable, and versatile tripod will make a world of difference for amateur and professional photographers who have relied for way too long on cheap, flimsy, and typically clunky budget options. While good tripods don't often come cheap (usually a few hundred bucks, at least), it's unusual to ever regret that choice. But, for those seeking maximal value for money, HEIPI's 3-in-1 travel tripod might be a pretty good bet.
It's a truly multi-functional companion for photographers and videographers alike, featuring an awesome amount of durability, flexibility, and a unique integrated design. Plus, it's really great to see, for once, that a Kickstarter project actually delivered in time, and something good came out at the other end. The goal is simple - to be a robust, all-in-one tripod solution for on-the-move shooting scenarios and mobility.
PLEASE NOTE: I WAS SENT THIS ITEM FOR REVIEW BUT NO OTHER PAYMENT OR CONTROL WAS EXCHANGED FOR PUBLISHING THIS UNBIASED REVIEW
Video Source - Dustin Abbott via YouTube
With that in mind, HEIPI has integrated a unique sub-tripod design, which doubles as a center column, or even as a standalone table-top tripod. Yet, despite its travel-focused form factor, the HEIPI W28 readily handles a 25kg (~55lbs) camera. Thus, ensuring stability for even professional-grade cameras. Although, for content creators and vloggers that shoot with phones, the ball head has a built-in smartphone holder.

Additionally, with thoughtful additions such as bubble levels, some spike feet, and accessory ports further help to enhance the HEIPI W28's functionality. Granted, it's not entirely perfect, as is evident by the W28's surprising heft that you have to lug around, and the need for hex wrenches to make adjustments. So, with that taken into consideration, should you look at the HEIPI W28 if you're shopping for a new tripod?
What Makes The HEIPI W28 Such A Compelling Package?
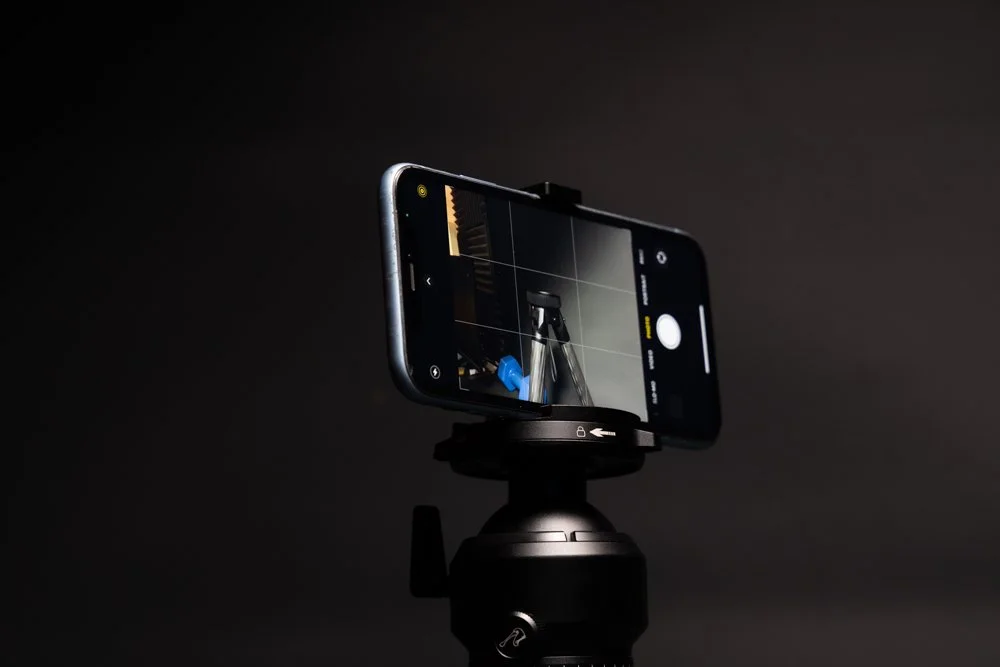
So, a bit more about that smartphone mount integration, which is quite unique when looking at other pro-grade camera tripods, it's conveniently located under the camera's mounting plate. This can support most smartphone sizes, so compatibility shouldn't be a problem. Plus, this feature is particularly handy for folks who switch between traditional cameras and smartphones, and this can be done rather speedily, too.


Videographers can benefit from the mounting system and ball head on the HEIPI W28, as well. HEIPI uses a ball head with an integrated pan head with 10-degree clicks, which is ideal for precise adjustments. This can be disabled, if you choose to, for smooth and consistent panning motions. What's more, there's a nice quick release plate with anti-twist pins, and compatibility with numerous popular camera models.

The leg locks and joints are another noteworthy highlight of the HEIPI W28 3-in-1 travel tripod. These are the brand's own, patented lever locks that are engineered for quick adjustments. In practice, I've found its operation to be pleasantly snappy and secure, providing confidence in the tripod's stability. I also like that the joints and the center column are pretty sturdy - not something you often find on budget tripods.

Thus, it allows for super smooth adjustments and a wide range of motion. You'll find that it ought to be a suitable tripod then, for various photography styles, such as macro or wildlife photography. The latter can be a tempting proposition, given that at just under 18 inches, the HEIPI W28 is compact enough that it's a superb tripod for traveling. Or, if you're regularly on the move, shifting around from shoot to shoot.
Where Does The HEIPI W28 Excel At?
Thus far, I've heaped praise for the HEIPI W28 travel tripod, and it's not without merit. So, here's a quick look at all the pros and upsides that HEIPI has built into the W28 that makes it such a brilliant tripod...
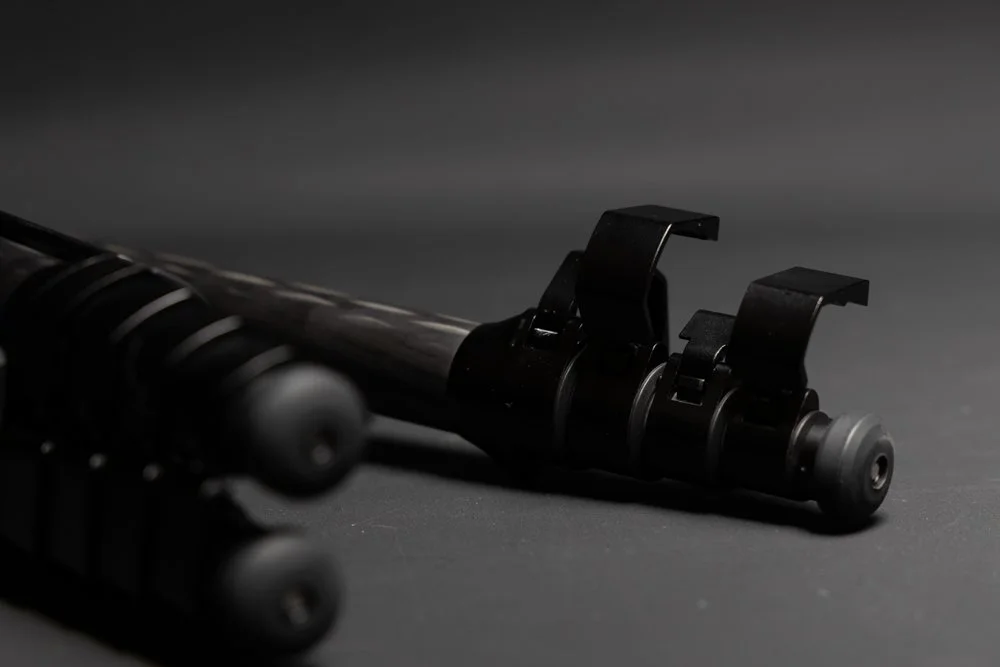
Dual Functionality - Being able to leverage the main and sub-tripods adds unmatched versatility. With this distinct design in mind, there are a few ways that you can use your tripod, whether you're crouched on the ground, in prone, or are mounting the tripod onto something secure. Aside from that, the HEIPI W28's sub-tripod is coupled neatly with the main tripods, ensuring that you can remove it within seconds. Better still, when it's tucked away, you won't even notice that it's there. This built-in, mini sub-tripod can offer a bit of extra shooting flexibility, particularly when you're vlogging or if a lighter setup is preferred.
Impressive Versatility - Weighing in at around 1.35kg (~3lbs), the HEIPI W28 is heavier than it appears, but this added mass does contribute a lot to its stability. Yet, it's compact enough when folded that it's handily travel-friendly. The load capacity, as I noted earlier, is quite impressive, allowing it to manage heavier gear with ease. I've seen folks use it with large format film cameras and vintage 120 cameras, with no problems whatsoever. On top of that, with a maximum height of 59 inches, the HEIPI W28 offers great reach. It's a good idea to be wary though, given that the minimum height is taller than some competitors, which might be a bit troublesome for storage.
Smooth Ball Head - The ball head on the HEIPI W28 is extremely smooth. Given that it's a tightly designed ball with pan head features, I reckon this will be highly appreciated by videographers on the go. Or, if and when you need to, the ball head itself is compatible with different plates for some extra convenience. You could further bet that it's an overall stable platform to lean and rely on, given the inclusion of a reversible spiked feet. There's a good level of stability on loose soil and sand, with those spiked feet providing a nice and secure grip on various terrains.
Video Source - Chris Schackart via YouTube
What Does The HEIPI W28 Do Poorly At?
Alas, it's not all sunshine and rainbows, since the HEIPI W28 does have its fair share of flaws that might be worth accounting for if you're considering adding it to your shopping cart...
Heavyweight Contender - While it might appear tiny at first glance, the HEIPI W28 has a good heft to it. It is a bit of a double-edged sword though, as I mentioned earlier. Thus, for all you traveling photographers and videographers, it might be a bit of a concern for those seeking ultra-lightweight options. This is partly due to the fact that the HEIPI W28's mini sub-tripod's legs are made of aluminum alloy, which in hindsight, could've been made out of carbon fiber. The latter would no doubt contribute massively to at least a bit of additional weight reduction.
Leg-Locking Levers' Ease Of Use - Though I do like HEIPI's clever leg lever locks on the W28, there's a bit of a learning curve associated with them. Therefore, for first-time users, it may not be easy to use right off the bat. Additionally, the leg locks are quite stiff when you're trying to use them for the first few times, but they will get looser and easier to use over time. Speaking of design flaws, the accessory ports on the HEIPI W28 also have some alignment issues on some units. Specifically, when the sub-tripod is re-inserted back into the main tripod, which could be a minor inconvenience for some.
Hex Wrench Requirement - The HEIPI W28 comes with four different hex key wrenches that are necessary for adjustments. This can be quite cumbersome to carry and keep track of, particularly for photographers who prefer a more streamlined and minimalist setup. So, make sure you don't lose any of them! Another thing to mention is how you stow away those hex wrenches. Hex key wrenches for adjusting tripods aren't a new concept, but some brands allow you to store the key wrenches within a compartment on the tripod itself. Meanwhile, with the HEIPI W28, you'll have to store it separately in your camera bag.


Is The HEIPI W28 Really Worth It?
For around $399, the HEIPI W28 3-in-1 travel tripod is positioned as a relatively more budget-friendly option than some of its competitors, such as the carbon fiber models from Peak Design. With that price point, this is a really competitive offering, providing good value considering its features and build quality. Compared to other travel tripods, the HEIPI W28 offers truly innovative features, such as that mini sub-tripod.

It further stands out in load capacity, stability, and smooth operation, which helps to justify that price. On top of that, the HEIPI W28 continues to impress with its robust build quality and supreme versatility. That alone could help sway buyers from more established brands. The natural competitor for this HEIPI W28 is undoubtedly Peak Design and their line-up of great tripods. So, how do these two brands compare?

I actually swapped my Arca-Swiss Leveller 60 head onto these legs for a killer travel combo!
Well, the HEIPI W28 is lighter, taller, and has a higher maximum load capacity, even when you compare it to the aluminum and carbon fiber tripods from Peak Design. However, those Peak Design tripods are more compact when folded down, which might be a crucial factor for some photographers. Overall, HEIPI's W28 offers a compelling blend of versatility, durability, and smooth operation for traveling photographers.


While it has its quirks, it's still a worthy investment for serious photogs on the move. The HEIPI W28 offers significant value for money, particularly compared to its closest competitors and other tripods at this price point. It's a really strong contender for those of you who are looking for a versatile, (relatively) lightweight travel tripod that doesn't compromise on features and usability, and everything you need a tripod to be.
Specs And Details
About the Author - Ross Jukes is a professional Photographer and Videographer with over a decade of experience. Working in both Digital and Analogue formats, Ross has worked with international clients, had his worked published numerous times and exhibited his work extensively. With a passion for all things photographic, Ross combines his experience, enthusiasm and dedication to his art form to create engaging and educational content for the photographic community.
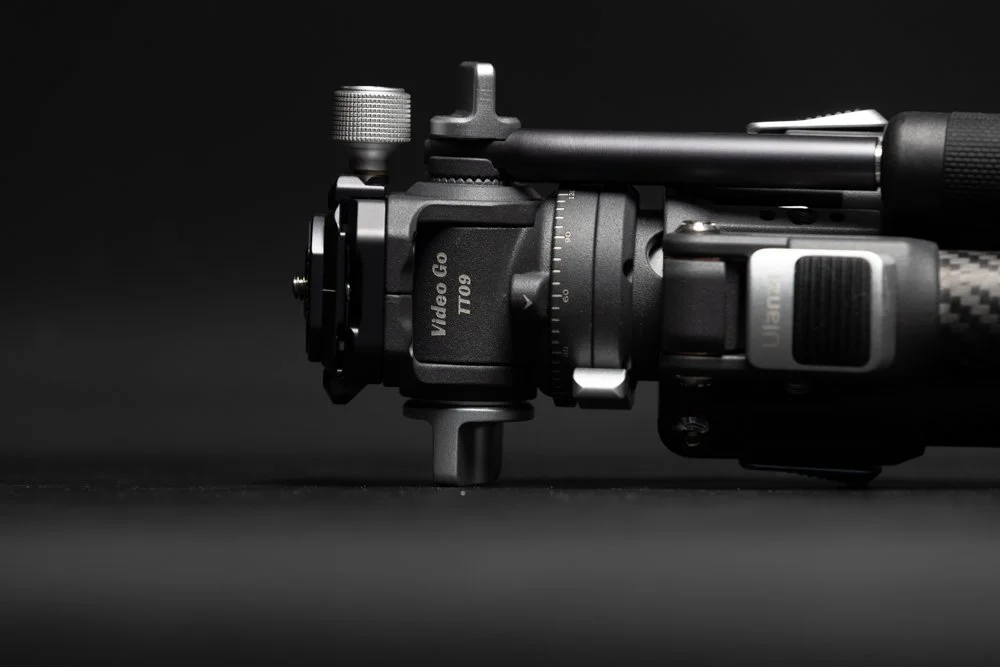
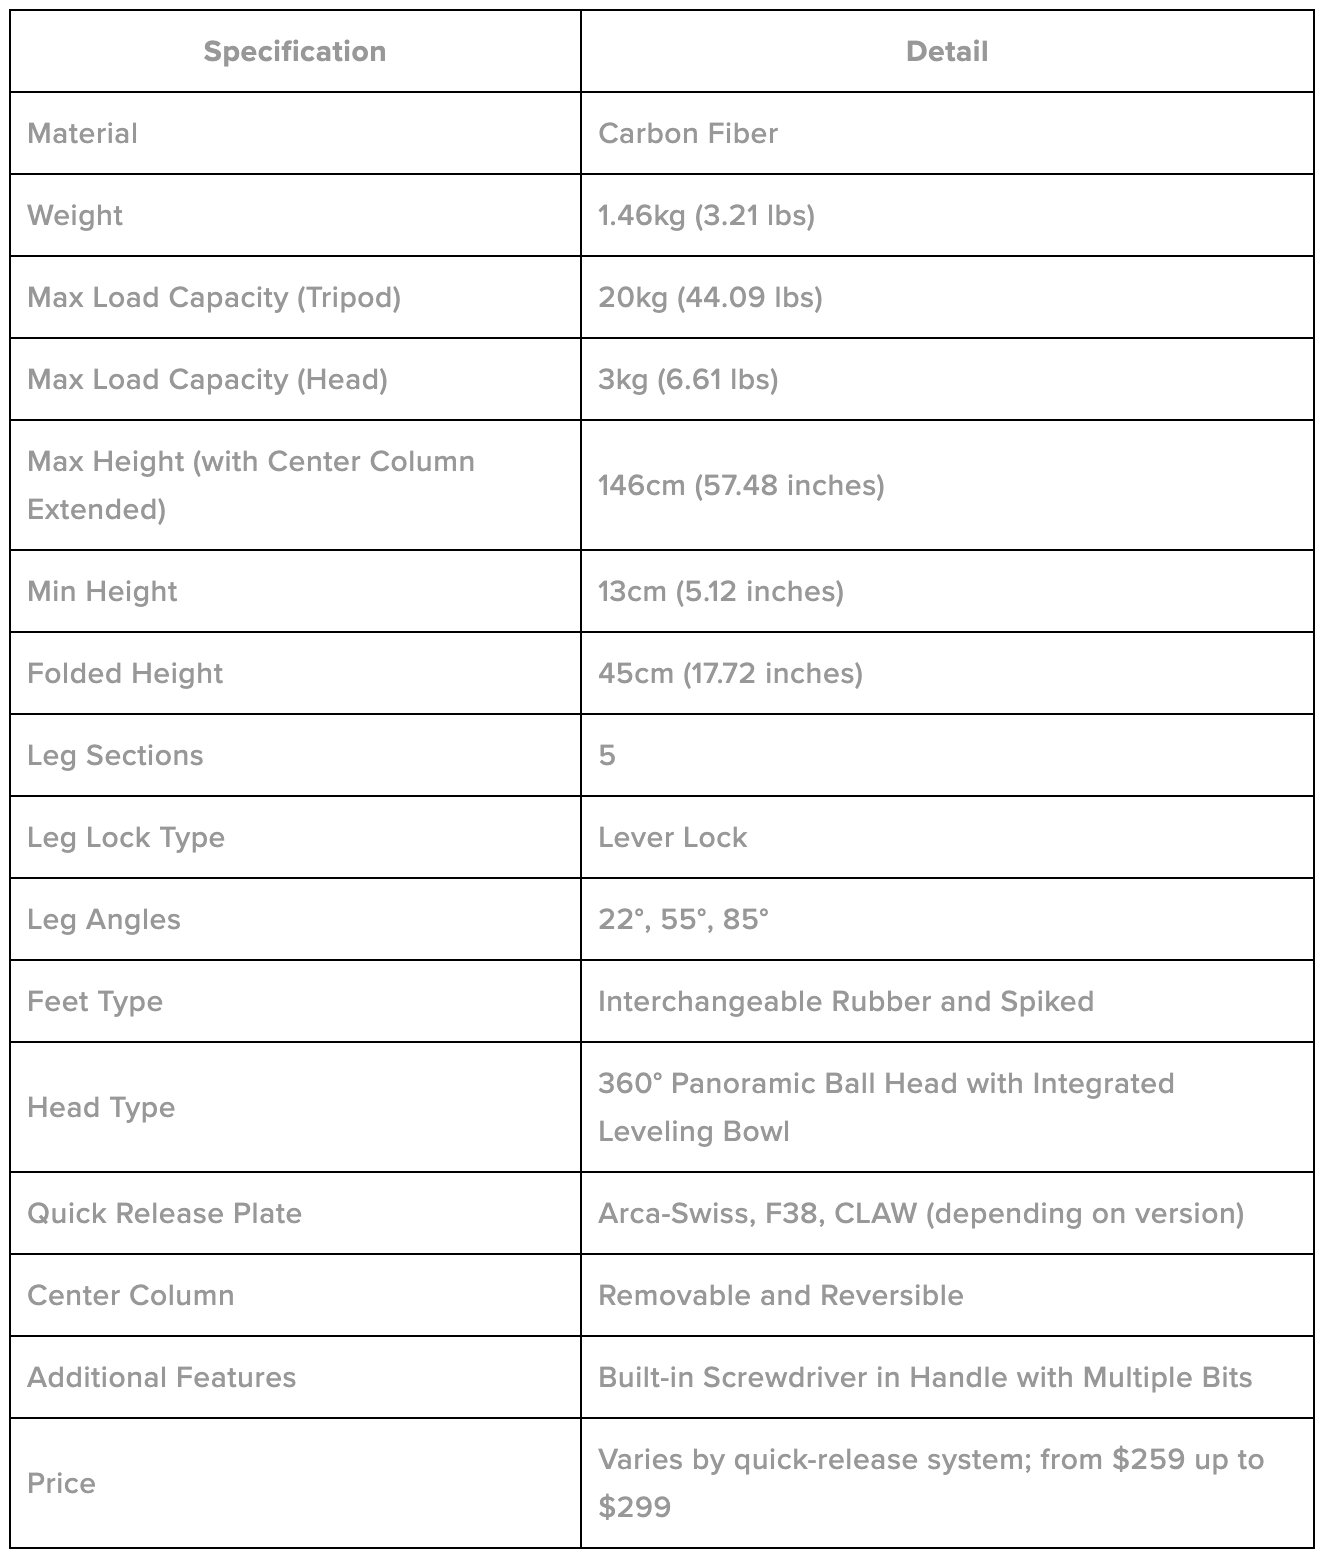
REVIEW: Ulanzi TT09 VideoGo Travel Tripod
The Ulanzi TT09 VideoGo travel tripod is an innovative solution for photographers and videographers on the move. This compact, lightweight tripod offers a perfect blend of portability and pro features. With a 10-layer carbon fiber construction, quick release options, high load capacity, and a built-in toolkit enhance versatility and convenience, it's a top contender in the travel tripod market.
Compact, lightweight, travel tripods are always a tricky concept to get right. On the one hand, it's easy to make a travel tripod that's too lightweight, to a point where it compromises on build quality and stability once you've mounted a camera. Otherwise, making it too heavy or robust doesn't make it that friendly to travel with, along with other compromises. But, maybe Ulanzi has found a perfect middle ground.
Ulanzi's TT09 VideoGo travel tripod is a compact, robust, well-built tripod designed for photographers and videographers who are always on the move. It aims to provide a stable shooting platform for compact and smaller cameras without the bulk or heft that's often associated with most pro-grade tripods. This is made possible thanks to its use of a 10-layer carbon fiber construction, which makes for good eye candy.
PLEASE NOTE: I WAS SENT THIS ITEM FOR REVIEW BUT NO OTHER PAYMENT OR CONTROL WAS EXCHANGED FOR PUBLISHING THIS UNBIASED REVIEW
But, besides looking cool, the use of carbon fiber entails superbly lightweight portability, as well as being stronger and stiffer than steel. Consequently, the Ulanzi TT09 VideoGo tripod weighs just 1.46kg (~3.21lbs), which is lighter than some other travel tripods that I've used before. However, unlike most other light and diminutive travel tripods, the Ulanzi TT09 VideoGo still retains the pro features that we all love.
Video Source - Ralph Mayhew Photography via YouTube
This includes a huge range of quick release options, compatible with the most popular systems that a lot of photogs are familiar with (more on that later). Plus, the ball head enables easy transitions; handy for those who need to quickly switch between dynamic and static shooting. With a lot more goodies and perks, is the Ulanzi TT09 VideoGo the best travel tripod on the market today, or are there better options out there?
What Makes The Ulanzi TT09 VideoGo Travel Tripod So Good?
While the Ulanzi TT09 VideoGo travel tripod is classed as a travel tripod, this doesn't mean that you're only limited to using smaller cameras with it. In fact, the TT09 VideoGo offers a maximum load capacity of 20kg on the tripod. Meanwhile, the ball head could support up to 3kg of weight. This weight threshold should be more than enough for most cameras, including a wide array of popular medium-format cameras.


Also, about those quick release options on the TT09 VideoGo, which is compatible with Arca-Swiss, F38, as well as CLAW systems. Once again, this opens up the possibilities for mounting options and cameras that you would use with the TT09 VideoGo. In my case, most of the gear in my arsenal fits the Ulanzi TT09 VideoGo with no issues. Moreover, the TT09 VideoGo's center column is removable and reversible.


The tripod feet could also be switched to adapt to different terrains, which is a crucial consideration, given how limiting some travel tripods can be when it comes to where and how you can utilize them. Speaking of the feet, the Ulanzi TT09 VideoGo's tripod legs have three opening angles - 22°, 55°, and 85°. The minimum shooting height is 13cm, with a maximum height of 146cm. This should be compact enough for travel.

Another neat bonus is Ulanzi's inclusion of a built-in toolkit within the handle of the TT09 VideoGo. Thus, it can provide you the ability to make on-the-go adjustments, tweaks, and repairs to the tripod, without you having to fiddle around for a hex key wrench. The latter is a common omission on some travel tripods, and it makes simply adjusting your tripod an unnecessary chore, so it's nice to see that being included here.


What Is The Ulanzi TT09 VideoGo Best At?
With that in mind, the TT09 VideoGo gets a lot of things right when it comes to engineering and designing the ideal travel tripod, so here's a quick overview of everything Ulanzi has gotten right...
Light & Strong Construction - As mentioned earlier, the use of carbon fiber for the TT09 VideoGo's general construction is much appreciated. Carbon fiber doesn't just ensure maximal durability when compared to many other alternatives, but it could also maintain a lighter relative weight for traveling. Aside from that, most other travel tripods often adopt aluminum alloy, which is often good enough. But, carbon fiber could more than handily cut down on those excess ounces and grams.
Versatile Quick Release System - The Ulanzi TT09 VideoGo's quick release system is more consequential at first glance than it might seem. With compatibility for numerous popular quick release systems - including Arca-Swiss, F38, and CLAW systems - this gives it optimal versatility to switch from one camera to the next. In addition to catering to various camera types and formats, it can also fit your personal preference. For me, this is a highly valuable feature, given the diverse array of cameras and gear that I use daily.
Integrated & Easy To Use Toolkit - It's not uncommon for tripods to require the use of tools for making any fine-tuning adjustments. Or, for re-calibrating your tripod after years of use, where it can get loose after a prolonged working life. Unfortunately, most travel tripods don't feature a clever way of including the tools that you'll need, which is why I often recommend carrying a small case of hex wrenches. But, that's not an issue with the Ulanzi TT09 VideoGo, given that the handle contains an integrated toolkit. There's a healthy mixture of all the hex socket bits you'll need in there for easy maintenance without needing to carry along any additional tools.
Compact Form-Factor - For a travel tripod, it's of course vital that it ought to be easy to travel around with. The fact that it's made of carbon fiber does help to shave off some excess weight from the construction. On top of that, the Ulanzi TT09 VideoGo's compact storage length makes it suitable for backpack stowage and traveling unencumbered. Yet, Ulanzi still finds room to add a half-bowl ball head, making it a huge plus for videographers who need to maintain a level horizon.
High Load Capacity - For a comparatively tiny travel tripod, the TT09 VideoGo has a pretty respectable load capacity when compared to its own weight. This offers really good stability for a larger range of cameras or setups. Therefore, it's not as limiting as some other travel tripods. To further compound that versatility, the Ulanzi TT09 VideoGo's reversible center column, and variable leg length provide additional flexibility, which can be helpful for creative shooting positions and angles.
Video Source - NVU Films via YouTube
Does The Ulanzi TT09 VideoGo Travel Tripod Have Any Flaws?
Although it's a superb contended among the best of the best travel tripods that you can buy today, it does not overshadow the fact that Ulanzi's TT09 VideoGo does have its fair share of flaws, such as...
Load Capacity Can Still Be Restrictive - Sure, the load capacity on the TT09 VideoGo overall is actually quite good. But, there are some travel tripods out there that could manage another 5kg of weight or so for their peak load capacity. This means that, unlike some of its rivals, the TT09 VideoGo can still be restrictive with heavier camera setups. So, do bear that in mind before picking one up. Furthermore, that's just the tripod's max load capacity. When it comes to the ball head, it's rated for 3kg, which further limits the types of cameras that you can mount on it.
Slightly Premium Pricing - The pricing of the TT09 VideoGo is certainly pretty competitive. However, it's still high enough that budget-conscious buyers might need to consider looking elsewhere, or if you're willing to save a few more pennies to invest in one over the long run. Ulanzi's pricing on the TT09 VideoGo does vary depending on which quick release system you choose. The Arca-Swiss variant is the cheapest, at $259, and the Claw version is priced at $279, while the F38 model is the costliest, setting you back $299.
So, Is The Ulanzi TT09 VideoGo Travel Tripod Worth Getting?
When taking into account cost-to-performance, the Ulanzi TT09 VideoGo travel tripod provides a massively compelling option for those needing a very travel-friendly tripod... But, wouldn't want to compromise when it comes to packing in professional capabilities, versatile feature-set, and intuitiveness. Granted, there are a plethora of options in the same price bracket, such as the Manfrotto Befree Live or the HEIPI W28.
The TT09 VideoGo does set itself apart with some unique design choices though, like the handy-dandy tools integrated into the handle. It's a small touch, but it makes a huge difference when you're out on the field. It continues to stand out for its robust carbon fiber construction, immensely versatile quick-release system (as well as its wide compatibility), and clever half-bowl ball head design. Altogether, it's a great option.


Ulanzi has struck a nice balance between portability, convenience, build quality, and functionality, and that gets even better when you consider the competitive price tag. Although, there are a few factors to consider, such as the load capacity. While it does have its limitations, it's pretty good when compared to a lot of rival travel tripods. The TT09 VideoGo is able to support a significant load, while retaining its compact size.

It helps that it's pretty lightweight, too. For what you get, the Ulanzi TT09 VideoGo will undoubtedly appeal to videographers and photographers who require a reliable travel tripod for on-the-go shooting. Though it's not going to outright replace a hefty, chunky, feature-packed pro-grade tripod, for something as diminutive as the Ulanzi TT09 VideoGo, you can get pretty close, but without the weight or the cumbersomeness.
Specs And Details
About the Author - Ross Jukes is a professional Photographer and Videographer with over a decade of experience. Working in both Digital and Analogue formats, Ross has worked with international clients, had his worked published numerous times and exhibited his work extensively. With a passion for all things photographic, Ross combines his experience, enthusiasm and dedication to his art form to create engaging and educational content for the photographic community.

REVIEW: Arca Swiss Core Leveller 60 Classic
For professional photographers, a reliable tripod head is essential. Arca-Swiss offers the Core 60 Leveler, a premium yet more affordable alternative to their C1 Cube. While it lacks some features of the pricier model, the Core 60 provides 80-90% of its capabilities at a lighter weight. It boasts a three-geared system for precise adjustments, ideal for various photography types. However, its limited tilt range and higher price might deter some. Overall, its precision and build quality make it a worthy investment for serious photographers.
Among the most understated yet vital components for any professional photographers kit is a good tripod head. Not only is a solid and reliable tripod head important to capture precise and stable shots, but it's also crucial for allowing smooth yet controlled movements when you need to tilt and pan your camera. While there are plenty of fantastic tripod heads on the market, Arca-Swiss still manages to stand out.
They make some of the most legendary tripod heads around, and in particular, with their selection of top-end, premium geared heads. Not too long ago, I discussed the merits with Arca-Swiss's flagship C1 Cube geared head. While it's a nearly perfect bit of kit for professional photographers, the C1 Cube is incredibly featured packed. For most pros, they may not need all the C1 has to offer, but may opt for something a little more compact but still precise!
PLEASE NOTE: I WAS SENT THIS ITEM FOR REVIEW BUT NO OTHER PAYMENT OR CONTROL WAS EXCHANGED FOR PUBLISHING THIS UNBIASED REVIEW
Video Source - Arca Shop via YouTube
For those that still want something close in terms of versatile engineering and clever design, its little brother, the Core 60 Leveller Classic might be the right fit for you. What the 60 Leveller loses in weight in features, it certainly does not lack any of the build quality and premium feel of the larger C1 - yet with plenty of capability for most applications. The 60 Leveller is aimed to fit the budgets and camera bags of those that want Arca-Swiss standards in an altogether more accessible form.

While it does miss out on some features compared to the pricier C1 Cube, the Core 60 is pretty much 80% or 90% of the way there in terms of what you're getting. Yet, the Core 60 is cheaper than the C1 Cube, yet it's more lightweight too, which is perfect for on-the-go photographers. Nevertheless, compared to plenty of the Core 60's contemporaries from other brands, the Arca-Swiss tax still applies, so is it really worth it?
What Makes The Arca-Swiss Core 60 Leveler (Classic) So Special?
Arca-Swiss definitely make premium products that may be seen as high-priced, that's by no means meant to be dismissive of the brand. Most of their products, such as geared tripod heads, are on the higher end of the scale, so it's no surprise that when compared to more budget options, they can appear very expensive. On the other hand, though, Arca-Swiss is well-regarded within the community for its precision, build quality and functionality.
The most commonly overlooked reasoning for the perceived higher-prices are the outstanding quality of the products, these things are built to last. As an Arca-Swiss user of many, many years, I can stand testament to this! From the precision milling of the aluminium parts to the quality of the anodising, the standard of these products speaks for itself - they are built to last! With care, there is no reason why they can’t last for decades and with that, they must be seen as long-term investments.

Their geared heads, such as the Core 60 Leveler, embody the brand's spirit wholeheartedly. As such, the Arca-Swiss Core 60 Level offers photographers a tripod head that combines speed and ease of use as well as the ability to manage meticulous and granular control. So, despite its (very) premium price tag (not as much when you see how much the C1 Cube costs), it's quite a compelling pick for pros and enthusiasts.
One of the standout features of the Core 60 Leveler (Classic) is its three-geared system that allows you to quickly make adjustments like tilting or panning your camera. Yet, that speed doesn't come at the cost of precision and accuracy, as that Arca-Swiss three-geared system ensures photographers a precise camera position and adjustment, making it ideal for macro, still life, panoramic, or architectural photography.

For my travels, I combined this head with the legs from the HEIPI W28 3-in-1 Travel Tripod for a killer Combo!
As for the range of adjustment and calibration that you have, the Core 60 Leveler has a +/-10º range, for both left-right and fore-aft tilts. Admittedly, this might be limited to some shooting scenarios that you'll encounter. Thus, the Core 60 Leveler is specifically optimal when used for those who mostly shoot at eye level and other similar scenarios. Meanwhile, it features a panning range of 360º, upper and lower.
What Should You Consider Before Getting The Arca-Swiss Core 60?
Expanding more on the aforementioned +/-10º tilt range, I pointed out prior that for architectural, as well as macro photography and the like, this limited tilt range shouldn't likely be an issue for most. Besides the specific scenarios here though, this does mean that, with only its +/-10º tilt range, it might not be the best all-rounder geared tripod head for every photographer, more so if you're shooting scenario varies a lot.

For instance, for photographers and enthusiasts who want to try out different mediums of photography, a small range of tilt movement like this can be highly limiting to what you can shoot at any given time when you have the Core 60 equipped. With that being said, if the Core 60 Leveler doesn't do it for you, there's a solution for this, and it comes in the form of the Core 60's bigger brother, the Arca-Swiss Core 75 Leveler.
The Core 75 Leveler offers a wider tilt range of +/-15º, which opens up a wealth of possibilities for what sort of photography you're into, or what kind of shots you need to take, depending on the scenario. If you need to take shots from a lower or higher angle, the extra +/-5º worth of tilt range could be a godsend. It should be noted, however, that the Core 75 is heavier and slightly more costly than the Core 60 Leveler.

On the flip side, the Core 75 does feature additional pull-out knobs for extra convenience, when you need to adjust it. The Core 60, on the other hand, doesn't have this. Regardless of which one you choose, Arca-Swiss have outdone themselves with the build quality. They feel durable and robust, yet retain a compact form factor and lightweight design, making them the ideal companion for lugging around between shoots.
What Are The Upsides To Choosing The Arca-Swiss Core 60?
Given how much I've praised it thus far, there are plenty of fantastic reasons why you'd pick the Arca-Swiss Core 60, despite the countless alternatives on the market. Here are just some of those top reasons:
High Precision & Accuracy - The three-geared system enables you to make meticulous and granular tilt or pan adjustments. This ensures that your camera is always positioned exactly when you need it to be. It alone is one of the best pieces of design that Arca-Swiss have integrated into its tripod heads, such as the Core 60 Leveler (and one that features the Classic quick release that I have here, as well as the flipLock or monoball quick releases from Arca-Swiss).
Built Like An Absolute Tank - Another typical Arca-Swiss thing with the Core 60 is their overbuilt design and top-notch build quality. It not only feels premium to use in the hand, but, and given how long all the stuff they've made in the past have fared over these past many years, it helps to ensure longevity as well as durability, even under rigorous use. During my time with the Core 60 (and the C1 Cube), I'm confident that they'll perform reliably for quite some time, and I can always rely on them, even years from now.
Compact And Lightweight - Although they're built like an absolute unit, the Core 60 (as with a lot of Arca-Swiss's other products) are still small and light enough that you can comfortably carry these with you, as you move from one shoot to the next. Even more so, when you pair it with the right tripod. So, for all you street photographers or photogs who like to be on the move most of the time, the Core 60 shouldn't slow you down.

Okay, But Are There Any Flaws To The Arca-Swiss Core 60 Leveler?
Despite its many upsides though, the Arca-Swiss Core 60 has its fair share of flaws, negatives, and things that could be better or are restrictive to some photographers. These include:
Limited Tilt Range - Just like how I've stressed before, the Core 60 has a fairly restricting +/-10º tilt range, which can be quite limiting to some photographers. Certain shooting scenarios, particularly when angling the camera upwards from a low position, will make the Core 60 difficult to use, and would otherwise need you to reposition multiple times in situations like that. Once again, this is a trade-off that you'll have to be wary of before getting the Core 60, and if you need a greater tilt range, the Core 75 should be on your list.
Premium Price Tag - The Core 60 Leveler (with the Classic quick-release system) costs around £550. This is going to vary depending on where you're shopping and whether or not you're able to snatch a discount or a promo code in the meantime. Nevertheless, at this premium price point, it's undoubtedly a deterrent for some would-be buyers, especially hobbyists or beginners. Still, given Arca-Swiss's penchant for world-class build quality, impactful performance, and sheer versatility, the Core 60's high cost isn't entirely surprising.

Is The Arca-Swiss Core 60 Leveler (Classic) Really Worth The Asking Price?
All in all, the Arca-Swiss Core 60 Leveler (Classic) is a testament to precision engineering and design. The amazing features and performance can at least justify the cost. Particularly so, among professionals and serious enthusiasts that demand the best in the business, and those who need a tripod head that can perform reliably, and ensure great precision. Though as previously mentioned, any concerns around cost are easily allayed when viewed as an investment into a piece of kit than can potentially last decades!
Granted, while the Core 60's limited tilt range would restrict you to a select few and specific photography genres and shooting scenarios, its compact design, great build quality, paired with precision controls, are the icing on the cake. The Arca-Swiss Core 60 is a highly capable and valuable tool, and once you consider what your shooting needs are to keep within that limited tilt range, I doubt you'd regret getting one!
Specs And Details

About the Author - Ross Jukes is a professional Photographer and Videographer with over a decade of experience. Working in both Digital and Analogue formats, Ross has worked with international clients, had his worked published numerous times and exhibited his work extensively. With a passion for all things photographic, Ross combines his experience, enthusiasm and dedication to his art form to create engaging and educational content for the photographic community.

REVIEW: FXLion Nano One V-Mount Battery
The FXLion Nano One V-mount battery stands out in the camera battery market with its compact design, 50Wh capacity, and unique 15W wireless charging pad. Not just for cameras, it doubles as a power bank for phones and laptops. While lightweight and travel-friendly, it's pricier than other batteries in its class and may require multiple units for longer shoots.

One of the most annoying things about handling a camera - and most videographers will no doubt agree with me on this - is its batteries. Given how powerful cameras are, and particularly so if you're using your camera to record long 4K or even 8k videos and grabbing shots left and right, batteries are the bane of every camera. They don't last nearly long enough, and despite their short battery life, those batteries are huge!
As such, it's not a surprise that there's been an arms race to develop V-mount batteries that could hold a long charge - ideally, long enough for a solid filming session. Yet, it is compact and lightweight enough, as to be readily lugged about from one shoot to the next. The latest entrant in this ever-expanding market, is FXLion and their latest Nano One V-mount battery, which packs something truly ground-breaking.
PLEASE NOTE: I WAS SENT THIS ITEM FOR REVIEW BUT NO OTHER PAYMENT OR CONTROL WAS EXCHANGED FOR PUBLISHING THIS UNBIASED REVIEW
Video Source - NewsShooter via YouTube
On the surface of it, the FXLion Nano One is your typical V-mount battery, showcasing some noteworthy evolutions from V-mount batteries of yesteryear. For starters, the FXLion Nano One is quite dense, which pairs a compact and lightweight package, yet still packs in a 50Wh battery pack. However, if you've found that your phone or Bluetooth earbuds are running low on charge, then the FXLion Nano One could also help.


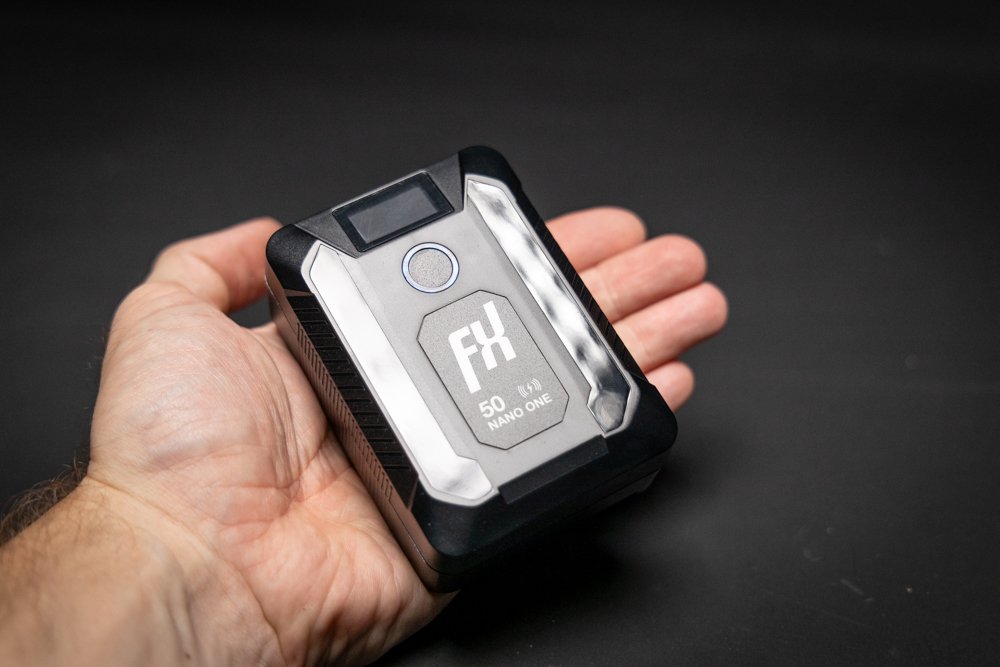
This latest FXLion Nano One model that I have here now features a 15W induction wireless charging pad on the back of the battery. In so doing, and when you're in a pinch, all you need to do is pop your phone or earbud case onto your FXLion Nano One V-mount battery and it'll charge it and keep it topped up. It'd also function as a power bank too, and its 14.8V battery could readily charge your MacBook or laptop, too. This has been an absolute lifesaver for me on more than one occasion already!
What Does The FXLion Nano One Battery Do Differently?
In the often staid world of camera batteries, the FXLion Nano One is a rather revolutionary device. While it's a pretty great V-mount battery for any smaller camera rigs or other gimbal-mounted equipment, this is just the start of what it could do. As I mentioned earlier, it could double as a power bank for any phone, and through the power of USB-C and a decently high 2.4A max output, it could handily charge a laptop.

On top of that, it's a battery bank with a handy-dandy 15W wireless charging pad. There have been many a day where I'd forget to plug in my phone for the day or I'd run through a full charge on a really long and busy shoot, without realising just how close my phone's battery was to dying. In the past, this could entail me running around looking for a wall outlet and borrowing a spare cable to charge my phone in a panic.
These days, though, all I needed to do was either plug my phone into the FXLion Nano One - if I wanted to charge it up more rapidly. Or, if time isn't of the essence, I'd just put my phone on the Nano One's wireless charging pad, and let it slowly trickle in some power. It's also neat that for charging input and output, the FXLion Nano One v-mount battery has a plethora of options, including USB-A, USB-C, Micro USB, and D-Tap.
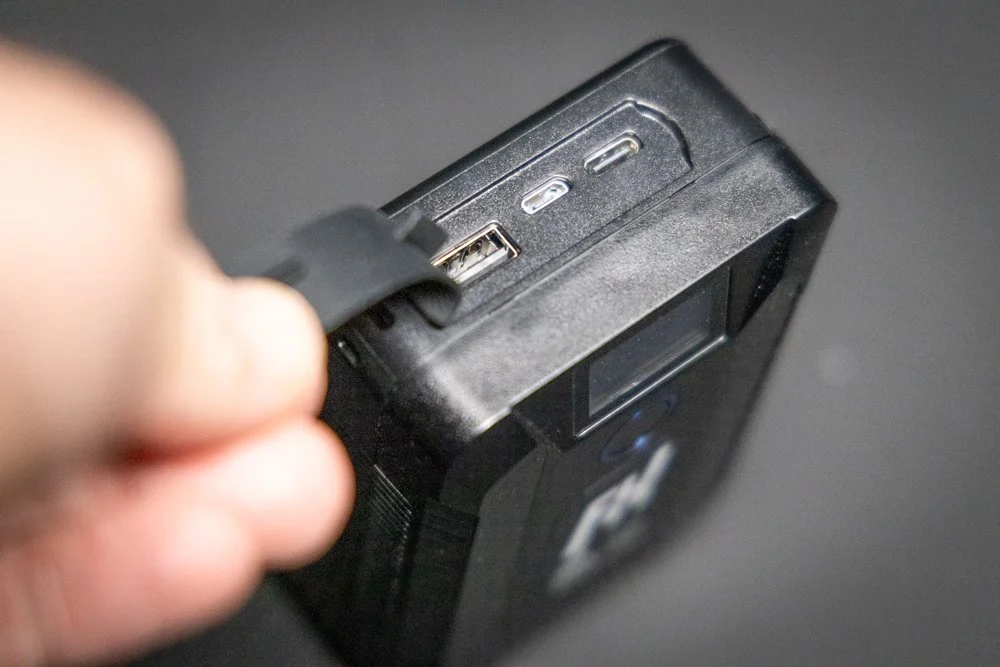
When the Nano One isn't charging my phone, and I'm only reserving it to power my camera, I could get a solid 2 hours worth of filming per battery, on a full charge. That's pretty decent, and you could keep track of how much battery you have left through its tiny LCD display and the LED indicators. Combined with the fact that it's one of the smallest V-mount batteries available, it's perfect for on-the-go professionals.
What Are The Benefits Of Using The FXLion Nano One?
Having used it for some time, I've noticed quite a few upsides to using the FXLion Nano One compared to a lot of other V-mount batteries that I'm used to, and here are just some of them:
Compact And Lightweight - Weighing in at just 310g, the FXLion Nano One is among the lightest as well as one of the smallest V-mount batteries on the market. Thus, for those who find themselves travelling a lot from one shoot to the next, these are way easier to carry around with you. It's even travel-friendly, as the Nano One conforms to TSA regulations for carrying batteries under 100Wh into planes.
Versatile Charging Options - Another nice little creature comfort is noticed when your Nano One runs out of charge. When you need to top it back up, the FXLion Nano One can be charged up using USB-C. Thus, it eliminates the need for dedicated (and often cumbersome or bulky and proprietary) chargers.
Built-In 15W Wireless Charging Pad - This is something that I keep bringing up, given how useful it's been to me during my time using it. That wireless charging pad is awesome and a lifesaver for the unexpected moments when your phone needs a quick charge.
Native Protection And Safeguards - As a tool for professionals, the FXLion Nano One remains reliable in a diverse array of environments. It could function properly, even when you're surrounded by a chilly -20°C winter storm, or the scorching 55°C desert heat. Moreover, FXLion has built-in additional safeguards like over-current protection, over-charge as well as over-discharge protection, and overheating resistance, as well.

How About The Downsides, Are There Any For The Nano One?
For all its many pluses, though, the FXLion Nano One V-mount battery isn't perfect, and there are a couple of major downsides to consider before buying it:
High Cost - The FXLion Nano One is hardly the most affordable option available when it comes to V-mount batteries in its class. Depending on where you're shopping and whether or not there's a discount running, a Nano One (with the updated design that includes the wireless charging pad) runs you at least £122. There are certainly cheaper alternatives, even if it might not come with the Nano One's many features.
Limited Battery Capacity - Another noteworthy point of consideration is the battery capacity of the Nano One. 50Wh is more than sufficient for a lot of enthusiasts and pros, like myself. But, for those long shoots and filming sessions, it might not be enough. At least, not if you're willing to carry a few Nano Ones with you. Therefore, if you need that added peace of mind and convenience, consider the Nano One's bigger siblings, the FXLion Nano Two and FXLion Nano Three, with 98Wh and 150Wh battery capacities, respectively.
Is The High Cost Of The FXLion Nano One Battery Worthwhile?
The FXLion Nano One is undoubtedly a premium product, given its relatively high price tag compared to a lot of other V-mount batteries that feature around 50Wh capacities. Nonetheless, the Nano One positions itself as a really unique contender in the market, given its inclusion of a 15W wireless charging pad in this new, updated model. That uniqueness alone and its robust feature set give it a pretty distinct edge.
When looking at a price-to-feature ratio then, the FXLion Nano One is definitely worth considering for any mobile, on-the-go photographer or videographer. It has a compact design that packs versatile power, and with its flexible nature of equally doubling as a power bank for your phone and other electronics, FXLion's Nano One V-mount battery is sure to find a place in your toolkit, particularly for those out in the field.
Specs And Details

About the Author - Ross Jukes is a professional Photographer and Videographer with over a decade of experience. Working in both Digital and Analogue formats, Ross has worked with international clients, had his worked published numerous times and exhibited his work extensively. With a passion for all things photographic, Ross combines his experience, enthusiasm and dedication to his art form to create engaging and educational content for the photographic community.
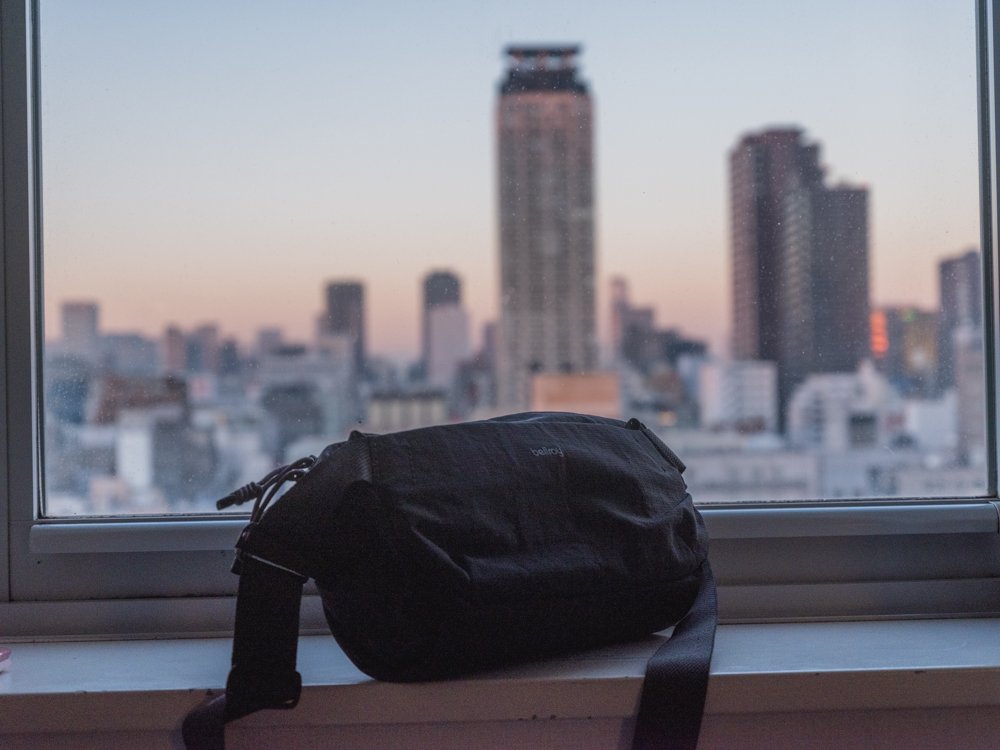
REVIEW: Bellroy Venture Sling 6L
The Bellroy Venture Sling 6L is a stylish and functional sling bag designed for urban adventurers and photographers. It offers quick access, and easy organization, and is made from 100% recycled, water-resistant fabric. Despite its compact size, it maximizes storage space. However, its high price tag of £114.95 may be a deterrent for some.
For any roaming photographer, a good carry bag is a must-have. However, more often than not, a typical camera bag is a tad too large and bulky, and may even be unnecessary if you're not carrying a lot of gear. On the other hand, not having a bag and simply chucking all your gear in your pockets or carrying your heavy camera around your neck is a huge pain. So, what about something like the Bellroy Venture 6L?
A well-designed sling bag is usually the best compromise between having a bag to keep your camera and photog gear in and ensuring that it's compact and light enough to keep yourself unencumbered and sleek while you're on the move. Bellroy's Venture Sling 6L is among the most popular options in photography circle that I've heard a lot about, so how does it perform in the real world, and is it worth the price tag?
PLEASE NOTE: I WAS SENT THIS ITEM FOR REVIEW BUT NO OTHER PAYMENT OR CONTROL WAS EXCHANGED FOR PUBLISHING THIS UNBIASED REVIEW
Video Source - Pack the Hackers via YouTube
On first impressions, the Bellroy Venture Sling 6L is certainly a pretty stylish and functional everyday carry sling bag well-designed for urbanites and metropolitan adventurers. So, while I'll be looking at it from the perspective of a photographer, it's versatile enough for students, commuters, or if you need something that's bigger than jacket pockets while you're walking about. Looking further, there's more to like, too.

The Bellroy Venture Sling 6L has a super-sleek design and features ample storage given its compact size. Yet, it comes with a plethora of nice-to-have features and creature comforts, making it perfect for people who need to haul along their everyday carry (EDC) and daily essentials, but without the massive bulk of a backpack. However, given its (spoiler alert) high price tag, is Bellroy's Venture Sling 6L really worth it?
How Does Bellroy Attempt To Re-Engineer The Sling Bag?
So then, what does Bellroy and its Venture Sling 6L do differently compared to other sling bags that you'll find on the market? One of the key challenges that Bellroy aimed to tackle was the needs of urbanites when designing this sling bag, as they wanted a bag that was both stylish and versatile. In other words, it needs to look good, while also doing what a bag really needs to do - carry as much stuff as optimally as possible.
With that in mind, the Bellroy Venture Sling 6L has been designed for quick access and easy organisation. Therefore, no matter how you intend to wear it - either as a messenger-style bag or a back-sling - getting access to all the pockets or compartments is really easy. Keeping stuff organised is just as effortless, as it comes with loads of smaller pockets and sleeves in the main compartment for storing different things.

There's a zipper pocket for slimmer items, if you'd like to stow that away from prying eyes and to keep it secured. Then, there are two smaller open pockets that are ideal for keeping your phone, wallet, or a small notepad. Despite how its clean, simplistic, uncomplicated exterior may be perceived, the main compartment was large enough, in my case, for a small umbrella, water bottle, snacks, and even a handheld game console.
Of course, for most of my use case, I stowed away my camera in here, and it fits just snugly. Plus, when I needed to grab my camera out in a jiffy to take a quick shot, the cool ambidextrous design of the Bellroy Venture Sling 6L meant that no matter how the bag was worn or oriented, I could get access to all of my gear very easily. Otherwise, if the 6L is not big enough, Bellroy also offers a larger 9L variant, too.

For context, I ended up using the sling to safely stow my GFX 50S II with 35-70mm lens and although the zipper felt a touch tight, it still fits! But that is a chunky medium format camera and it still worked a treat! It would be absolutely perfect for smaller, mirrorless cameras and positively cavernous for little compact cameras with plenty of room for additonal items!
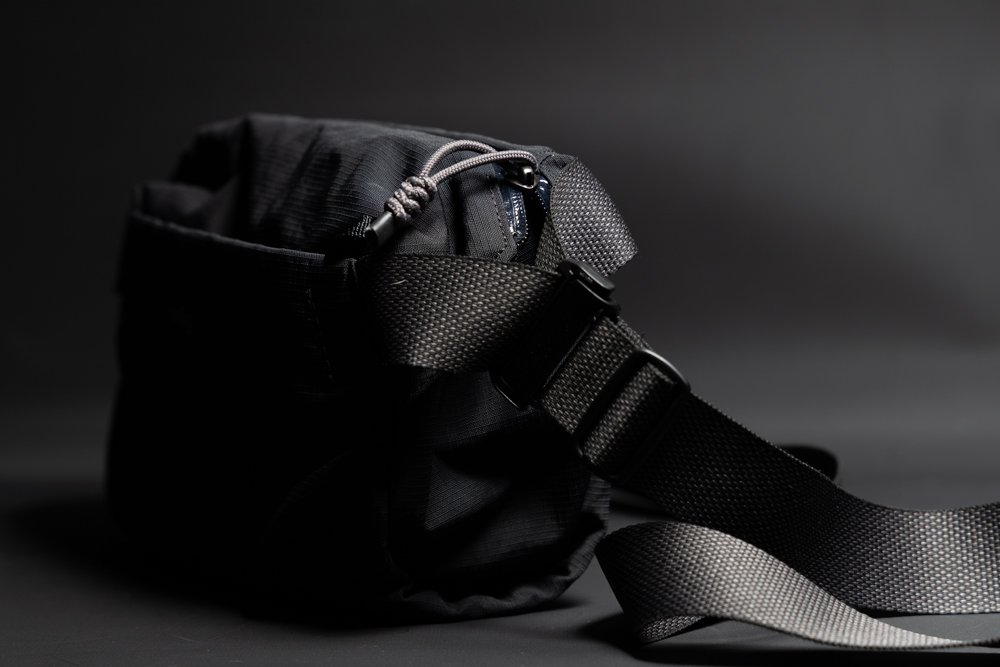
Where Does The Bellroy Venture Sling 6L Do Right On?
TL;DR, here are some of the many pros and benefits of the Bellroy Venture Sling 6L that you'll experience when you buy and use one of these:
Durable Material Choice - Given that it's made from 100% recycled, water-resistant woven fabric, it's both eco-friendly and built tough. In my testing, it's certainly robust enough to withstand day-to-day wear and tear, like constantly packing into jam-packed buses and trains, or when I chucked it aside. If you're into the sustainability side of things, it's also nice to hear that Bellroy uses leather-free composition here.
Excellent Use Of Space - Besides just how optimal this tiny sling bag was able to maximise how much space it affords you, those pockets are made with abundant attention to detail. The lining of each pocket is very soft, ensuring that fragile items like unprotected phone screens, won't get scratched easily. Moreover, the generous padding all around ought to offer a decent amount of protection, especially for your camera.
Easy Access - Getting at whatever you've stowed away inside the Bellroy Venture Sling 6L shouldn't be an issue, as the double zippers are often within easy reach, no matter how you wear or orient the bag. Speaking of, you can carry it in numerous ways, either as a messenger bag or a back-sling style.
Purposeful Design & Aesthetics - Bellroy's products are often well-regarded for their sleek design language, and the Venture Sling 6L is no different. There are 6 unique colours to choose from, and no matter how tiny it might appear, it's no doubt able to accommodate more stuff than you might expect.

What Are Some Negative Aspects To Consider, Instead?
Although, while I've sung praise for Bellroy's neat sling bag here, it's not perfect, and there are certainly a few downsides that you have to get used to if you're wearing one:
Tiny & Tight Front Pocket - I haven't yet mentioned the front pocket of the Venture Sling 6L, and that's mainly because it's mostly for very small items. The front pocket is far too small and tight, which severely limits what you can store there. Most of the time, you might be able to keep a pair of cables, and other small, loose items.
Shoulder Strap Buckles - While these are a great design touch, the dual buckles on the Venture Sling 6L's shoulder strap might be considered somewhat redundant. In my experience, I've found that just a single strap is more than enough, and I do wonder how much more cost-effective that would've been. Even the dual zippers that we mentioned earlier, as great as they are, might also seem fairly redundant, whereas a single zipper might've sufficed.
High Price Tag - If you're not familiar with Bellroy products before, then this is normally the major deal-breaker for a lot of people, and that's the price. Here in the UK - and the cost might vary depending on where you're shopping and if there's a discount available - the Bellroy Venture Sling 6L costs £114.95, which is quite pricey for a sling bag.
Video Source - Danny Packs via YouTube
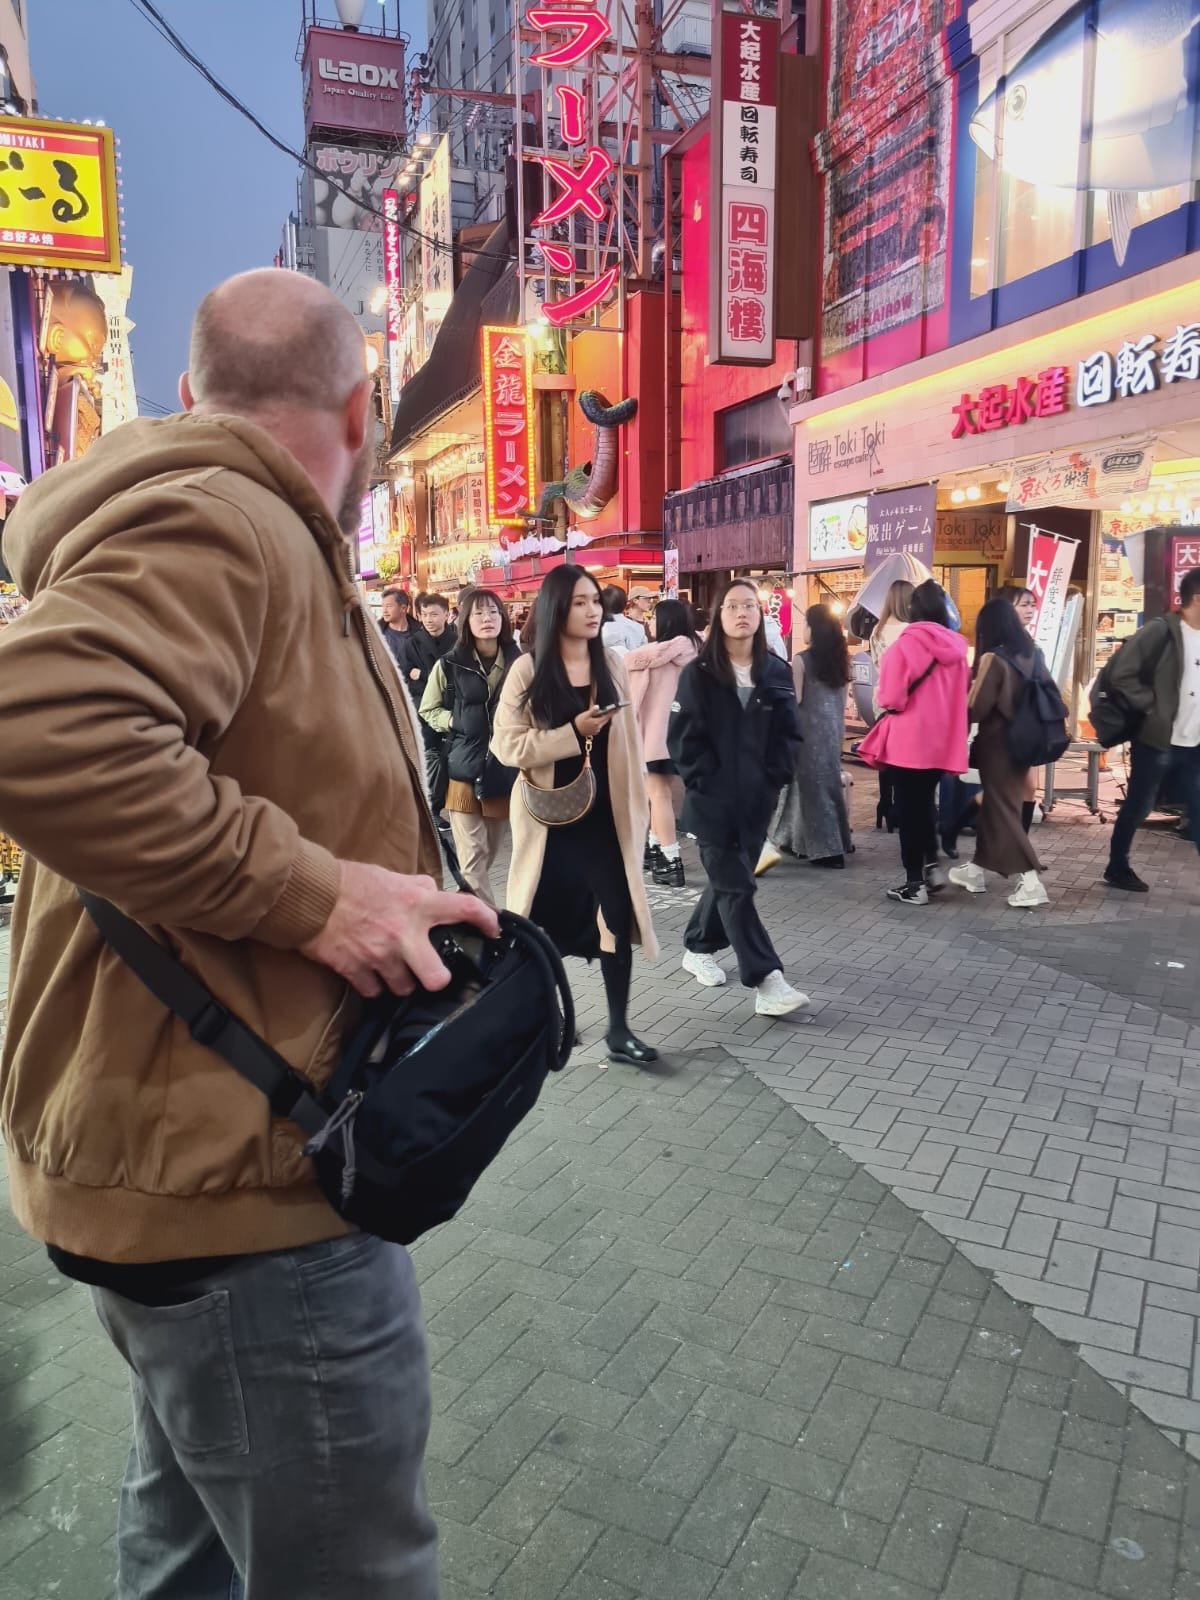
Should You Consider The Bellroy Over Other Sling Bags?
Given how costly it is, it's tough to recommend the Bellroy Venture Sling 6L to the vast majority of people. After all, trying to justify spending over £100+ on any bag or backpack is by itself a significant expense. In addition, you could easily get similar sling bags on the market for a mere fraction of the price that Bellroy charges for its options. No doubt, you could get a pretty close experience with cheaper bags, as well.
However, when it comes to the premium options, there aren't that many that could rival what the Bellroy Venture Sling 6L can offer. It's undoubtedly a top contender in the world of premium everyday carry bags. With its blend of sleek styling, purposeful functionality, ease of use, and sustainable construction, it's one neat sling bag for a lot of urban adventurers out there, and more so for outgoing street photographers.
Specs And Details

About the Author - Ross Jukes is a professional Photographer and Videographer with over a decade of experience. Working in both Digital and Analogue formats, Ross has worked with international clients, had his worked published numerous times and exhibited his work extensively. With a passion for all things photographic, Ross combines his experience, enthusiasm and dedication to his art form to create engaging and educational content for the photographic community.

How To Create Cinematic Looking Photographs
Over the past few years, there has been a real shift towards photographers wanting their images to look more cinematic. It’s not necessarily something you will see in commercial photography but on social media, there are countless accounts dedicated to the cinematic aesthetic, and they are incredibly popular! So how do you make your images look cinematic? I took an evening stroll to see what I could create.
Over the past few years, there has been a real shift towards photographers wanting their images to look more cinematic. It’s not necessarily something you will see in commercial photography but on social media, there are countless accounts dedicated to the cinematic aesthetic, and they are incredibly popular! So how do you make your images look cinematic? I took an evening stroll to see what I could create.
It’s important to understand that this look isn’t for everyone and it will not make a bad photograph look better, it’s very much just a matter of taste. The good news is that the look is very desirable and even better, it can make very mundane scenes seem, well like a still from a gritty Hollywood movie, what’s not to like!


At this point, I’m sure many photographers will be rolling their eyes and thinking ‘it’s all been done before’ and I’ve certainly been guilty of wishing an early demise of the ‘Social Media’ fad of basically, trying to make images look like something they are not! However, maybe it’s my old age or my general love for any type of photography, but I’ve actually come around to quite like the cinematic look. So with my camera, a warm coat and a healthy dose of optimism - I set out around the dark streets of Birmingham to get some film-like photographs.
In all honesty, I’ve received compliments on my photos in the past, ‘Looks like something from a film’! Which is always nice to hear, but I really wanted to be more intentional and delve even deeper into the cinematic feel. I knew that there are certain elements that give an image a more ‘film scene’ feel. As I roamed the streets, looking for the perfect subject matter, those elements were running around my mind!
Getting the right Colour Grade
It is impossible to talk about cinematic feeling images without speaking about the most predominant element that gives an image a cinematic feel, the colour grade. Many photographers, both amateur and professional alike, will be very aware of the importance of colour and the potential that editing software can give us to manipulate those colours. Before anyone attacks me, yes black and white photography is by its nature, the absence of colour - but even black and white can look very cinematic!

However, we will be focussing on colour photography here and referring to the art of adjusting those colours as colour grading. The term itself can be applied to still or moving images, but more commonly used in the world of cinematography. Grading simply means the ‘feel’ that is given to a video or image in post production by using certain colours to elicit certain emotions. OK, so that’s a lot to wrap our heads around, let’s be a bit more specific.
Basic colour theory can tell us how certain colours may affect our emotions and perceptions of a scene. For instance, it’s pretty common to depict a warm scene using oranges and yellows, to imply heat and a cold scene - you guessed it, blues. Colours such as red can imply danger and greens can be calming and relaxing. We can also use multiple colours together to add interest to a scene, splashes of red in a blue scene will draw the viewer's interest to that point. The same red accents may be lost in an orange scene or lose impact.

The art of grading is, in its most simple essence, the choice the creator makes to convey the overall feeling of the narrative for that image or video. But why is grading our images so popular these days? Surely we want to create a true representation of the scene in front of us? Well, my very unscientific take on this is ‘blame social media’. Many of us can list our inspirations not just in the photography world, but that of the world of cinema and social media is awash with people claiming inspiration from the likes of Wes Anderson, Roger Deakins and countless other directors and cinematographers.
Possibly the most enduring ‘grade’ of modern times is the Teal & Orange look - no prizes for guessing the primary colour scheme there and a quick Google search will show thousands of examples of it! This particular look creates depth and can draw the viewer's attention to important aspects of a scene. However, it’s important to remember that just because this is the most popular, doesn’t make it the only scheme we can use and neither does it imply that we need to use such extreme grades, as with everything, less is often more.

So we have established the importance of colour and its impactfulness of setting a mood for our image. But there is more to creating a cinematic feel than simply ramping up certain colours and hoping for the best! Next we will look at choosing the right subject matter in the first place and making the seemingly mundane, well, look magnificent!
Choosing Cinematic Feeling Subjects
As I continue my walk around Birmingham, I find my eyes are constantly drawn to construction yards, car parks, street lights and any pools of light in the otherwise dreary night. This is where personal taste and opinion play a huge part in choosing the right subject (and where my particular love of the Sci-Fi and moodier feeling films comes into play!) but the mix of metal, flood lights and concrete give me very ‘Blade Runner’ like feels! It’s a stretch, but I did say I was venturing out with a healthy dose of optimism!

Finding scenes that feel cinematic is no easy feat. For a start, one person’s cinematic scene is, well, another’s ‘picture of a crane in rainy Birmingham on a cold, wet Tuesday night’. If cinema has taught us anything, it’s that almost any scene can look cinematic, it is all in the vision of the person creating it. I’m certainly not adverse to photographing on warm sunny days, but I do find I lean towards darker, moodier settings on a regular basis so choosing what time of day and in what weather conditions, is equally as important.
Unless we are heading out with the intent to create one single image, we usually will have a series of images in mind. This can again have an impact on choosing what and where we shoot. Thinking in even broader terms, we will normally be trying to add images to a portfolio and will want to keep a consistent look and feel across those images, this again will influence the kind of subject that we choose to shoot on a regular basis.
Seeing the light
As I loop around the dark streets and start to head home, I find I’m drawn even more towards the dark corners, single points of light and the soft puddles of illumination glowing on the wet streets. This is no accident, with cinematic feeling images, it’s often what we choose to leave in the shadows that help create mystery and can give the viewer a slightly uneasy feeling of what might be lurking there.


After years of shooting with film cameras and having a particular love of Cinestill 800T (a derivative of a film stock used in motion pictures) I’ve learnt to seek out artificial lighting and to try to replicate the subtle glow or halation created by such film stocks. This certainly was my intent as I walked around, crown to the lamppost and lights from buildings like a crazed photography moth!
Light is the most fundamental part of any photograph but using light to create a cinematic feel is often about the subtraction of that light. I’ll have a friendly bet with you that if you Google the word ‘cinematic’ the kinds of images you find will lean towards the darker, rather than bright sunny days. Again, it’s not to say that bright and light can’t be cinematic, that’s simply not true. But there is definitely a skew towards the notion of a cinematic image having a darker, moodier overall feel.
Bringing the elements together
As I get home, make myself a drink and sit down to edit the images, I feel engrossed in how all of the elements actually come together to create a look, feel and emotion. I frantically move sliders in Lightroom, a little here, a lot there and slowly concoct my interpretation of something I feel has a cinematic feel. Though it won’t be to everyone's taste, for a brief stroll around the streets of the second city, I feel quite happy with the overall impact of the images.

The choice of subject matter, the light and most importantly, the colour grade all come together to give the images a certain feel. Now I am not saying they are anything special, they’re no ‘In the Mood for Love’ - Wong Kar-Wai’s masterpiece! But they have very distinct stylisation that helps the viewer imagine that they could be a still from a film, and I think that is the goal here.

Yes, there are certain aspects that don’t fit so simply into a ‘cinematic’ feel - for instance, I've still stuck with my love of the 4:5 aspect ratio, where a more widescreen ratio would have helped sell the cinematic look. However, photography is all about compromises and I’m afraid I am a little too stuck in my ways!

I hope you found some aspects of this useful - there are no groundbreaking techniques here and nothing that hasn’t been done a thousand times before. However, even for someone as stubborn as I am, it’s still nice just to spend an evening trying something a little different and broadening our photographic horizons!
About the Author - Ross Jukes is a professional Photographer and Videographer with over a decade of experience. Working in both Digital and Analogue formats, Ross has worked with international clients, had his worked published numerous times and exhibited his work extensively. With a passion for all things photographic, Ross combines his experience, enthusiasm and dedication to his art form to create engaging and educational content for the photographic community.