

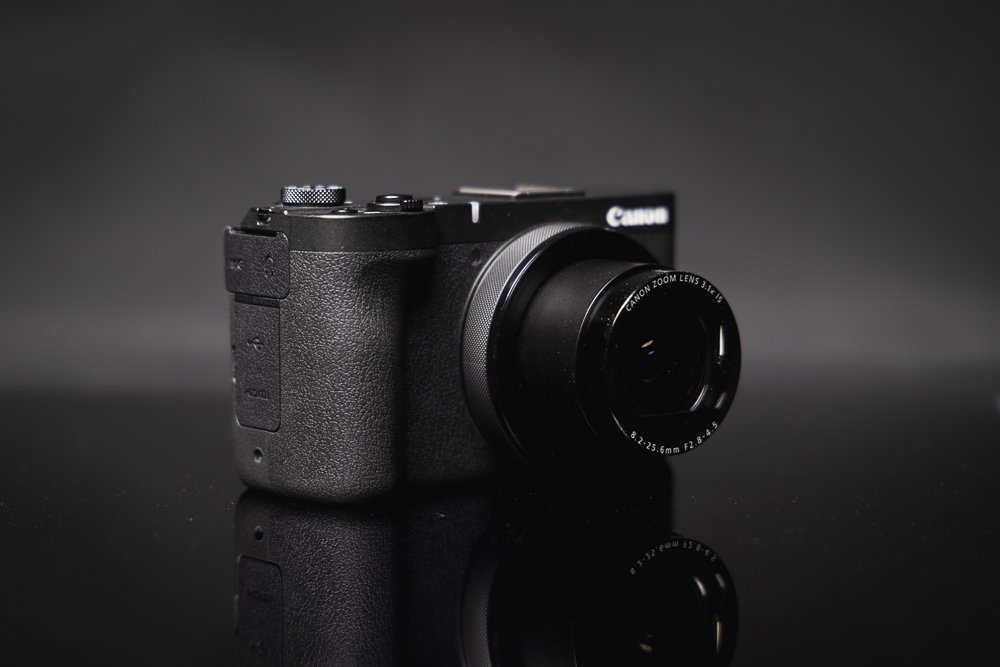
Canon PowerShot V1 Review - Compact Power in your Pocket
When I started out, over 15 years ago, I would never have believed all of the features that we take for granted in a consumer level camera. Incredible autofocus, high resolution stills, 4k video with effective wide-dynamic range (Log) - With the Canon PowerShot V1 launched in April 2025, we now have all of that and much more in our pocket. When I think about it, it really is mind blowing. However, it does all come at a cost, let's find out if it’s worth it… Oh, and I will have a video review coming soon so be sure to check out my YouTube Channel…

When I started out, over 15 years ago, I would never have believed all of the features that we take for granted in a consumer level camera. Incredible autofocus, high resolution stills, 4k video with effective wide-dynamic range (Log) - With the Canon PowerShot V1 launched in April 2025, we now have all of that and much more in our pocket. When I think about it, it really is mind blowing. However, it does all come at a cost, let's find out if it’s worth it… Oh, and I will have a video review coming soon so be sure to check out my YouTube Channel…

TL;DR
If you don’t have time to read the full article, my ‘Too Long; Didn’t Read’ take on this is…
The Canon Powershot V1 is an excellent compact camera. Yes, it has a premium price tag but it is an incredibly capable little camera. Whereas some of it’s counterparts make up for their high price tags by offering a myriad of features and specs, the Canon is simple to use yet powerful enough to get great results in an all but the most challenging scenarios. It’s a great stills camera but for a vlogging/content creator, the video features make this camera a ‘no-brainer’…


PLEASE NOTE - No AI was used to make this article. It is my own work based on my experiences and created in my own time. If payment was received or any items gifted to me, it will be clearly stated in the article. If you would like to support the blog, please consider making a small donation.
Build Quality and Ergonomics
Straight out of the box (and I’m pleased to see Canon using mostly recycled packaging for their cameras) the camera feels like a premium camera. It has a little weight to it and feels dense - though at 426 grams, it’s certainly not heavy. That dense feel makes sense when you think of all of the technology crammed inside this thing! The package comes with a battery and wind cover for the mic, this camera is certainly targeted towards vloggers after all.
Ergonomics
The ergonomics of the camera are another standout feature. Can have somehow managed to make this feature packed camera incredibly simple to handle and use. I’ve used my fair share of small cameras and there is usually a compromise when it comes to button layout. The PowerShot V1 focuses on being simple and fast to use. Startup time is quick, the buttons all makes sense in terms of placement and the flip out LCD touchscreen is a joy to use in all but the very brightest of situations.

What is missing?
I do have two very minor gripes with the body. Firstly, and probably most importantly is that the PowerShot V1 is not weather-sealed. Canon has obviously had to work thermal wonders to keep the issue of overheating at bay. However, that does come at the expense of not being able to use the camera in wetter conditions - which is a shame for more travel focussed users. My other personal issue is the lack of EVF - though I really am stretching here as the camera is packed with other features - I really don’t know how they would have fit an EVF in, so its absence is understandable.

Canon Powershot V1 for Stills Photography
I’m going to break the review up into the two main areas of use for this camera, stills and video. The 1.4 inch CMOS sensor crams in 22 megapixels which helps deliver fantastically rich images. I’m not going to bang on about ‘Canon colour science’ but if you know, you know. The PowerShot V1 delivers images that certainly have that ‘Canon Feel’ and as an owner of the Canon R5 MkII - in some ways I preferred the images out of the V1 but my mixed emotions towards the R5 MkII is a conversation for another day.
Source - Gordon Laing via YouTube
I’ll talk more about the 16-50mm equivalent lens in the video section but suffice to say it delivers wonderfully crisp images with little compromise and with Optical Image Stabilisation - it’s more than just a typical ‘point and shoot’ lens. There is a bit of distortion but nothing that isn’t very easily fixed and sharpness throughout the aperture range seemed decent from my own very basic testing - though YouTube is your friend if you want to find some very detailed examples. The lens has a maximum aperture of f2.8 at the wide end going to f4.5 at the longer end which is decent for a small camera like this.

Image Performance
The images have decent dynamic range and I was impressed with the lowlight performance. I really think we have reached a point where you would struggle to find a truly ‘bad’ modern camera for stills but I’m pleased to say that the PowerShot V1 is a good stills performer, even with its diminutive form factor. The Dual Pixel Autofocus performs very well. It's nice to see some of Canon’s new tracking features built in. An additional bonus is the built in ND filter which can help in some scenarios - the mechanical shutter maxes out at 1/2000 of a second but there is an electronic shutter that delivers up to an incredible 1/16000 of a second.

Overall, the PowerShot V1 delivers fantastic images from what is a compact camera. The lens is sharp and the sensor renders images with plenty of dynamic range. As a professional photographer, I would have no problem using this camera to deliver images for social media, websites etc. and for most users, they will not be disappointed with the image performance and more importantly, the usability of this camera to capture great images.

Canon Powershot V1 for Videography
There is no doubt that this little powerhouse is mainly focussed on the video side of things with its primary customer base being vloggers and content creators. However, to simply class this little camera as a ‘vloggers camera’ would be missing some rather large points. Most notably the 4K 60 P video and the fact that this camera has Canon Log 3 - a feature that up until only a few years ago was reserved mostly for Canon’s premium Cinema line of cameras. It shouldn’t be overlooked that this ‘pocket’ camera, if used in the right hands, is capable of producing some beautiful video.
Additonal Features
Other key video features include Canon’s ‘Movie Digital IS’ - this worked well in the field but it does come with a small crop factor and call me old-fashioned, but I appear to be the only person that still likes a bit of ‘normal’ camera shake. The previously mentioned built-in ND filter is also a great feature though fairly commonplace in video oriented compact cameras these days. In addition to the 4K 60 P, this little beast also delivers Full HD 120 P which for a lot of content creators will be a great addition - for those looking to make more ‘cinematic’ content, the choices of frame rates have you well covered. The Dual Pixel Autofocus also appeared to work well with the lens and I rarely found the camera ‘hunting’ for focus - in particular when used as a vlog-style camera.

The Lens for video
One of the most crucial features for videography and in particular for the cloggers out there is the lens, and with a 16mm equivalent at the wide end - it really does have you covered. One of the main gripes for most vlog-style cameras is that you normally need the dreaded ‘selfie-stick’ to get the camera far enough away from the user so that they do not completely dominate the frame. The Powershot V1 is wide enough that this really is not an issue. The lens is slightly more compromised at the long end - the 50mm equivalent offers some degree of ‘zoom’ but from a personal perspective, I’d love to have seen this closer to 80mm or ideally, 105mm. I must caveat that with the fact that I don’t know the technical limitations of building a lens with that zoom range so it may not be possible!
Video Perfomrace
Video quality overall is great and for most users, they will be happy with the results. The audio also sounds fantastic for a small camera and even though I’d always recommend using a wireless lav etc. the onboard audio sounds full and rich - just remember to use the supplied wind-cover when outside. For more advanced users, the addition of C-Log 3 is great to see. Lowlight performance was decent with noise present as you start to ramp up the ISO - but this is where I feel some people forget the basics of videography in terms of looking for good lighting scenarios, with balanced audio and good framing - it is only a camera after all and won’t make poorly shot video look incredible, so some user skill is required to get the absolute most out of this camera - but it is certainly easy to get good looking footage from it.
Source - PetaPixel via YouTube
FREQUENTLY ASKED QUESTIONS…
-
The Canon PowerShot V1 is clearly marketed towards the ‘Content Creator’ and Vlogger. The video-centric features make this ideal for those looking to produce YouTube style content. However, the great still performance make this an icreadibly versatile camera for most end-users.
-
The PowerShot V1 is feature packed but the headline grabbing features are the excellent 22 MegaPixel sensor, the high quality lens and the professional standard video features. The additon of 40K 60 P video, Full HD at 120 P and Canon C-Log 3 make this and increidbly well specced camera for video creators.
-
An often overlooked feature of video cameras is how well the audio performs and I’m pleased to say it performs incredibly well for such a small camera. The included wind cover is a nice touch a I would always recommend getting the mic closer tothe source (use a wirelss lav mic) but audio sounds great on the PowerShot V1
-
For me, the biggest downsides are the lack of weather sealing, the focal range of the lens and the cost. All of these are personal things and you will know if they are deal breakers for you - but I would have loved to have seen a bit more reach with the lens. As for weather sealing and cost, well these are issues that are slighlty more difficult to overcome.
-
I can’t state enough that even though this camera is marketed towards ‘vloggers’ and ‘content creators’ this is still an incredibly well specced portable camera and even for old, worn out photographers like me - it still makes a great, pocketable option for an everday carry style camera.

Final Thoughts…
I’ve taken a slightly different approach to this review, without focussing too heavily on every technical detail. As I mentioned at the start though, I find it genuinely mind-blowing that a ‘pocket size’ camera can deliver all of these features and functions. More importantly, it delivers fantastic stills and video performance in a simple to use, well built and stylish form factor. If you know that this camera suits your needs as a user, it’s very difficult to find any downside to it. However, there is one…

My biggest downside to this camera is the cost, at £959 - it’s expensive. Shopping around may bring that price down a little but that price still places this camera very much in the ‘premium compact’ category. The strange thing is, I actually think it is worth the money - this camera is incredibly capable. My main issue with the cost is that it puts this camera very near the price point of some other very capable mirrorless cameras. I’m not going to start making comparisons as this isn’t an ‘A vs B’ review - but at nearly a thousand pounds, that's a large chunk of change to be spending on a camera. That’s before we even get into the ‘camera vs phone’ debate for making vlog style content (camera every time for me but again, a conversation for another day!).

If the price is not the deciding factor for you, then one thing is for sure - you’ll be hard-pressed to find a more capable little camera that can slip in your pocket. Canon have done their research and delivered a camera that will have 99% of its target market covered! I would have no issue using this camera as an ‘everyday carry’ or for travel. For content creators, I think the PowerShot V1 would be an excellent option. Please leave a comment below if you like the look of this camera or if you think there are better options out there, I’d love to get your thoughts…
Posts you might also like…


About the Author - Ross Jukes is a professional Photographer and Videographer with over a decade of experience. Working in both Digital and Analogue formats, Ross has worked with international clients, had his worked published numerous times and exhibited his work extensively. With a passion for all things photographic, Ross combines his experience, enthusiasm and dedication to his art form to create engaging and educational content for the photographic community.
Disclaimer: All links to Amazon UK/US are affiliated links - you will still pay the same price but I will receive a small commission. All information provided in this blog is intended either for educational or entertainment purposes and is accurate to the best knowledge of the author. However, further research/professional advice should be sort before making purchases/implementing any advice given and no responsibility is taken by the author or parties mentioned here within.

A Walk Around The Photography Show 2025 London - My HIGHLIGHTS
The 2025 Photography & Videography show took place at ExCel London and I made the journey south and took a look around. In this video, I share my highlights from the show and give you a feel for what the event was like, My particular highlights were getting to play with the new Sigma BF - a beautiful new camera. I also got to try the Canon C400 and C80 video cameras which I am very interested in as well as a host of other really cool stands and exhibitions. Watch the video below for my full highlights.

The 2025 Photography & Videography show took place at ExCel London and I made the journey south and took a look around. In this video, I share my highlights from the show and give you a feel for what the event was like, My particular highlights were getting to play with the new Sigma BF - a beautiful new camera. I also got to try the Canon C400 and C80 video cameras which I am very interested in as well as a host of other really cool stands and exhibitions. Watch the video below for my full highlights.
Posts you might also like…
About the Author - Ross Jukes is a professional Photographer and Videographer with over a decade of experience. Working in both Digital and Analogue formats, Ross has worked with international clients, had his worked published numerous times and exhibited his work extensively. With a passion for all things photographic, Ross combines his experience, enthusiasm and dedication to his art form to create engaging and educational content for the photographic community.
Disclaimer: All links to Amazon UK/US are affiliated links - you will still pay the same price but I will receive a small commission. All information provided in this blog is intended either for educational or entertainment purposes and is accurate to the best knowledge of the author. However, further research/professional advice should be sort before making purchases/implementing any advice given and no responsibility is taken by the author or parties mentioned here within.
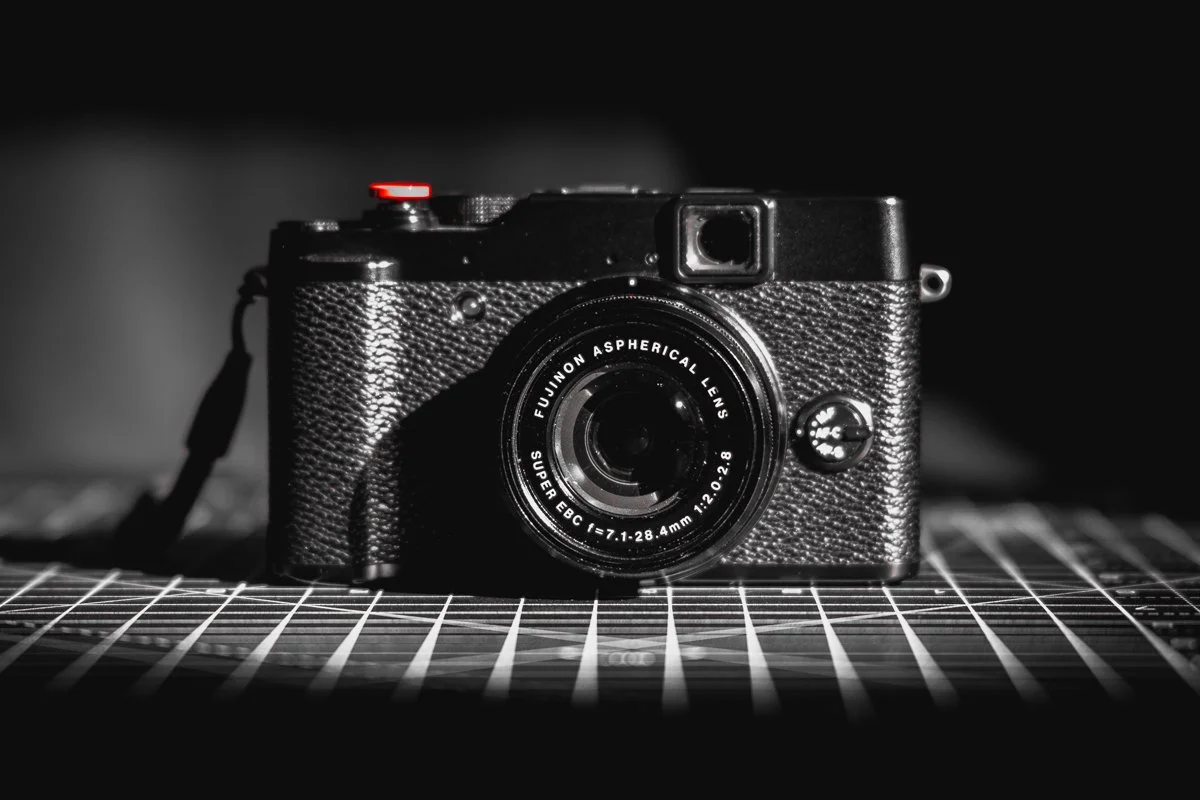
VIDEO: Fuji X10 in 2025! BEST Budget Fuji X100V Alternative?
The Fuji X10 could be one of the best budget alternatives to the legendary Fuji X100V and similar style cameras. However, can a camera from 2011 really compete with the modern day lowlight monsters? In this video I look at the pro’s and obvious con’s of comparing a camera over a decade older than it’s modern counterparts. I have previously written about the Fuji X10 and it’s fair to say I was a fan then, but has anything changed?

The Fuji X10 could be one of the best budget alternatives to the legendary Fuji X100V and similar style cameras. However, can a camera from 2011 really compete with the modern day lowlight monsters? In this video I look at the pro’s and obvious con’s of comparing a camera over a decade older than it’s modern counterparts. I have previously written about the Fuji X10 and it’s fair to say I was a fan then, but has anything changed?
Posts you might also like…
About the Author - Ross Jukes is a professional Photographer and Videographer with over a decade of experience. Working in both Digital and Analogue formats, Ross has worked with international clients, had his worked published numerous times and exhibited his work extensively. With a passion for all things photographic, Ross combines his experience, enthusiasm and dedication to his art form to create engaging and educational content for the photographic community.
Disclaimer: All links to Amazon UK/US are affiliated links - you will still pay the same price but I will receive a small commission. All information provided in this blog is intended either for educational or entertainment purposes and is accurate to the best knowledge of the author. However, further research/professional advice should be sort before making purchases/implementing any advice given and no responsibility is taken by the author or parties mentioned here within.

VIDEO: My Favourite Cameras That I have Used in 2024!
I love using different cameras and whether they are film or digital, photo or video focussed - every one of them brings something unique. I thought I would share my favourite cameras that I have used throughout 2024 and there may be a few in there that surprise you. Take a look at the video and let me know in the comments what your favourite camera of 2024 has been!
I love using different cameras and whether they are film or digital, photo or video focussed - every one of them brings something unique. I thought I would share my favourite cameras that I have used throughout 2024 and there may be a few in there that surprise you. Take a look at the video and let me know in the comments what your favourite camera of 2024 has been!


Posts you might also like…
About the Author - Ross Jukes is a professional Photographer and Videographer with over a decade of experience. Working in both Digital and Analogue formats, Ross has worked with international clients, had his worked published numerous times and exhibited his work extensively. With a passion for all things photographic, Ross combines his experience, enthusiasm and dedication to his art form to create engaging and educational content for the photographic community.
Disclaimer: All links to Amazon UK/US are affiliated links - you will still pay the same price but I will receive a small commission. All information provided in this blog is intended either for educational or entertainment purposes and is accurate to the best knowledge of the author. However, further research/professional advice should be sort before making purchases/implementing any advice given and no responsibility is taken by the author or parties mentioned here within.

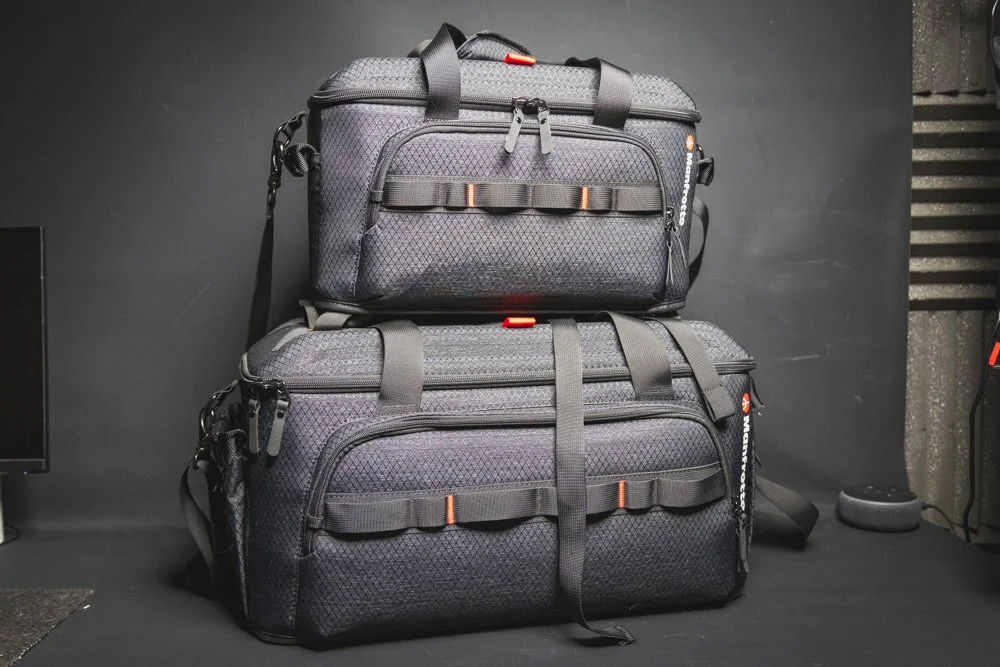
REVIEW - Manfrotto Pro Light Cineloader Small - Big Things come in Small Packages!
I have previously reviewed the Pro Light Cineloader Medium and it’s fair to say that I absolutely loved it! So when Manfrotto reached out to me and asked if I would like to try the Small version, it was an instant yes! I would highly recommend reading my review of the medium as the small is almost exactly the same, just smaller… It boasts the same excellent build quality, thoughtful design and offers a great level of protection for your gear - but let’s take a closer look, I’ll keep it brief.
I have previously reviewed the Pro Light Cineloader Medium and it’s fair to say that I absolutely loved it! So when Manfrotto reached out to me and asked if I would like to try the Small version, it was an instant yes! I would highly recommend reading my review of the medium as the small is almost exactly the same, just smaller… It boasts the same excellent build quality, thoughtful design and offers a great level of protection for your gear - but let’s take a closer look, I’ll keep it brief.

PLEASE NOTE: I WAS SENT THIS ITEM FOR REVIEW BUT NO OTHER PAYMENT OR CONTROL WAS EXCHANGED FOR PUBLISHING THIS UNBIASED REVIEW
As mentioned, I’ll try not to repeat myself too much from the review of the medium version of the Cineloader but it’s fair to say it’s smaller sibling is no less of a quality product. In many respects, I’ve actually found the small version more useful as commonly, I just want to transport a rigged out camera and don’t need all of the additional space that the medium offers. More so, it fits on top of a Pelicase perfectly with the additional loop and that has become my go too setup - Cineloader for the camera, Pelicase for all of the additional items.

Build and Features
The build quality is excellent with a good, solid structure to the bag which gives you extra confidence that your precious gear will be protected. This is something that I have tested out the ‘hard’ way when I dropped my bags down a set of stairs! The Cineloader did a wonderful job of protecting the camera and apart from wiping a bit of dust from the water repellent exterior, everything was fine - apart from my embarrassment levels which were distinctly peaked!

There is a single larger compartment in the interior with ‘M-Guard’ dividers that feature heavily in the medium bag also present here. The dividers help the versatility of the bag but personally I have been using the bag without them, preferring to just have the main compartment for the built out camera rig. The straps, zips and padding are all equally as well constructed as on the medium version and Manfrotto have certainly not skimped in any way on the smaller version.
Source: ProAV TV via YouTube
Usability and Versatility
What the small version lacks in terms of size compared to the larger options, I think it makes up for its portability and usability. The small is the perfect size for small and medium cinema rigs and it makes it the perfect option for just throwing a camera in the bag and running out of the door. Not having to break a camera down to transport it really is the biggest feature of the Cineloader bags once you’ve used one, it’s pretty difficult to go back to the ‘old’ way of doing things.

Apart from the trolley loop setup which has become my preferred way of transporting the bag, the included shoulder strap is more than comfortable enough and makes carrying the bag for long periods of time easy. External pockets also add to the versatility of the bag and on many occasions, if it’s just capturing b-roll or a simple setup, I just take the small with a few batteries in the pockets and a tripod strapped to the top with the included tripod loops - good job Manfrotto.
Final Thoughts
It’s very difficult not to just repeat everything that I have said in my review of the Pro Light Cineloader Medium as it really is only the size that is different. However, I do find that having both sizes offers a lot of benefits for different styles of working. The medium certainly has its benefits for larger jobs when you might be carrying multiple cameras and all of the additional items that are needed such as audio, lighting etc.
However, the small bag is a joy to use when you simply need to travel light and I love combining it with a Pelicase and having my perfect ‘solo shooter’ setup. You will probably have noticed that I haven’t mentioned any negatives and that is because I really can’t find any. Even the price, usually around £150-£170 is a good price for a product of this quality. The bigger question is does this fit your needs? If you regularly carry a rigged out camera, or even cameras with longer lenses - it’s difficult to see how this wouldn’t be a great addition!
Posts you might also like…
About the Author - Ross Jukes is a professional Photographer and Videographer with over a decade of experience. Working in both Digital and Analogue formats, Ross has worked with international clients, had his worked published numerous times and exhibited his work extensively. With a passion for all things photographic, Ross combines his experience, enthusiasm and dedication to his art form to create engaging and educational content for the photographic community.
Disclaimer: All links to Amazon UK/US are affiliated links - you will still pay the same price but I will receive a small commission. All information provided in this blog is intended either for educational or entertainment purposes and is accurate to the best knowledge of the author. However, further research/professional advice should be sort before making purchases/implementing any advice given and no responsibility is taken by the author or parties mentioned here within.

Five Pieces of Photo & Video Gear That I Would Love to Try in 2025!
As 2024 draws to a close, it’s time to start planning for the next twelve months and I thought it might be good to share my thoughts on some gear that I would love to get my hands on in 2025! It would be really easy just to list off a load of dream cameras and lenses but that’s not really what this is about. Each of these items would help make a significant difference in either my workflow or the quality of my final output and let’s face it, that’s what all of this is really about.
As 2024 draws to a close, it’s time to start planning for the next twelve months and I thought it might be good to share my thoughts on some gear that I would love to get my hands on in 2025! It would be really easy just to list off a load of dream cameras and lenses but that’s not really what this is about. Each of these items would help make a significant difference in either my workflow or the quality of my final output and let’s face it, that’s what all of this is really about.
There are some pretty ambitious items on the list that may be out of reach. There are also some pretty surprising items as they don’t seem particularly exciting at first glance. There is no getting away from the fact that if I actually want to round up all of these items, a little win on the lottery would probably be needed (more likely the case that I’ll be overwhelming eBay with old camera gear!). But sometimes, it’s nice to have some lofty aspirations to keep you motivated on those cold, early January mornings! Let’s take a look at the list…

1) Canon C400
This one might be a bit of a stretch as it’s well outside of my budget, but the Canon C400 sure looks like an amazing camera. I recently broke the HDMI out on my Canon R5C and this has got me thinking about whether now would be a good time to ‘upgrade’ my main video camera. For anyone that has been following Canon’s latest offerings, you might think that the C80 is the obvious replacement but there are a couple of limitations with that camera. Notably, only having SD cards and the slightly peculiar body shape really put me off.
Source - CVP Via YouTube
The Canon C400 seems to offer everything I would ever need - more so in fact, so much more that it would be a borderline waste on me. However, that’s where the opportunity lies! Being able to grow into a camera system and push yourself on more challenging shoots is exceptionally beneficial. Plus, it has triple base ISO and solid autofocus, two things that I really would rely on judging by the varying nature of the work I carry out. My biggest challenge would be making the financial side of things work but sometimes, you have to push yourself and this may just be one of those times, we’ll see.

2) Zhiyun Molus G300
I’ve been a big fan of the Zhiyun range of lights for a while now and own a few. However, I always find myself just wanting that little bit more power in my bag. I use the G200 on a regular basis and it has been great and I absolutely love the form factor, but I worry about walking into a situation where 200w just isn't enough. I’m learning to light ‘spaces’ more than faces and with this in mind, I like the idea of having a few 200w+ lights that can help bring the overall ambiance of a scene up and having a 300w as a key light sounds like a good balance.
It’s difficult to say whether this is a good or bad option as there are certainly more powerful lights out there. However, I constantly have to think about portability and how I will travel with lights and this is where the G300 seems to be best in class - power vs portability! I can see this light working really well in my setup and is (in the world of lighting) even pretty reasonably priced. I will be holding out for some January Sales and hoping to add this to the kit bag.

3) Lighting Diffusion
OK, so this may seem like an obscure choice when talking about things that you can’t wait to try, but hear me out. In 2025, I want to move slightly more into corporate interviews and maybe even documentary style work, so lighting will be essential. With this in mind, learning how to diffuse light and create really pleasing and natural looking lighting is essential. Up-steps diffusion and with so much to choose from, it might be difficult knowing where to start.
Manfrotto offer a fantastic looking range of scrims and diffusion which certainly seem to have most bases covered. I could go down the ‘budget’ route of trying Muslin and even shower curtains! I’m just not sure how that looks when turning up to a commercial client's premises armed with what looks like a bag full of decorators dust sheets! It’s certainly an area that I am looking forward to experimenting with and hopefully upping the quality of my video production.

4) EIZO FlexScan FLT Monitor
I admit it, I get excited about some pretty unusual gear choices and upgrading my monitor setup is certainly on the cards in 2025! I was casually looking at EIZO’s lineup who are relied upon by many professional photographers & videographers and stumbled across the FlexScan FLT - A lightweight monitor with some pretty impressive stats but not just in the area you may think, but in its eco-credentials! This might be the perfect second monitor! It is literally a Class-A power efficiency monitor made from 95% recycled plastics, happy days!


Even though I was initially looking at replacing my main working monitor which is what led me to EIZO in the first place - I’m suddenly really drawn to the idea of having a secondary working monitor and with power efficiency and eco-credentials like this, it seems like a no-brainer. I will be trying to get my hands on one of these to see how it can help my workflow but it has also set my mind racing about where else I can be looking at more sustainable options and that can’t be a bad thing!

5) General Audio Gear
One area that I would probably like to focus on making some serious upgrades is my audio gear. I have already invested in this area quite a bit but the more work I do, the more I realise just how important it is to be able to capture good quality audio in a range of circumstances. Nothing panics me more than forgetting to set audio levels correctly or a mic being badly placed and even though 32-bit float audio is a lifesaver, there are always areas for improvement.
Source - Curtis Judd Via YouTube
One particular area that I am keen to improve is the quality of the Lav mics that I use and getting better at placing and hiding a mic. In a dream situation, the Sanken COS 11D’s look like amazing options. It’s not super-necessary for a lot of the style of work that I do but showing an appreciation for subtle improvements in the quality of output is what elevates you above your competition. It’s the kind of area that many people might look to save a few quid but actually, nailing audio might just be one of the most important steps in the video process.
Rounding Up…
I love this time of year and not because of the Whiskey and Mince Pies (I’m quite partial to one of those!) but because it offers an opportunity to take stock of where you are and plan out where you want to be. Making lists like this might feel fanciful and more of an elaborate shopping list to show off to your fellow photographers/videographers - but I actually think it’s a really useful exercise in seeing how you can grow and become a better professional in your area of production.
I may not accrue all of the items on this list (I’m looking at you Canon C400! ££££) but by consciously looking for the gaps in your current gear and how you can make your workflow faster, easier and better quality - it’s not just good for you but also your clients and the quality of your final output. I’m really keen to hear what areas you are looking to upgrade in 2025 and what’s on your kit wish list? Leave a comment below and thanks for reading.
Posts you might also like…
About the Author - Ross Jukes is a professional Photographer and Videographer with over a decade of experience. Working in both Digital and Analogue formats, Ross has worked with international clients, had his worked published numerous times and exhibited his work extensively. With a passion for all things photographic, Ross combines his experience, enthusiasm and dedication to his art form to create engaging and educational content for the photographic community.
Disclaimer: All links to Amazon UK/US are affiliated links - you will still pay the same price but I will receive a small commission. All information provided in this blog is intended either for educational or entertainment purposes and is accurate to the best knowledge of the author. However, further research/professional advice should be sort before making purchases/implementing any advice given and no responsibility is taken by the author or parties mentioned here within.

Belroy Traveller 26L - The Perfect Travel Companion for Photographers
The Bellroy Venture Travel Pack 26L is a versatile and thoughtfully designed backpack that offers photographers a blend of style, functionality, and durability. As a photographer constantly on the move, I've found this pack to be an excellent companion for both urban adventures and outdoor shoots. However, does its stylish looks outweigh its practicality? Let’s find out…
The Bellroy Venture Travel Pack 26L is a versatile and thoughtfully designed backpack that offers photographers a blend of style, functionality, and durability. As a photographer that travels and is constantly on the move, I've found this pack to be an excellent companion for both urban adventures and outdoor shoots. However, does its stylish looks outweigh its practicality? Let’s find out…

PLEASE NOTE: I WAS SENT THIS ITEM FOR REVIEW BUT NO OTHER PAYMENT OR CONTROL WAS EXCHANGED FOR PUBLISHING THIS UNBIASED REVIEW
Design and Build Quality
I’ve previously used a Belroy Sling and was always seriously impressed with the build quality and the 26l is exactly the same. Bellroy has crafted the Venture Travel Pack with a sleek, minimalist aesthetic that doesn't scream "camera bag." This low-profile design is perfect for photographers who want to blend in while navigating busy city streets or exploring new locations. The bag is constructed from a 100% recycled water-resistant woven fabric that feels robust and ready to withstand the rigors of travel.
The zippers are heavy-duty and feature weather-sealing strips, providing an extra layer of protection for your valuable gear. While these zippers may feel a bit stiff initially, they do loosen up with use. The overall build quality is impressive, with no noticeable issues even after months of use.

Comfort and Ergonomics
For photographers who often carry heavy gear for extended periods, comfort is paramount. The Venture Travel Pack excels in this area, thanks to its well-designed back panel and shoulder straps. The back panel features a contoured shape that follows the natural curve of your spine, with a solid lumbar support cushion at the bottom. This design helps distribute weight evenly and reduces strain on your back, especially when carrying a full load of camera equipment.

The shoulder straps, while slightly rigid, are comfortable and feature a sternum strap for added stability. The top grab handle is generously padded, making it easy to maneuver the bag in tight spaces or when stowing it in overhead compartments. Personally, I found the bag to be very comfortable to carry for long periods of time and loved carrying it around whilst exploring new cities. A lot of the time, you just forget it’s there.
Capacity and Organisation
With a 26-litre capacity, this backpack strikes a good balance between spaciousness and compactness. It's large enough to accommodate a professional camera body, an extra lens or two and accessories while still fitting under most airline seats as a personal item.
The main compartment opens both fully clamshell-style and as a top-loader, offering flexibility in how you access your gear. This feature is particularly useful for photographers who need quick access to their equipment without fully unpacking the bag.

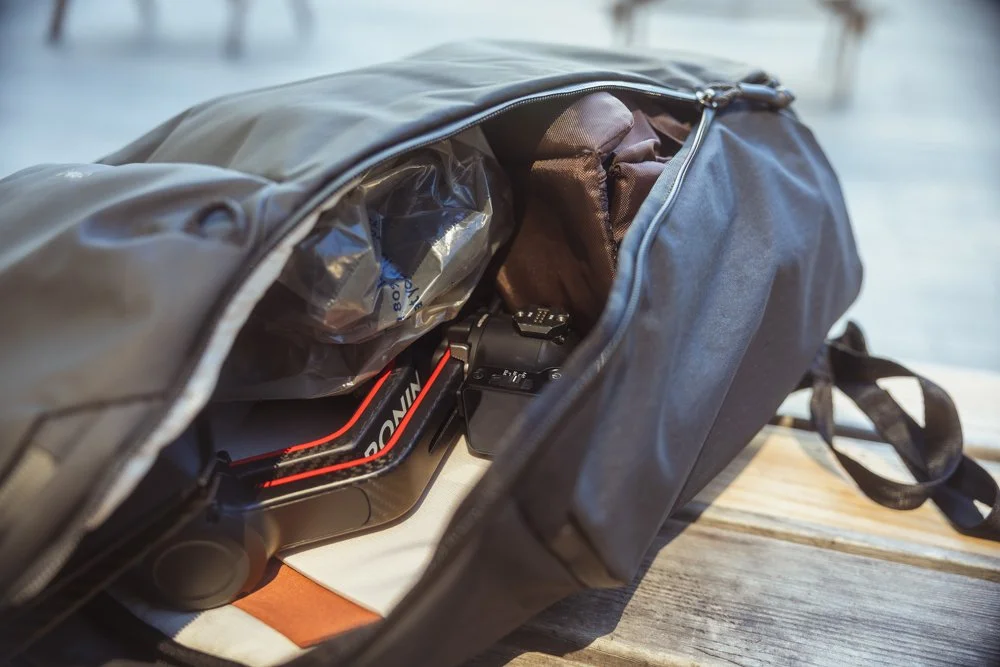
One of the standout features for photographers is the "brain" pocket at the top of the bag. This compartment is divided into two sections and can easily fit a mirrorless camera like a Fuji X100V or even a larger camera with a pancake lens. It's an ideal spot for storing frequently used items or smaller camera gear that you want to access quickly. For me, it was the X100V and an Osmo Pocket 3 - perfect travel companions.
Camera Gear Storage
While the Venture Travel Pack isn't specifically designed as a camera bag, it adapts well to photographic needs. The main compartment can easily accommodate a camera cube, allowing you to organise and protect your gear efficiently. Alternatively, you can use packing cubes and pouches to create a custom setup for your equipment.

The bag's various pockets and compartments offer ample opportunities for organizing smaller items like memory cards, batteries, and filters. The side pocket is large enough for everyday carry items but can be useful for storing a travel tripod or monopod, depending on their length.
Unique Features
One of the most innovative features of this backpack is the hidden tote bag stored in a dedicated pocket on the front of the bag. This 15-liter tote can be incredibly useful for photographers who need an extra bag for carrying props, additional gear, or even souvenirs picked up during their travels. It’s also useful if you are exploring a new city and want to leave the main bag behind, just carrying the tote bag itself.

The water bottle pocket does take up some internal space but provides easy access to hydration while on the go. However, it may cause some gear in the main compartment to shift if not packed carefully. Personally, I used it for smaller items and never bothered with a water bottle. I found this compartment was ideal for storing toiletries and other potential ‘leak’ hazards as it is separate to the main compartment.

Weather Resistance
The water-resistant fabric and weather-sealed zippers provide good protection for your gear in light rain or drizzle. However, for heavy downpours or extended exposure to the elements, you may want to consider using an additional rain cover for extra peace of mind. I have been caught in a few showers and the bag has stood up to the test very well, but it’s always best to practice a bit of caution.

Versatility
One of the Venture Travel Pack's strongest suits is its versatility. It can seamlessly transition from a camera bag to a travel pack, hiking backpack, or even a daily office bag. This adaptability makes it an excellent choice for photographers who don't want to invest in multiple specialised bags. The addition of laptop storage pockets also make this great for those that need to edit on the go!

Pros and Cons
Pros
Versatile Design: Functions well as both a travel pack and camera bag.
Comfortable Carry: Ergonomic back panel and padded shoulder straps reduce fatigue.
Ample Organisation: Multiple compartments including a "brain" pocket for easy access.
Hidden Tote Bag: Extra storage option for souvenirs or additional gear.
Durable Materials: Water-resistant fabric protects against light rain.
Travel Friendly: I’ve been using this as a ‘carry on’ bag so no need to pay for a cabin bag.
Cons
Saggy Base: The rounded bottom makes it difficult for the bag to stand upright.
Water Bottle Pocket: Takes up internal volume that could be used for gear.
Side Pocket Depth: Items stored here can sink too low, wasting space.
Weight Distribution: Heavier loads may require more support; adding a waist strap could enhance comfort.
Cost: Certainly not the most budget friendly option.
Conclusion
The Bellroy Venture Travel Pack 26L is a compelling option for photographers seeking a versatile, well-built backpack that doesn't compromise on style or functionality. Its thoughtful design, comfortable carry, and adaptable storage make it suitable for various photographic pursuits—from urban street photography to outdoor adventures.

While it may not have all the specialised features of dedicated camera bags, its versatility and quality construction more than make up for it. For photographers who value a bag that can seamlessly transition between different roles and environments, the Bellroy Venture Travel Pack 26L is definitely worth considering.
Posts you might also like…
About the Author - Ross Jukes is a professional Photographer and Videographer with over a decade of experience. Working in both Digital and Analogue formats, Ross has worked with international clients, had his worked published numerous times and exhibited his work extensively. With a passion for all things photographic, Ross combines his experience, enthusiasm and dedication to his art form to create engaging and educational content for the photographic community.
Disclaimer: All links to Amazon UK/US are affiliated links - you will still pay the same price but I will receive a small commission. All information provided in this blog is intended either for educational or entertainment purposes and is accurate to the best knowledge of the author. However, further research/professional advice should be sort before making purchases/implementing any advice given and no responsibility is taken by the author or parties mentioned here within.

REVIEW - Sekonic L-858D - The Rolls Royce of Light Meters!
The Sekonic L-858D Speedmaster light meter is a sophisticated tool that has become increasingly popular among photographers, particularly those working with film. This advanced meter offers a range of features that cater to both digital and analog photography needs, making it a versatile choice for professionals and enthusiasts alike. In addition, it could be useful for those working with video and filmmakers who need a professional grade light meter, let’s take a closer look.
The Sekonic L-858D Speedmaster light meter is a sophisticated tool that has become increasingly popular among photographers, particularly those working with film. This advanced meter offers a range of features that cater to both digital and analog photography needs, making it a versatile choice for professionals and enthusiasts alike. In addition, it could be useful for those working with video and filmmakers who need a professional grade light meter, let’s take a closer look.

PLEASE NOTE: I WAS SENT THIS ITEM FOR REVIEW BUT NO OTHER PAYMENT OR CONTROL WAS EXCHANGED FOR PUBLISHING THIS UNBIASED REVIEW
Design and Build Quality
The L-858D is a robust and weather-resistant construction, designed to withstand the rigors of outdoor photography and all of the challenges that landscapes can throw at it. It is dustproof, splashproof and ensures reliability in various shooting conditions. The meter features a mix of physical buttons and a 2.7-inch color dot-matrix touchscreen, providing an intuitive interface for users and the screen is a joy to use.


One of the standout design elements is the retractable incident metering lumisphere, which can rotate 270 degrees, offering flexibility in measurement angles. The meter also includes a 1-degree spot meter for reflected metering and a 1/4-20 mount point on the base, enhancing its versatility. The versatility of this little beauty is one of the standout features, offering reliable metering whatever your needs.
Video Source - Stephen Milner via YouTube
Enhanced Sensitivity
The L-858D has impressive sensitivity, capable of measuring light levels as low as 0.1 lux or to the uninitiated, like me, in very dark situations! This three-stop improvement over previous models is particularly beneficial for photographers working in low-light conditions or with long exposures. This may be particularly useful to landscape photographers or those shooting film, where reading even the lowest measurements of available light is critical.

Expanded Measurement Range
With an ISO range extending up to 13,107,200 and a luminance range of 0.1 to 2 million lux, the L-858D can handle a wide variety of lighting scenarios. This expanded range is especially useful for film photographers who often work with various film speeds and lighting conditions. However, most photographers and videographers will benefit from this incredible range and it will come as good comfort that you are pretty much covered in any situation.
Customisable Profiles
The meter allows users to create and store custom camera exposure profiles, which can be particularly useful for film photographers working with different film stocks. These profiles can be easily edited, saved, and recalled, providing quick access to specific camera or film characteristics. This is one feature that I absolutely love and is a real time saver, in particular if you are using multiple cameras or prefer certain film stocks in different lighting conditions.

Filter Compensation
The L-858D can store up to 30 filter factors, allowing photographers to account for light loss when using filters. This feature is invaluable for landscape and fine art photographers who frequently use neutral density or color filters. Landscape photographers using ND filters will love this feature and for those of us using older film cameras where it may be necessary to use centre ND filters to compensate for vignetting - this is a real killer feature.

Multiple Measurement Modes
The meter offers both incident and reflected light measurement capabilities, with the ability to switch between them without changing attachments. It also includes an illuminance mode, which is useful for measuring the intensity of light sources. I have personally held back on buying expensive light meters in the past because of needing both incident & reflected meters, but this solves that problem by having both metering methods available, though this does come at a price.

Averaging and Contrast Measurement
The L-858D can store up to 9 measurements in memory for averaging, helping photographers determine optimal exposure in complex lighting situations. Additionally, the AVE/EV feature allows for easy measurement of lighting ratios, which is particularly useful for portrait and studio photographers. Average metering is one of the most effective metering methods for shooting with film stocks. Using this feature can also work well with the Zone System famously used by Ansel Adams - whereas that is slightly different to average metering, the L858D is a fantastic tool for use in the Zone System. That would take an entire blog of its own to explain though!


Usability
The touchscreen interface of the L-858D represents a significant improvement in usability compared to previous models. The menu system is generally intuitive, although some users may find that certain features require navigating through multiple levels. It also takes a level of knowledge around metering terms and methods but I doubt this is the kind of light meter that ‘new’ photographers would be plumping for, so some knowledge is certainly assumed.
The meter's ability to auto-dim its backlight to prevent influencing measurements is a thoughtful touch that demonstrates attention to detail in its design. The option to lock the touchscreen while still taking measurements adds an extra layer of usability, particularly in challenging shooting conditions. I did find the screen a little difficult to see in very harsh lighting situations but this is quickly resolved when shielded with a hand.
Pros
1. High sensitivity in low-light conditions
2. Extensive measurement range
3. Customizable camera/film profiles
4. Comprehensive filter compensation features
5. Versatile measurement modes
6. Durable, weather-resistant construction
7. Intuitive touchscreen interface
8. Uses standard AA batteries
Cons
1. Some features may require navigating through multiple menu levels
2. The touchscreen may take some getting used to for those accustomed to analog meters
3. The price point may be high for casual photographers
4. Some advanced features may be unnecessary for certain users

Who Would Find It Useful…
Film Photographers
The L-858D is particularly well-suited for film photographers due to its ability to create and store custom profiles for different film stocks. Its high sensitivity and expanded measurement range are also beneficial for those working with various film speeds and in challenging lighting conditions. I, for one, found this an incredible tool to accompany any of my film cameras, no matter how accurate I assumed their meters to be - the L-858D would be my go-to choice.

Landscape Photographers
The meter's durability, filter compensation features, and ability to average multiple readings make it an excellent tool for landscape photographers, especially those working with large format cameras. I assume many would rely on modern cameras internal metering but if you really want to unleash your creativity in the wild, adaptive and versatile metering is a must and there are few that are more versatile than the L-858D.
Studio Photographers
The illuminance mode and the ability to measure lighting ratios easily can be invaluable for studio photographers working with complex lighting setups. This is certainly not my forte so I will leave that to the experts, but I can certainly see the benefits of such a hugely capable light meter.

Long Exposure Enthusiasts
The L-858D's enhanced low-light sensitivity and expanded measurement range make it particularly useful for photographers experimenting with long exposures. Film photographers dealing with reciprocity and all the other challenges of shooting film will also enjoy the L-858D’s all encompassing abilities.

Professional Cinematographers
While primarily designed for still photography, the meter's ability to handle various frame rates and shutter angles makes it a versatile tool for cinematographers as well. Simple things like being able to measure in T-Stops and the aforementioned ability to average meter and consider lighting ratios make this an excellent tool for those dealing with moving images, as well as still.
Video Source - Sekonic Via YouTube
Comparison to In-Camera Metering
While many digital cameras offer sophisticated in-camera metering systems, a dedicated light meter like the L-858D can provide several advantages, especially for film photographers:
1. Consistency across different cameras and film stocks
2. More precise control over exposure, particularly in challenging lighting situations
3. The ability to meter light without the camera, which can be beneficial for large format photography
4. Advanced features like filter compensation and custom profiles that may not be available in-camera
All-in-all, the L-858D offers a more versatile and trustworthy level of metering that most modern cameras simply can’t compete with and for film shooters, it’s quite simply a must!

Software and Connectivity
The L-858D offers connectivity with MAC/PC Software, allowing users to upgrade firmware, apply custom settings, and utilise exposure profiling. This feature enhances the meter's longevity and adaptability to future needs.

Value Proposition
At a retail price of around £600 (though price do seem to vary so some research is suggested), the Sekonic L-858D represents a significant investment. However, for professional photographers and serious enthusiasts, particularly those working with film, the meter's advanced features and durability can provide excellent long-term value. Many photographers view a high-quality light meter as a lifetime investment, and the L-858D's comprehensive feature set positions it well in this regard. I’m a big believer in ‘buy cheap, buy twice’ so even though it is a heavy investment, it really will pay off in the long run.
Conclusion
The Sekonic L-858D Speedmaster is a highly capable light meter that offers a wealth of features for both film and digital photographers. Its enhanced sensitivity, expanded measurement range, and customisable profiles make it particularly well-suited for film photography, while its durability and versatility appeal to a wide range of photographic disciplines.

While the meter's advanced features and touchscreen interface may present a learning curve for some users, the overall design is intuitive and user-friendly. The L-858D's ability to handle complex lighting situations, coupled with its filter compensation and averaging capabilities, make it an invaluable tool for photographers who demand precise exposure control.
For film photographers, landscape shooters, and those working in challenging lighting conditions, the L-858D offers capabilities that can significantly enhance workflow and ensure consistent, accurate exposures. While the price point may be high for casual users, professionals and serious enthusiasts will likely find the investment worthwhile, given the meter's comprehensive feature set and potential for long-term use.

Ultimately, the Sekonic L-858D Speedmaster stands as a powerful tool in the modern photographer's kit, bridging the gap between traditional light metering techniques and contemporary digital technology. Its ability to cater to both film and digital workflows makes it a versatile choice for photographers across various specialties, ensuring its relevance in an ever-evolving photographic landscape.
Posts you might also like…
About the Author - Ross Jukes is a professional Photographer and Videographer with over a decade of experience. Working in both Digital and Analogue formats, Ross has worked with international clients, had his worked published numerous times and exhibited his work extensively. With a passion for all things photographic, Ross combines his experience, enthusiasm and dedication to his art form to create engaging and educational content for the photographic community.
Disclaimer: All links to Amazon UK/US are affiliated links - you will still pay the same price but I will receive a small commission. All information provided in this blog is intended either for educational or entertainment purposes and is accurate to the best knowledge of the author. However, further research/professional advice should be sort before making purchases/implementing any advice given and no responsibility is taken by the author or parties mentioned here within.

10 Essential Amazon Black Friday Tips for Photographers & Videographers
I love a bargain as much as the next person and whenever ‘Black Friday’ rolls around, I find a comfy chair, a cup of coffee and arm myself with my credit card waiting to snag myself a deal! However, this annual homage to consumerism isn’t always the money-saving bonanza that we think it is and quite often we can find ourselves spending more than we’d planned to! So how can you take best advantage of the Black Friday deals? I’ve added my top tips to give you a chance of actually grabbing a bargain and not going bust!
I love a bargain as much as the next person and whenever ‘Black Friday’ rolls around, I find a comfy chair, a cup of coffee and arm myself with my credit card waiting to snag myself a deal! However, this annual homage to consumerism isn’t always the money-saving bonanza that we think it is and quite often we can find ourselves spending more than we’d planned to! So how can you take best advantage of the Black Friday deals? I’ve added my top tips to give you a chance of actually grabbing a bargain and not going bust!
Don’t forget to leave your own personal tips in the comments below :)
NEW - NO TIME TO READ THE POST, LISTEN TO THE AUDIO ABOVE!
1. Plan Ahead: Know What You Need
It might sound obvious, but start by assessing your current equipment and figuring out what you need versus what you want. This is the ideal time to consider any upgrades that could enhance your workflow, whether it’s a faster lens, a new lighting setup, or additional storage solutions. Once you have a list, note down the specific brands, models, or features you’re looking for. This will help you stay focused during the sale and avoid impulse purchases that may not serve your long-term goals. I tend to keep a list throughout the year of items that I know I will need, usually more memory cards!

Memory Cards are always a good buy!
2. Set a Budget and Stick to It
Black Friday can lure even the most disciplined buyers into overspending, especially with so many enticing offers flashing on your screen. Set a budget for how much you’re willing to spend on new equipment, and be realistic about it. Keep in mind that even small accessory purchases can add up quickly. Sticking to a budget will help you prioritise purchases that provide real value to your business and prevent unnecessary splurges that could strain your finances later on.

Batteries are usually another good Black Friday Bargain
3. Consider your Cashflow
OK, this one may seem a little obscure at first but stick with me! Have you thought about how you are actually going to pay for your items and in particular, bigger purchases? I’m a strong believer in never taking out credit to pay for an item and no Black Friday bargain is worth going into debt for. If you are upgrading gear, have you considered the resale value of your old equipment? Will you get enough money back to cover your beautiful new purchase? Be realistic, if it’s going to be a financial stretch, it won’t feel like you’re getting a good deal.
4. Compare Prices to Ensure the Best Deal
Just because an item is labeled “Black Friday Sale” doesn’t necessarily mean it’s the lowest price you’ll get. Use price comparison tools like Camera Price Buster which track the historical prices of camera products. These tools can show you how an item’s price has fluctuated over time and help you determine whether it’s truly a good deal. Additionally, check other retailers to see if they’re offering better discounts on the same item; sometimes, brands will match or even beat Amazon’s pricing during Black Friday. I personally check prices against eBay to see whether something really feels like a bargain.
5. Look for Bundle Deals
During Black Friday, many brands offer bundled packages that include multiple items at a discounted rate. For photographers and videographers, bundles can include a camera body with additional lenses, memory cards, or even a tripod. These bundles provide substantial savings compared to purchasing each item separately, allowing you to stretch your budget further. Just make sure to review the items in each bundle to confirm they match your needs and are from brands you trust. In addition, look out for the ever-popular Adobe deals - you can save big on the Creative Cloud plans.
6 Think Outside the (Camera) Box
Similar to the idea of keeping a list of items you think you will need, also try to consider items that might not immediately spring to mind - like stationery, books, printing and framing materials etc. Personally, I’m holding out for things like Cinefoil, Diffusion Cloths and 5-in-1 Reflectors - all stuff that wouldn’t immediately get you excited about grabbing a bargain but you’ll be glad of any additional discount. Think through your entire workflow and see what springs to mind! Another great area to save money on is external storage, you can never have enough!

Think of what other accessories you may need!
7. Consider Refurbished Gear for Extra Savings
If you’re open to buying slightly used or refurbished gear, Amazon’s refurbished section can offer deep discounts on cameras, lenses, and other equipment. Refurbished items are typically inspected and tested to meet certain quality standards and often come with warranties. You’ll pay significantly less than you would for a brand-new item, which can be a great solution for picking up a backup camera or testing out a new lens without a huge investment.
8. Follow Influencers and Reviewers for Recommendations
During Black Friday, photography influencers and tech reviewers often share curated lists of the best deals, particularly on Amazon. These individuals frequently have early access to deals or insider knowledge of upcoming sales. Following a few trusted voices can give you the extra edge in discovering discounts you might have missed. Look out for photographers or videographers who have similar styles or equipment needs to your own—they often post recommendations that are specific to professionals like you.

Tech items usually have a good chance of being discounted
9. Use Social Media to Catch Flash Sales and Exclusive Offers
Brands tend to ramp up their social media activity during Black Friday, announcing flash sales or exclusive discounts across their social media channels. Follow your favorite photography and videography brands on platforms like Instagram, Twitter, or Facebook, and set notifications for posts if possible. Social media can be a valuable source for early access to sales, exclusive discount codes, or limited-time offers that aren’t widely promoted.
10. Be Ready to Act Quickly
The most popular Black Friday deals, especially on high-demand photography and videography items, can sell out quickly. If you see a deal that aligns perfectly with your list, be prepared to act fast. Amazon’s “Lightning Deals” are designed to offer high discounts for a short time or until stock runs out, so having a solid plan in place can help you avoid missing out. Ensure your payment information is updated, and if there’s something you absolutely need, consider setting alarms or reminders for when deals are expected to go live.
Wrapping Up
Black Friday on Amazon can be an ideal opportunity to get high-quality gear at a fraction of the cost, but only if you’re strategic about it. These tips will help you stay focused, save money, and build out your photography and videography kit without the stress of overspending. Remember that preparation is key, and a little advance planning can go a long way in ensuring you get the most value out of this shopping season.

Think about what you can sell to finance your new purchases!
Whether you’re upgrading to a new camera, adding a versatile lens to your collection, or picking up accessories to improve your setup, Black Friday deals on Amazon have something for every photographer and videographer. Just keep your list and budget in mind, and you’ll be well-equipped to score the best deals while building out your creative arsenal. Happy shopping!
Posts you might also like…
About the Author - Ross Jukes is a professional Photographer and Videographer with over a decade of experience. Working in both Digital and Analogue formats, Ross has worked with international clients, had his worked published numerous times and exhibited his work extensively. With a passion for all things photographic, Ross combines his experience, enthusiasm and dedication to his art form to create engaging and educational content for the photographic community.
Disclaimer: All links to Amazon UK/US are affiliated links - you will still pay the same price but I will receive a small commission. All information provided in this blog is intended either for educational or entertainment purposes and is accurate to the best knowledge of the author. However, further research/professional advice should be sort before making purchases/implementing any advice given and no responsibility is taken by the author or parties mentioned here within.

A Birmingham Photographers Dream Job: Aston Villa Vs Bayern Munich!
As a Birmingham Photographer, there is one client who I had always dreamed of working with but one that will completely divide the locals reading this. For my sins, I’m a football fan. I have been an Aston Villa fan from a very early age. I’m aware that this sentence alone may just have cost me half of my Photography and Videography clients in the second city but sometimes, it’s worth the risk. This is one of those occasions and this is my experience of working with my dream client.
As a Birmingham Photographer, there is one client who I had always dreamed of working with but one that will completely divide the locals reading this. For my sins, I’m a football fan. I have been an Aston Villa fan from a very early age. I’m aware that this sentence alone may just have cost me half of my Photography and Videography clients in the second city but sometimes, it’s worth the risk. This is one of those occasions and this is my experience of working with my dream client.
When I started my photography career, I never imagined that I could end up working with a club that I had supported for years. I just assumed that as I wasn’t a ‘sports’ photographer, I would never get the chance. However, life sometimes works in your favour and as luck would have it, a family member ended up working in the marketing team at Aston Villa. As much as I would love to believe that this played no part in it and of course they chose me based on my incredible ability, I’ll hazard a guess that my name was mentioned more out of familiarity than technical ability.

Either way, a few years ago I was asked to produce some marketing photos and videos showcasing the hospitality areas at Villa Park. It may not have been hanging out with the players and giving the manager tips on which team I would pick, but it still felt amazing to add ‘Aston Villa’ to my list of clients. The work was enjoyable enough and I was asked to do more, which gave me some encouragement that they liked my work - that or the previously mentioned family member was forcing them to use me, still no complaints from me.


Fast forward to 2024 and I’m not sure which comes as more of a shock, but Villa are now a Champions League club and I’m still doing work for them! Furthermore, I received an email asking if I could photograph the pre-match display before our first game against none other than Bayern Munich! It didn’t take me long to type ‘Yes’ and hit send! Of course I would. I had already planned to be at the game anyway, albeit in probably a slightly more drunken state but what did I care, photography and Aston Villa are two of my favourite things!

I still get nervous before jobs and I see this as a good thing as it shows that the work cares. However, I felt particularly nervous about this job as the timings were very tight. The majority of the critical shots were in the build up to kick off with the climax being a light display in the ground, flame throwers on the pitch, a firework display and rounded off with the ‘Champions League’ theme tune being played out. I went through my usual pre-visualizations of how I would get the shots, packed all my gear and made my way off to the ground.


There was an absolutely electric atmosphere at Villa Park. The crowd was even more excitable than usual and maybe it was a mix of nerves and apprehensions (plus beer!) but everybody seemed giddy with excitement. I had a fellow photographer, Paul, who was helping me with a second angle but that didn’t seem to calm my nerves any - I knew what shot I wanted to get and that was all I could focus on. Well, that and praying that somehow, this little team from Aston could overcome one of the giants of European football (again!).


The shot that I really wanted to capture was a long exposure of the fireworks going off above the ground as the tifo (larger banner) was raised in front of the Holte End. I already knew that this would be a challenge as I wasn’t exactly sure when the fireworks would go off and in truth, all of the elements would be happening at slightly different times and each one posed their own challenges. I was determined to get ‘the’ shot that as an Aston Villa fan, would mark Champions League football returning to our beloved club.
Around ten minutes before kick off and the atmosphere really starts to build. A mix of things are happening on the pitch and in the stands. I had found my spot in the upper tier of the North Stand and had set two cameras up, both on tripods with the aim of having a wide angle and something a bit more focused on the banner. I’d spoken to the fans around me, everyone knew what I was doing and I was set, now it was just time to focus on what was unfolding in front of me and make sure I was primed to capture all of the action!

Just a couple of minutes before kick-off in arguably one of our most important matches, certainly in my living history, my fingers are primed on the shutter buttons - a camera for each hand and I could feel the sweat building on my neck, despite the chilly autumnal conditions. The lights around the ground start to flash and just as Jeff Beck starts blaring out of the speakers - it’s go time! I started shooting and praying that all elements of the image could come together.
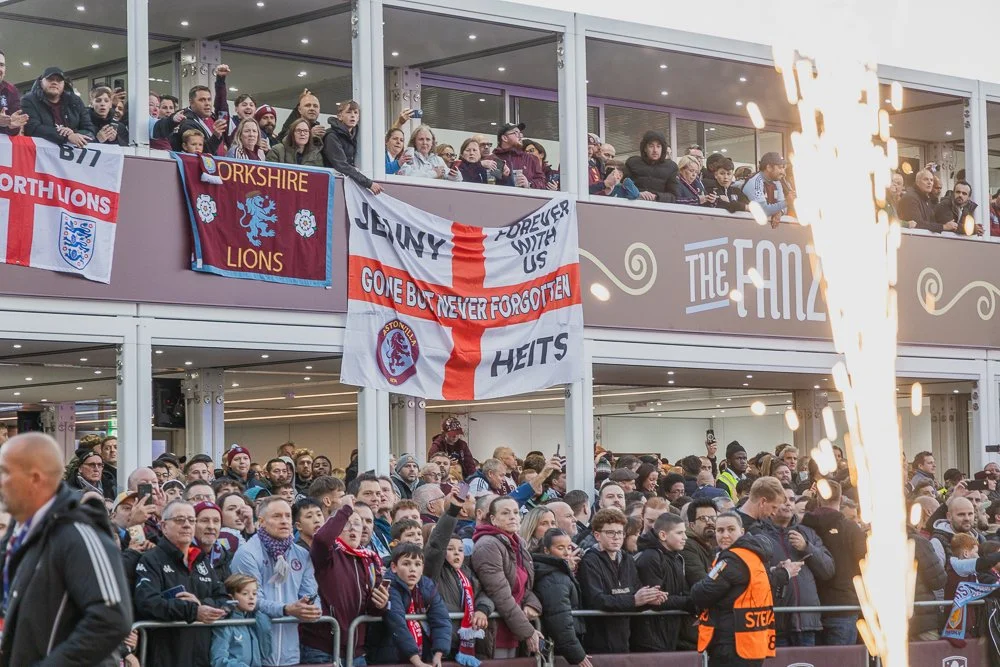


The flamethrowers at the side of the pitch start blasting out huge jets of fire and I know that at any minute, the two most challenging aspects of the image will need to be captured. Just as I start to see the banner being raised and I know the fireworks will soon make their brief appearance, I feel a push in the back! Not just a light tap, a fan had started pushing me, knocking my camera and absolutely ruining my chance of making the image that I had planned! The next few seconds felt like an eternity as I decided what to do - start crying, start punching - I think everything crossed my mind.


Paul Hadley
The first bang of the firework snapped my attention back and I desperately grabbed my camera, adjusted the tripod and started blasting out photos. For those who are unaware, any kind of additional motion in a long exposure basically ruins the image - and there was a lot of additional motion! The ‘fan’ started putting his hand in front of my camera and despite my protestations, he seemed to find it amusing that I was clearly distraught at ruining my attempts to take what I had hoped would be a great image.

Paul Hadley
The next two minutes were a complete blur. I desperately tried to capture images and just prayed that something had worked. As I packed my gear up and left the ‘fan’ shouted back to me ‘It was only a joke mate’ - neither of those things were true. I was neither amused nor feeling particularly friendly towards the guy. I had to hand my memory cards over to the marketing team before returning to my seat so I didn’t even have time to check to see what I had captured. I even missed the Champions League music in my feverish state and spent most of the first half of the game in a state of stress, panicking that I missed my shot.

During the second half, after calming down somewhat and finally returning my attention to the on pitch action - Villa did the unbelievable, and scored. I don’t think I’ve ever heard a noise quite like it, the ground erupted. At least some of my anxieties had been vanquished and by the time the final whistle went and we had won, I think I was a bit of an emotional wreck - I had been through just about every emotion I could handle for one day.
My final image…
The next day, I loaded up my images onto the computer and decided to see what I could make of what I was sure was a complete wreck of a shoot. To my surprise, I’d actually managed to salvage some shots and after a bit of ‘Photoshopping’ I managed to piece together something that resembled what I had envisaged in my head. Furthermore, Paul had grabbed loads of great shots as well and later that day an email pinged up saying how happy the club were with the images.

I got invited back for the Bologna match, but that’s a story for another day…
Looking back, I think I probably learned two things. Firstly, for all the planning you can never account for every single eventuality. There was no real need for the fans' actions but I guess I should have been more aware of the potential of being in the wrong place at the wrong time. Secondly, it just goes to show that even when the dream jobs come along and you’re so wrapped up in the excitement, you just have to keep a cool head and get the job done. This is not something that comes to me naturally but it certainly paid to persevere and get the shot! As for working with Aston Villa? I hope I get the chance again and more importantly, at plenty more Champions League matches.
Posts you might also like…
About the Author - Ross Jukes is a professional Photographer and Videographer with over a decade of experience. Working in both Digital and Analogue formats, Ross has worked with international clients, had his worked published numerous times and exhibited his work extensively. With a passion for all things photographic, Ross combines his experience, enthusiasm and dedication to his art form to create engaging and educational content for the photographic community.
Disclaimer: All links to Amazon UK/US are affiliated links - you will still pay the same price but I will receive a small commission. All information provided in this blog is intended either for educational or entertainment purposes and is accurate to the best knowledge of the author. However, further research/professional advice should be sort before making purchases/implementing any advice given and no responsibility is taken by the author or parties mentioned here within.