
REVIEW: Ulanzi TT09 VideoGo Travel Tripod
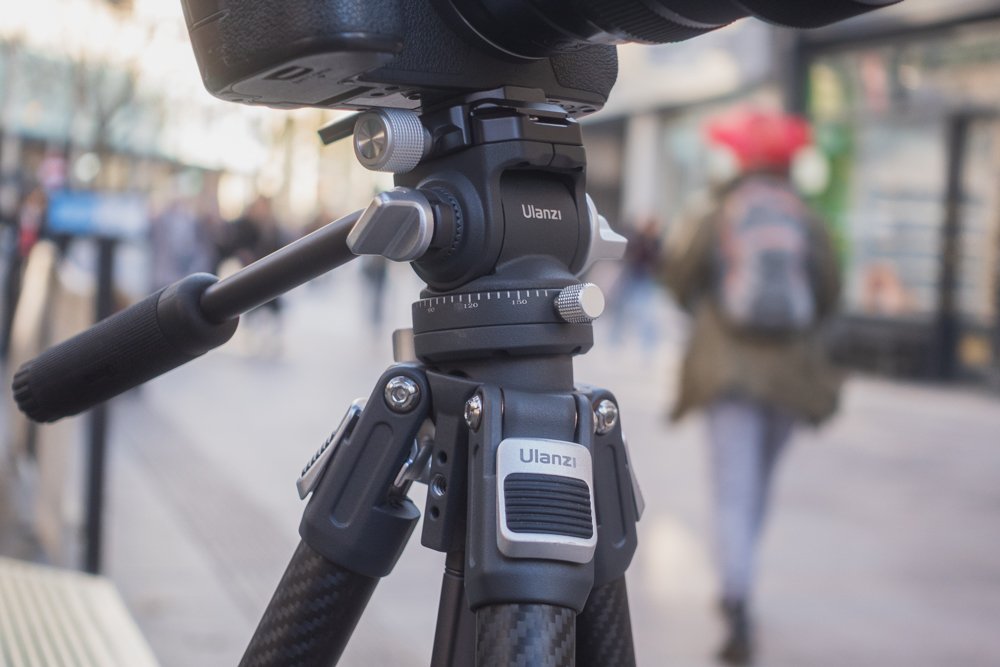
The Ulanzi TT09 VideoGo travel tripod is an innovative solution for photographers and videographers on the move. This compact, lightweight tripod offers a perfect blend of portability and pro features. With a 10-layer carbon fiber construction, quick release options, high load capacity, and a built-in toolkit enhance versatility and convenience, it's a top contender in the travel tripod market.
Compact, lightweight, travel tripods are always a tricky concept to get right. On the one hand, it's easy to make a travel tripod that's too lightweight, to a point where it compromises on build quality and stability once you've mounted a camera. Otherwise, making it too heavy or robust doesn't make it that friendly to travel with, along with other compromises. But, maybe Ulanzi has found a perfect middle ground.
Ulanzi's TT09 VideoGo travel tripod is a compact, robust, well-built tripod designed for photographers and videographers who are always on the move. It aims to provide a stable shooting platform for compact and smaller cameras without the bulk or heft that's often associated with most pro-grade tripods. This is made possible thanks to its use of a 10-layer carbon fiber construction, which makes for good eye candy.
PLEASE NOTE: I WAS SENT THIS ITEM FOR REVIEW BUT NO OTHER PAYMENT OR CONTROL WAS EXCHANGED FOR PUBLISHING THIS UNBIASED REVIEW
But, besides looking cool, the use of carbon fiber entails superbly lightweight portability, as well as being stronger and stiffer than steel. Consequently, the Ulanzi TT09 VideoGo tripod weighs just 1.46kg (~3.21lbs), which is lighter than some other travel tripods that I've used before. However, unlike most other light and diminutive travel tripods, the Ulanzi TT09 VideoGo still retains the pro features that we all love.
Video Source - Ralph Mayhew Photography via YouTube
This includes a huge range of quick release options, compatible with the most popular systems that a lot of photogs are familiar with (more on that later). Plus, the ball head enables easy transitions; handy for those who need to quickly switch between dynamic and static shooting. With a lot more goodies and perks, is the Ulanzi TT09 VideoGo the best travel tripod on the market today, or are there better options out there?
What Makes The Ulanzi TT09 VideoGo Travel Tripod So Good?
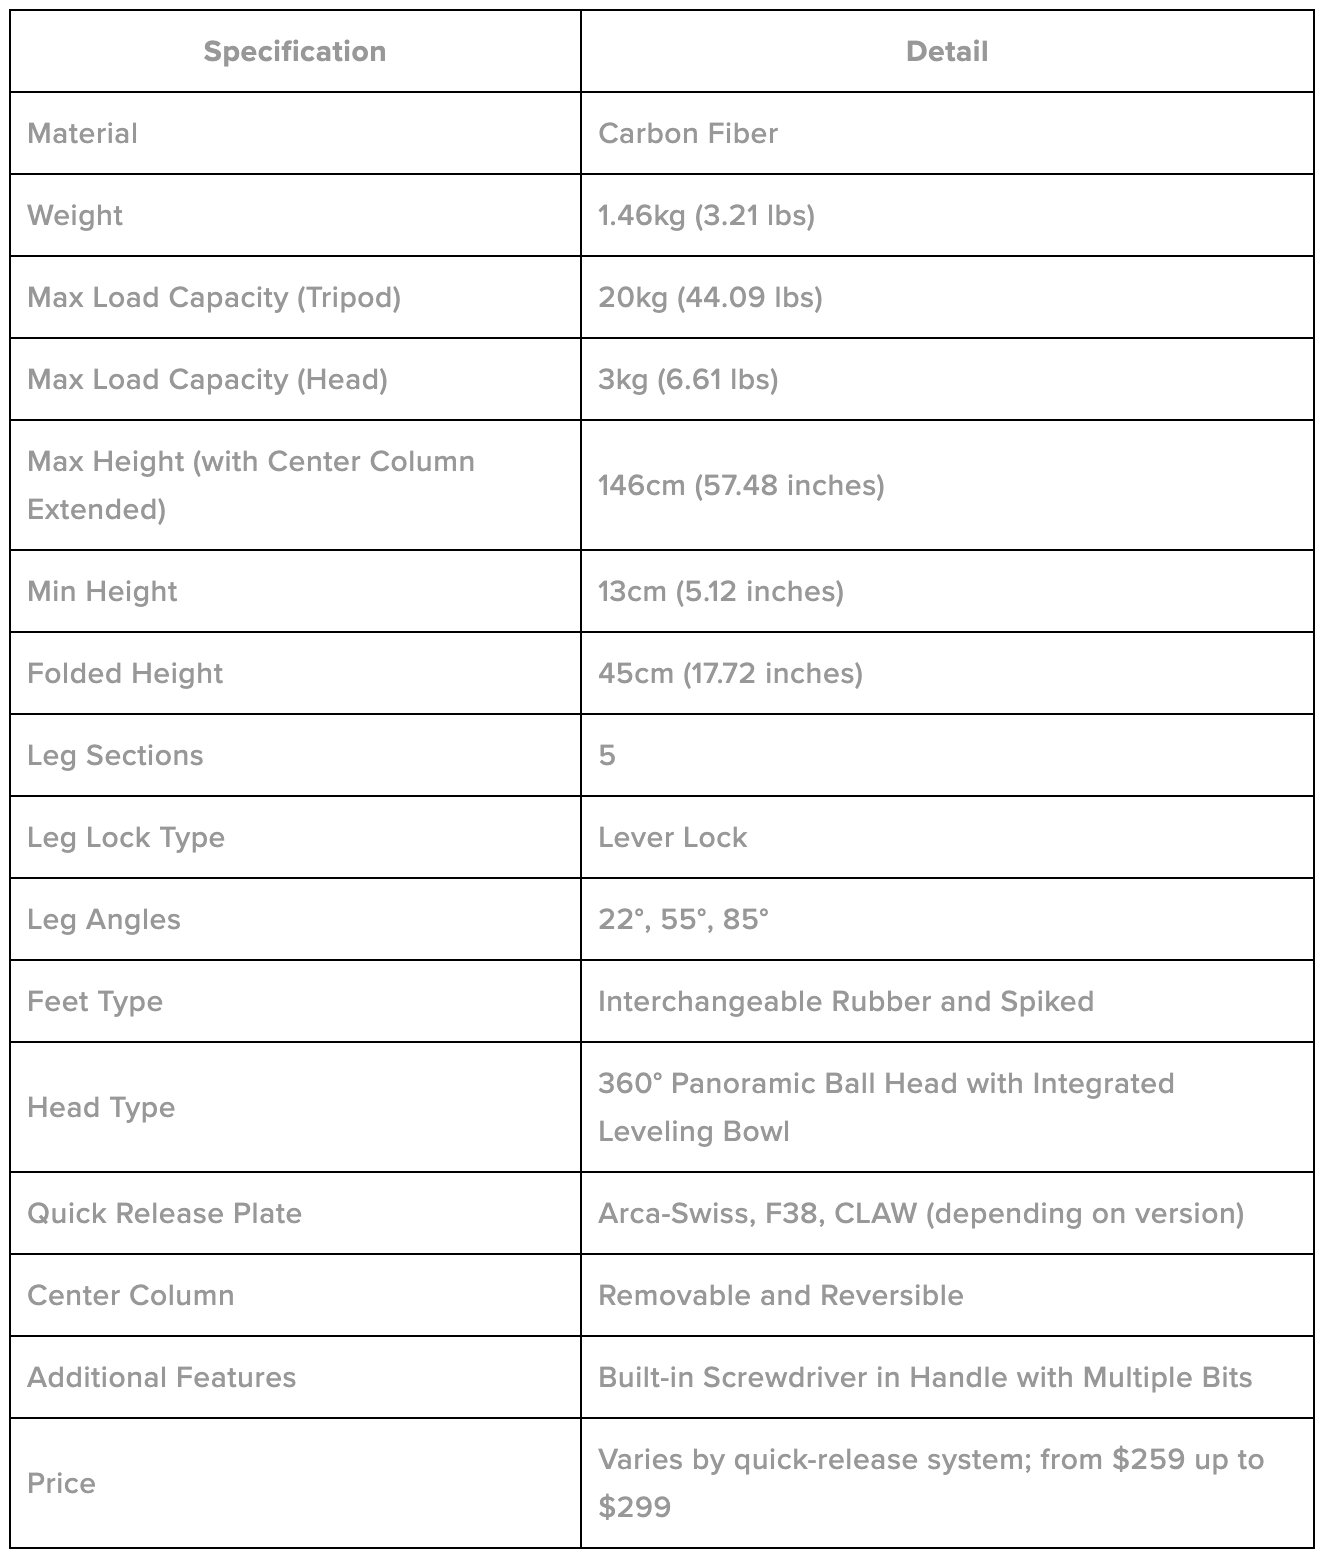
While the Ulanzi TT09 VideoGo travel tripod is classed as a travel tripod, this doesn't mean that you're only limited to using smaller cameras with it. In fact, the TT09 VideoGo offers a maximum load capacity of 20kg on the tripod. Meanwhile, the ball head could support up to 3kg of weight. This weight threshold should be more than enough for most cameras, including a wide array of popular medium-format cameras.


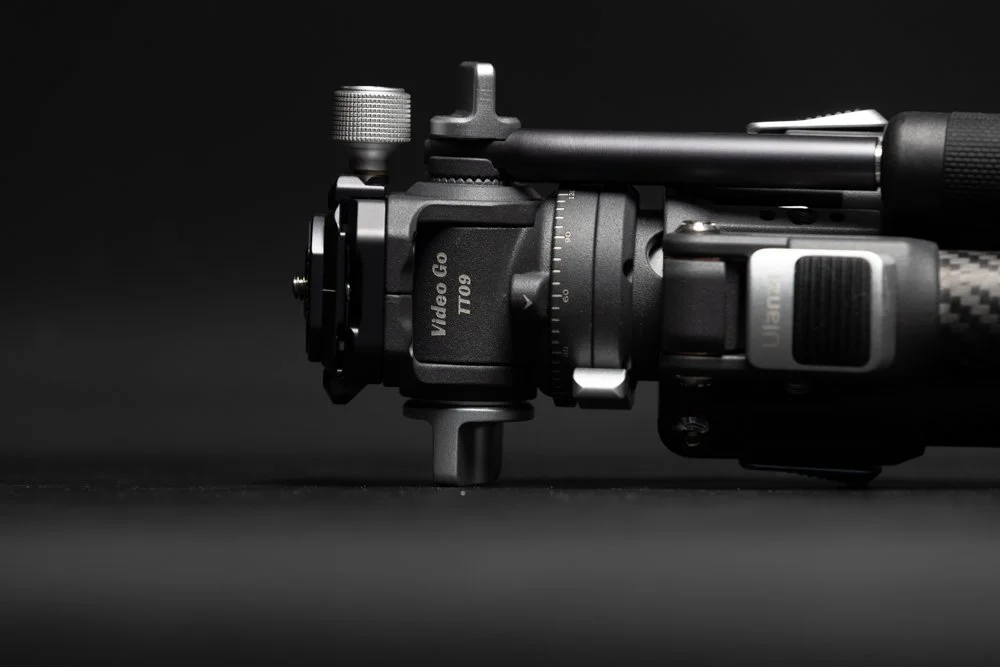
Also, about those quick release options on the TT09 VideoGo, which is compatible with Arca-Swiss, F38, as well as CLAW systems. Once again, this opens up the possibilities for mounting options and cameras that you would use with the TT09 VideoGo. In my case, most of the gear in my arsenal fits the Ulanzi TT09 VideoGo with no issues. Moreover, the TT09 VideoGo's center column is removable and reversible.


The tripod feet could also be switched to adapt to different terrains, which is a crucial consideration, given how limiting some travel tripods can be when it comes to where and how you can utilize them. Speaking of the feet, the Ulanzi TT09 VideoGo's tripod legs have three opening angles - 22°, 55°, and 85°. The minimum shooting height is 13cm, with a maximum height of 146cm. This should be compact enough for travel.

Another neat bonus is Ulanzi's inclusion of a built-in toolkit within the handle of the TT09 VideoGo. Thus, it can provide you the ability to make on-the-go adjustments, tweaks, and repairs to the tripod, without you having to fiddle around for a hex key wrench. The latter is a common omission on some travel tripods, and it makes simply adjusting your tripod an unnecessary chore, so it's nice to see that being included here.


What Is The Ulanzi TT09 VideoGo Best At?
With that in mind, the TT09 VideoGo gets a lot of things right when it comes to engineering and designing the ideal travel tripod, so here's a quick overview of everything Ulanzi has gotten right...
Light & Strong Construction - As mentioned earlier, the use of carbon fiber for the TT09 VideoGo's general construction is much appreciated. Carbon fiber doesn't just ensure maximal durability when compared to many other alternatives, but it could also maintain a lighter relative weight for traveling. Aside from that, most other travel tripods often adopt aluminum alloy, which is often good enough. But, carbon fiber could more than handily cut down on those excess ounces and grams.
Versatile Quick Release System - The Ulanzi TT09 VideoGo's quick release system is more consequential at first glance than it might seem. With compatibility for numerous popular quick release systems - including Arca-Swiss, F38, and CLAW systems - this gives it optimal versatility to switch from one camera to the next. In addition to catering to various camera types and formats, it can also fit your personal preference. For me, this is a highly valuable feature, given the diverse array of cameras and gear that I use daily.
Integrated & Easy To Use Toolkit - It's not uncommon for tripods to require the use of tools for making any fine-tuning adjustments. Or, for re-calibrating your tripod after years of use, where it can get loose after a prolonged working life. Unfortunately, most travel tripods don't feature a clever way of including the tools that you'll need, which is why I often recommend carrying a small case of hex wrenches. But, that's not an issue with the Ulanzi TT09 VideoGo, given that the handle contains an integrated toolkit. There's a healthy mixture of all the hex socket bits you'll need in there for easy maintenance without needing to carry along any additional tools.
Compact Form-Factor - For a travel tripod, it's of course vital that it ought to be easy to travel around with. The fact that it's made of carbon fiber does help to shave off some excess weight from the construction. On top of that, the Ulanzi TT09 VideoGo's compact storage length makes it suitable for backpack stowage and traveling unencumbered. Yet, Ulanzi still finds room to add a half-bowl ball head, making it a huge plus for videographers who need to maintain a level horizon.
High Load Capacity - For a comparatively tiny travel tripod, the TT09 VideoGo has a pretty respectable load capacity when compared to its own weight. This offers really good stability for a larger range of cameras or setups. Therefore, it's not as limiting as some other travel tripods. To further compound that versatility, the Ulanzi TT09 VideoGo's reversible center column, and variable leg length provide additional flexibility, which can be helpful for creative shooting positions and angles.
Video Source - NVU Films via YouTube
Does The Ulanzi TT09 VideoGo Travel Tripod Have Any Flaws?
Although it's a superb contended among the best of the best travel tripods that you can buy today, it does not overshadow the fact that Ulanzi's TT09 VideoGo does have its fair share of flaws, such as...
Load Capacity Can Still Be Restrictive - Sure, the load capacity on the TT09 VideoGo overall is actually quite good. But, there are some travel tripods out there that could manage another 5kg of weight or so for their peak load capacity. This means that, unlike some of its rivals, the TT09 VideoGo can still be restrictive with heavier camera setups. So, do bear that in mind before picking one up. Furthermore, that's just the tripod's max load capacity. When it comes to the ball head, it's rated for 3kg, which further limits the types of cameras that you can mount on it.
Slightly Premium Pricing - The pricing of the TT09 VideoGo is certainly pretty competitive. However, it's still high enough that budget-conscious buyers might need to consider looking elsewhere, or if you're willing to save a few more pennies to invest in one over the long run. Ulanzi's pricing on the TT09 VideoGo does vary depending on which quick release system you choose. The Arca-Swiss variant is the cheapest, at $259, and the Claw version is priced at $279, while the F38 model is the costliest, setting you back $299.
So, Is The Ulanzi TT09 VideoGo Travel Tripod Worth Getting?
When taking into account cost-to-performance, the Ulanzi TT09 VideoGo travel tripod provides a massively compelling option for those needing a very travel-friendly tripod... But, wouldn't want to compromise when it comes to packing in professional capabilities, versatile feature-set, and intuitiveness. Granted, there are a plethora of options in the same price bracket, such as the Manfrotto Befree Live or the HEIPI W28.
The TT09 VideoGo does set itself apart with some unique design choices though, like the handy-dandy tools integrated into the handle. It's a small touch, but it makes a huge difference when you're out on the field. It continues to stand out for its robust carbon fiber construction, immensely versatile quick-release system (as well as its wide compatibility), and clever half-bowl ball head design. Altogether, it's a great option.


Ulanzi has struck a nice balance between portability, convenience, build quality, and functionality, and that gets even better when you consider the competitive price tag. Although, there are a few factors to consider, such as the load capacity. While it does have its limitations, it's pretty good when compared to a lot of rival travel tripods. The TT09 VideoGo is able to support a significant load, while retaining its compact size.

It helps that it's pretty lightweight, too. For what you get, the Ulanzi TT09 VideoGo will undoubtedly appeal to videographers and photographers who require a reliable travel tripod for on-the-go shooting. Though it's not going to outright replace a hefty, chunky, feature-packed pro-grade tripod, for something as diminutive as the Ulanzi TT09 VideoGo, you can get pretty close, but without the weight or the cumbersomeness.

Specs And Details

About the Author - Ross Jukes is a professional Photographer and Videographer with over a decade of experience. Working in both Digital and Analogue formats, Ross has worked with international clients, had his worked published numerous times and exhibited his work extensively. With a passion for all things photographic, Ross combines his experience, enthusiasm and dedication to his art form to create engaging and educational content for the photographic community.

REVIEW: Arca Swiss Core Leveller 60 Classic
For professional photographers, a reliable tripod head is essential. Arca-Swiss offers the Core 60 Leveler, a premium yet more affordable alternative to their C1 Cube. While it lacks some features of the pricier model, the Core 60 provides 80-90% of its capabilities at a lighter weight. It boasts a three-geared system for precise adjustments, ideal for various photography types. However, its limited tilt range and higher price might deter some. Overall, its precision and build quality make it a worthy investment for serious photographers.
Among the most understated yet vital components for any professional photographers kit is a good tripod head. Not only is a solid and reliable tripod head important to capture precise and stable shots, but it's also crucial for allowing smooth yet controlled movements when you need to tilt and pan your camera. While there are plenty of fantastic tripod heads on the market, Arca-Swiss still manages to stand out.
They make some of the most legendary tripod heads around, and in particular, with their selection of top-end, premium geared heads. Not too long ago, I discussed the merits with Arca-Swiss's flagship C1 Cube geared head. While it's a nearly perfect bit of kit for professional photographers, the C1 Cube is incredibly featured packed. For most pros, they may not need all the C1 has to offer, but may opt for something a little more compact but still precise!
PLEASE NOTE: I WAS SENT THIS ITEM FOR REVIEW BUT NO OTHER PAYMENT OR CONTROL WAS EXCHANGED FOR PUBLISHING THIS UNBIASED REVIEW
Video Source - Arca Shop via YouTube
For those that still want something close in terms of versatile engineering and clever design, its little brother, the Core 60 Leveller Classic might be the right fit for you. What the 60 Leveller loses in weight in features, it certainly does not lack any of the build quality and premium feel of the larger C1 - yet with plenty of capability for most applications. The 60 Leveller is aimed to fit the budgets and camera bags of those that want Arca-Swiss standards in an altogether more accessible form.

While it does miss out on some features compared to the pricier C1 Cube, the Core 60 is pretty much 80% or 90% of the way there in terms of what you're getting. Yet, the Core 60 is cheaper than the C1 Cube, yet it's more lightweight too, which is perfect for on-the-go photographers. Nevertheless, compared to plenty of the Core 60's contemporaries from other brands, the Arca-Swiss tax still applies, so is it really worth it?
What Makes The Arca-Swiss Core 60 Leveler (Classic) So Special?
Arca-Swiss definitely make premium products that may be seen as high-priced, that's by no means meant to be dismissive of the brand. Most of their products, such as geared tripod heads, are on the higher end of the scale, so it's no surprise that when compared to more budget options, they can appear very expensive. On the other hand, though, Arca-Swiss is well-regarded within the community for its precision, build quality and functionality.
The most commonly overlooked reasoning for the perceived higher-prices are the outstanding quality of the products, these things are built to last. As an Arca-Swiss user of many, many years, I can stand testament to this! From the precision milling of the aluminium parts to the quality of the anodising, the standard of these products speaks for itself - they are built to last! With care, there is no reason why they can’t last for decades and with that, they must be seen as long-term investments.

Their geared heads, such as the Core 60 Leveler, embody the brand's spirit wholeheartedly. As such, the Arca-Swiss Core 60 Level offers photographers a tripod head that combines speed and ease of use as well as the ability to manage meticulous and granular control. So, despite its (very) premium price tag (not as much when you see how much the C1 Cube costs), it's quite a compelling pick for pros and enthusiasts.
One of the standout features of the Core 60 Leveler (Classic) is its three-geared system that allows you to quickly make adjustments like tilting or panning your camera. Yet, that speed doesn't come at the cost of precision and accuracy, as that Arca-Swiss three-geared system ensures photographers a precise camera position and adjustment, making it ideal for macro, still life, panoramic, or architectural photography.

For my travels, I combined this head with the legs from the HEIPI W28 3-in-1 Travel Tripod for a killer Combo!
As for the range of adjustment and calibration that you have, the Core 60 Leveler has a +/-10º range, for both left-right and fore-aft tilts. Admittedly, this might be limited to some shooting scenarios that you'll encounter. Thus, the Core 60 Leveler is specifically optimal when used for those who mostly shoot at eye level and other similar scenarios. Meanwhile, it features a panning range of 360º, upper and lower.
What Should You Consider Before Getting The Arca-Swiss Core 60?
Expanding more on the aforementioned +/-10º tilt range, I pointed out prior that for architectural, as well as macro photography and the like, this limited tilt range shouldn't likely be an issue for most. Besides the specific scenarios here though, this does mean that, with only its +/-10º tilt range, it might not be the best all-rounder geared tripod head for every photographer, more so if you're shooting scenario varies a lot.

For instance, for photographers and enthusiasts who want to try out different mediums of photography, a small range of tilt movement like this can be highly limiting to what you can shoot at any given time when you have the Core 60 equipped. With that being said, if the Core 60 Leveler doesn't do it for you, there's a solution for this, and it comes in the form of the Core 60's bigger brother, the Arca-Swiss Core 75 Leveler.
The Core 75 Leveler offers a wider tilt range of +/-15º, which opens up a wealth of possibilities for what sort of photography you're into, or what kind of shots you need to take, depending on the scenario. If you need to take shots from a lower or higher angle, the extra +/-5º worth of tilt range could be a godsend. It should be noted, however, that the Core 75 is heavier and slightly more costly than the Core 60 Leveler.

On the flip side, the Core 75 does feature additional pull-out knobs for extra convenience, when you need to adjust it. The Core 60, on the other hand, doesn't have this. Regardless of which one you choose, Arca-Swiss have outdone themselves with the build quality. They feel durable and robust, yet retain a compact form factor and lightweight design, making them the ideal companion for lugging around between shoots.
What Are The Upsides To Choosing The Arca-Swiss Core 60?
Given how much I've praised it thus far, there are plenty of fantastic reasons why you'd pick the Arca-Swiss Core 60, despite the countless alternatives on the market. Here are just some of those top reasons:
High Precision & Accuracy - The three-geared system enables you to make meticulous and granular tilt or pan adjustments. This ensures that your camera is always positioned exactly when you need it to be. It alone is one of the best pieces of design that Arca-Swiss have integrated into its tripod heads, such as the Core 60 Leveler (and one that features the Classic quick release that I have here, as well as the flipLock or monoball quick releases from Arca-Swiss).
Built Like An Absolute Tank - Another typical Arca-Swiss thing with the Core 60 is their overbuilt design and top-notch build quality. It not only feels premium to use in the hand, but, and given how long all the stuff they've made in the past have fared over these past many years, it helps to ensure longevity as well as durability, even under rigorous use. During my time with the Core 60 (and the C1 Cube), I'm confident that they'll perform reliably for quite some time, and I can always rely on them, even years from now.
Compact And Lightweight - Although they're built like an absolute unit, the Core 60 (as with a lot of Arca-Swiss's other products) are still small and light enough that you can comfortably carry these with you, as you move from one shoot to the next. Even more so, when you pair it with the right tripod. So, for all you street photographers or photogs who like to be on the move most of the time, the Core 60 shouldn't slow you down.

Okay, But Are There Any Flaws To The Arca-Swiss Core 60 Leveler?
Despite its many upsides though, the Arca-Swiss Core 60 has its fair share of flaws, negatives, and things that could be better or are restrictive to some photographers. These include:
Limited Tilt Range - Just like how I've stressed before, the Core 60 has a fairly restricting +/-10º tilt range, which can be quite limiting to some photographers. Certain shooting scenarios, particularly when angling the camera upwards from a low position, will make the Core 60 difficult to use, and would otherwise need you to reposition multiple times in situations like that. Once again, this is a trade-off that you'll have to be wary of before getting the Core 60, and if you need a greater tilt range, the Core 75 should be on your list.
Premium Price Tag - The Core 60 Leveler (with the Classic quick-release system) costs around £550. This is going to vary depending on where you're shopping and whether or not you're able to snatch a discount or a promo code in the meantime. Nevertheless, at this premium price point, it's undoubtedly a deterrent for some would-be buyers, especially hobbyists or beginners. Still, given Arca-Swiss's penchant for world-class build quality, impactful performance, and sheer versatility, the Core 60's high cost isn't entirely surprising.

Is The Arca-Swiss Core 60 Leveler (Classic) Really Worth The Asking Price?
All in all, the Arca-Swiss Core 60 Leveler (Classic) is a testament to precision engineering and design. The amazing features and performance can at least justify the cost. Particularly so, among professionals and serious enthusiasts that demand the best in the business, and those who need a tripod head that can perform reliably, and ensure great precision. Though as previously mentioned, any concerns around cost are easily allayed when viewed as an investment into a piece of kit than can potentially last decades!
Granted, while the Core 60's limited tilt range would restrict you to a select few and specific photography genres and shooting scenarios, its compact design, great build quality, paired with precision controls, are the icing on the cake. The Arca-Swiss Core 60 is a highly capable and valuable tool, and once you consider what your shooting needs are to keep within that limited tilt range, I doubt you'd regret getting one!
Specs And Details

About the Author - Ross Jukes is a professional Photographer and Videographer with over a decade of experience. Working in both Digital and Analogue formats, Ross has worked with international clients, had his worked published numerous times and exhibited his work extensively. With a passion for all things photographic, Ross combines his experience, enthusiasm and dedication to his art form to create engaging and educational content for the photographic community.

REVIEW: FXLion Nano One V-Mount Battery
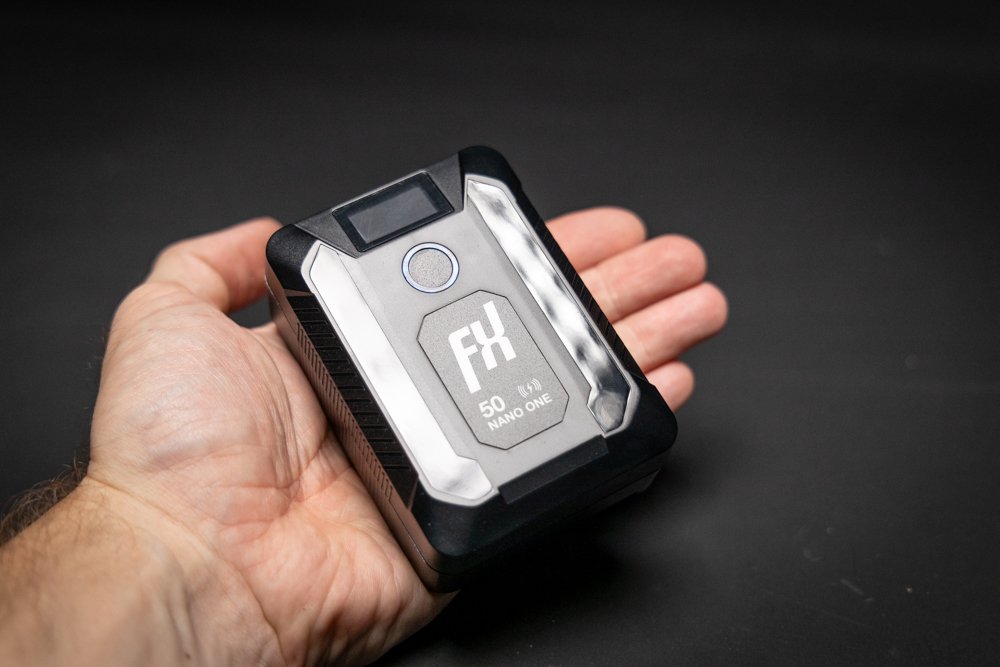
The FXLion Nano One V-mount battery stands out in the camera battery market with its compact design, 50Wh capacity, and unique 15W wireless charging pad. Not just for cameras, it doubles as a power bank for phones and laptops. While lightweight and travel-friendly, it's pricier than other batteries in its class and may require multiple units for longer shoots.

One of the most annoying things about handling a camera - and most videographers will no doubt agree with me on this - is its batteries. Given how powerful cameras are, and particularly so if you're using your camera to record long 4K or even 8k videos and grabbing shots left and right, batteries are the bane of every camera. They don't last nearly long enough, and despite their short battery life, those batteries are huge!
As such, it's not a surprise that there's been an arms race to develop V-mount batteries that could hold a long charge - ideally, long enough for a solid filming session. Yet, it is compact and lightweight enough, as to be readily lugged about from one shoot to the next. The latest entrant in this ever-expanding market, is FXLion and their latest Nano One V-mount battery, which packs something truly ground-breaking.
PLEASE NOTE: I WAS SENT THIS ITEM FOR REVIEW BUT NO OTHER PAYMENT OR CONTROL WAS EXCHANGED FOR PUBLISHING THIS UNBIASED REVIEW
Video Source - NewsShooter via YouTube
On the surface of it, the FXLion Nano One is your typical V-mount battery, showcasing some noteworthy evolutions from V-mount batteries of yesteryear. For starters, the FXLion Nano One is quite dense, which pairs a compact and lightweight package, yet still packs in a 50Wh battery pack. However, if you've found that your phone or Bluetooth earbuds are running low on charge, then the FXLion Nano One could also help.


This latest FXLion Nano One model that I have here now features a 15W induction wireless charging pad on the back of the battery. In so doing, and when you're in a pinch, all you need to do is pop your phone or earbud case onto your FXLion Nano One V-mount battery and it'll charge it and keep it topped up. It'd also function as a power bank too, and its 14.8V battery could readily charge your MacBook or laptop, too. This has been an absolute lifesaver for me on more than one occasion already!
What Does The FXLion Nano One Battery Do Differently?
In the often staid world of camera batteries, the FXLion Nano One is a rather revolutionary device. While it's a pretty great V-mount battery for any smaller camera rigs or other gimbal-mounted equipment, this is just the start of what it could do. As I mentioned earlier, it could double as a power bank for any phone, and through the power of USB-C and a decently high 2.4A max output, it could handily charge a laptop.

On top of that, it's a battery bank with a handy-dandy 15W wireless charging pad. There have been many a day where I'd forget to plug in my phone for the day or I'd run through a full charge on a really long and busy shoot, without realising just how close my phone's battery was to dying. In the past, this could entail me running around looking for a wall outlet and borrowing a spare cable to charge my phone in a panic.
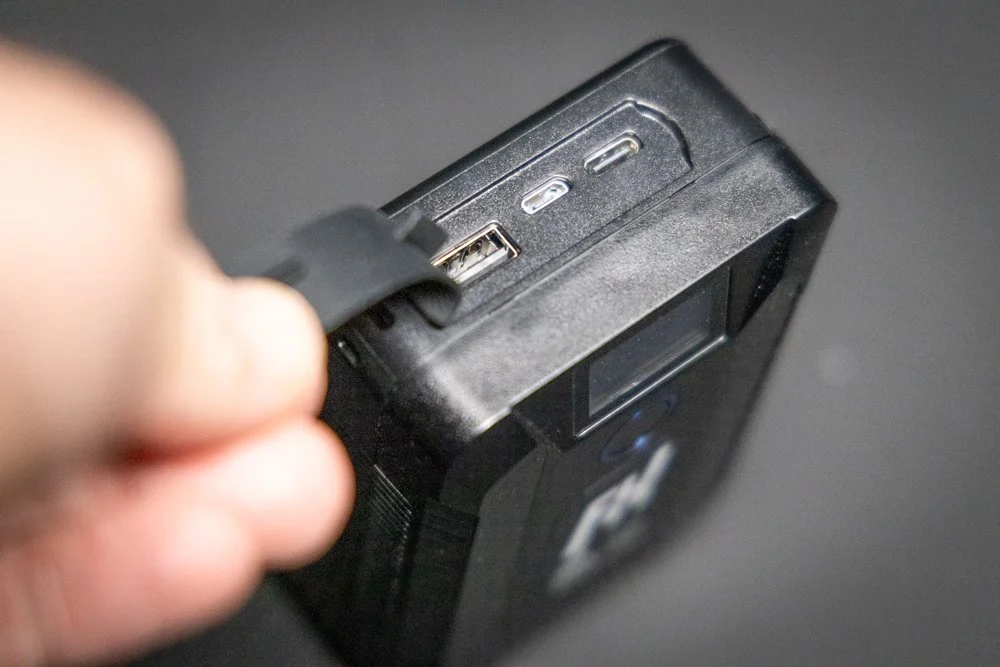
These days, though, all I needed to do was either plug my phone into the FXLion Nano One - if I wanted to charge it up more rapidly. Or, if time isn't of the essence, I'd just put my phone on the Nano One's wireless charging pad, and let it slowly trickle in some power. It's also neat that for charging input and output, the FXLion Nano One v-mount battery has a plethora of options, including USB-A, USB-C, Micro USB, and D-Tap.
When the Nano One isn't charging my phone, and I'm only reserving it to power my camera, I could get a solid 2 hours worth of filming per battery, on a full charge. That's pretty decent, and you could keep track of how much battery you have left through its tiny LCD display and the LED indicators. Combined with the fact that it's one of the smallest V-mount batteries available, it's perfect for on-the-go professionals.
What Are The Benefits Of Using The FXLion Nano One?
Having used it for some time, I've noticed quite a few upsides to using the FXLion Nano One compared to a lot of other V-mount batteries that I'm used to, and here are just some of them:
Compact And Lightweight - Weighing in at just 310g, the FXLion Nano One is among the lightest as well as one of the smallest V-mount batteries on the market. Thus, for those who find themselves travelling a lot from one shoot to the next, these are way easier to carry around with you. It's even travel-friendly, as the Nano One conforms to TSA regulations for carrying batteries under 100Wh into planes.
Versatile Charging Options - Another nice little creature comfort is noticed when your Nano One runs out of charge. When you need to top it back up, the FXLion Nano One can be charged up using USB-C. Thus, it eliminates the need for dedicated (and often cumbersome or bulky and proprietary) chargers.
Built-In 15W Wireless Charging Pad - This is something that I keep bringing up, given how useful it's been to me during my time using it. That wireless charging pad is awesome and a lifesaver for the unexpected moments when your phone needs a quick charge.
Native Protection And Safeguards - As a tool for professionals, the FXLion Nano One remains reliable in a diverse array of environments. It could function properly, even when you're surrounded by a chilly -20°C winter storm, or the scorching 55°C desert heat. Moreover, FXLion has built-in additional safeguards like over-current protection, over-charge as well as over-discharge protection, and overheating resistance, as well.

How About The Downsides, Are There Any For The Nano One?
For all its many pluses, though, the FXLion Nano One V-mount battery isn't perfect, and there are a couple of major downsides to consider before buying it:
High Cost - The FXLion Nano One is hardly the most affordable option available when it comes to V-mount batteries in its class. Depending on where you're shopping and whether or not there's a discount running, a Nano One (with the updated design that includes the wireless charging pad) runs you at least £122. There are certainly cheaper alternatives, even if it might not come with the Nano One's many features.
Limited Battery Capacity - Another noteworthy point of consideration is the battery capacity of the Nano One. 50Wh is more than sufficient for a lot of enthusiasts and pros, like myself. But, for those long shoots and filming sessions, it might not be enough. At least, not if you're willing to carry a few Nano Ones with you. Therefore, if you need that added peace of mind and convenience, consider the Nano One's bigger siblings, the FXLion Nano Two and FXLion Nano Three, with 98Wh and 150Wh battery capacities, respectively.
Is The High Cost Of The FXLion Nano One Battery Worthwhile?
The FXLion Nano One is undoubtedly a premium product, given its relatively high price tag compared to a lot of other V-mount batteries that feature around 50Wh capacities. Nonetheless, the Nano One positions itself as a really unique contender in the market, given its inclusion of a 15W wireless charging pad in this new, updated model. That uniqueness alone and its robust feature set give it a pretty distinct edge.
When looking at a price-to-feature ratio then, the FXLion Nano One is definitely worth considering for any mobile, on-the-go photographer or videographer. It has a compact design that packs versatile power, and with its flexible nature of equally doubling as a power bank for your phone and other electronics, FXLion's Nano One V-mount battery is sure to find a place in your toolkit, particularly for those out in the field.
Specs And Details

About the Author - Ross Jukes is a professional Photographer and Videographer with over a decade of experience. Working in both Digital and Analogue formats, Ross has worked with international clients, had his worked published numerous times and exhibited his work extensively. With a passion for all things photographic, Ross combines his experience, enthusiasm and dedication to his art form to create engaging and educational content for the photographic community.

REVIEW: Bellroy Venture Sling 6L
The Bellroy Venture Sling 6L is a stylish and functional sling bag designed for urban adventurers and photographers. It offers quick access, and easy organization, and is made from 100% recycled, water-resistant fabric. Despite its compact size, it maximizes storage space. However, its high price tag of £114.95 may be a deterrent for some.
For any roaming photographer, a good carry bag is a must-have. However, more often than not, a typical camera bag is a tad too large and bulky, and may even be unnecessary if you're not carrying a lot of gear. On the other hand, not having a bag and simply chucking all your gear in your pockets or carrying your heavy camera around your neck is a huge pain. So, what about something like the Bellroy Venture 6L?
A well-designed sling bag is usually the best compromise between having a bag to keep your camera and photog gear in and ensuring that it's compact and light enough to keep yourself unencumbered and sleek while you're on the move. Bellroy's Venture Sling 6L is among the most popular options in photography circle that I've heard a lot about, so how does it perform in the real world, and is it worth the price tag?
PLEASE NOTE: I WAS SENT THIS ITEM FOR REVIEW BUT NO OTHER PAYMENT OR CONTROL WAS EXCHANGED FOR PUBLISHING THIS UNBIASED REVIEW
Video Source - Pack the Hackers via YouTube
On first impressions, the Bellroy Venture Sling 6L is certainly a pretty stylish and functional everyday carry sling bag well-designed for urbanites and metropolitan adventurers. So, while I'll be looking at it from the perspective of a photographer, it's versatile enough for students, commuters, or if you need something that's bigger than jacket pockets while you're walking about. Looking further, there's more to like, too.

The Bellroy Venture Sling 6L has a super-sleek design and features ample storage given its compact size. Yet, it comes with a plethora of nice-to-have features and creature comforts, making it perfect for people who need to haul along their everyday carry (EDC) and daily essentials, but without the massive bulk of a backpack. However, given its (spoiler alert) high price tag, is Bellroy's Venture Sling 6L really worth it?

How Does Bellroy Attempt To Re-Engineer The Sling Bag?
So then, what does Bellroy and its Venture Sling 6L do differently compared to other sling bags that you'll find on the market? One of the key challenges that Bellroy aimed to tackle was the needs of urbanites when designing this sling bag, as they wanted a bag that was both stylish and versatile. In other words, it needs to look good, while also doing what a bag really needs to do - carry as much stuff as optimally as possible.
With that in mind, the Bellroy Venture Sling 6L has been designed for quick access and easy organisation. Therefore, no matter how you intend to wear it - either as a messenger-style bag or a back-sling - getting access to all the pockets or compartments is really easy. Keeping stuff organised is just as effortless, as it comes with loads of smaller pockets and sleeves in the main compartment for storing different things.

There's a zipper pocket for slimmer items, if you'd like to stow that away from prying eyes and to keep it secured. Then, there are two smaller open pockets that are ideal for keeping your phone, wallet, or a small notepad. Despite how its clean, simplistic, uncomplicated exterior may be perceived, the main compartment was large enough, in my case, for a small umbrella, water bottle, snacks, and even a handheld game console.
Of course, for most of my use case, I stowed away my camera in here, and it fits just snugly. Plus, when I needed to grab my camera out in a jiffy to take a quick shot, the cool ambidextrous design of the Bellroy Venture Sling 6L meant that no matter how the bag was worn or oriented, I could get access to all of my gear very easily. Otherwise, if the 6L is not big enough, Bellroy also offers a larger 9L variant, too.

For context, I ended up using the sling to safely stow my GFX 50S II with 35-70mm lens and although the zipper felt a touch tight, it still fits! But that is a chunky medium format camera and it still worked a treat! It would be absolutely perfect for smaller, mirrorless cameras and positively cavernous for little compact cameras with plenty of room for additonal items!
Where Does The Bellroy Venture Sling 6L Do Right On?
TL;DR, here are some of the many pros and benefits of the Bellroy Venture Sling 6L that you'll experience when you buy and use one of these:
Durable Material Choice - Given that it's made from 100% recycled, water-resistant woven fabric, it's both eco-friendly and built tough. In my testing, it's certainly robust enough to withstand day-to-day wear and tear, like constantly packing into jam-packed buses and trains, or when I chucked it aside. If you're into the sustainability side of things, it's also nice to hear that Bellroy uses leather-free composition here.
Excellent Use Of Space - Besides just how optimal this tiny sling bag was able to maximise how much space it affords you, those pockets are made with abundant attention to detail. The lining of each pocket is very soft, ensuring that fragile items like unprotected phone screens, won't get scratched easily. Moreover, the generous padding all around ought to offer a decent amount of protection, especially for your camera.
Easy Access - Getting at whatever you've stowed away inside the Bellroy Venture Sling 6L shouldn't be an issue, as the double zippers are often within easy reach, no matter how you wear or orient the bag. Speaking of, you can carry it in numerous ways, either as a messenger bag or a back-sling style.
Purposeful Design & Aesthetics - Bellroy's products are often well-regarded for their sleek design language, and the Venture Sling 6L is no different. There are 6 unique colours to choose from, and no matter how tiny it might appear, it's no doubt able to accommodate more stuff than you might expect.

What Are Some Negative Aspects To Consider, Instead?
Although, while I've sung praise for Bellroy's neat sling bag here, it's not perfect, and there are certainly a few downsides that you have to get used to if you're wearing one:
Tiny & Tight Front Pocket - I haven't yet mentioned the front pocket of the Venture Sling 6L, and that's mainly because it's mostly for very small items. The front pocket is far too small and tight, which severely limits what you can store there. Most of the time, you might be able to keep a pair of cables, and other small, loose items.
Shoulder Strap Buckles - While these are a great design touch, the dual buckles on the Venture Sling 6L's shoulder strap might be considered somewhat redundant. In my experience, I've found that just a single strap is more than enough, and I do wonder how much more cost-effective that would've been. Even the dual zippers that we mentioned earlier, as great as they are, might also seem fairly redundant, whereas a single zipper might've sufficed.
High Price Tag - If you're not familiar with Bellroy products before, then this is normally the major deal-breaker for a lot of people, and that's the price. Here in the UK - and the cost might vary depending on where you're shopping and if there's a discount available - the Bellroy Venture Sling 6L costs £114.95, which is quite pricey for a sling bag.
Video Source - Danny Packs via YouTube

Should You Consider The Bellroy Over Other Sling Bags?
Given how costly it is, it's tough to recommend the Bellroy Venture Sling 6L to the vast majority of people. After all, trying to justify spending over £100+ on any bag or backpack is by itself a significant expense. In addition, you could easily get similar sling bags on the market for a mere fraction of the price that Bellroy charges for its options. No doubt, you could get a pretty close experience with cheaper bags, as well.
However, when it comes to the premium options, there aren't that many that could rival what the Bellroy Venture Sling 6L can offer. It's undoubtedly a top contender in the world of premium everyday carry bags. With its blend of sleek styling, purposeful functionality, ease of use, and sustainable construction, it's one neat sling bag for a lot of urban adventurers out there, and more so for outgoing street photographers.
Specs And Details

About the Author - Ross Jukes is a professional Photographer and Videographer with over a decade of experience. Working in both Digital and Analogue formats, Ross has worked with international clients, had his worked published numerous times and exhibited his work extensively. With a passion for all things photographic, Ross combines his experience, enthusiasm and dedication to his art form to create engaging and educational content for the photographic community.

REVIEW: Fujifilm GFX 50s II With GF 35-70mm
Fujifilm's GFX 50s II, paired with the GF 35-70mm lens, offers unparalleled image quality in the medium format market. Despite its compact design, it captures sharp, high-resolution photos, excelling in dynamic range. However, it falls short in video recording and autofocus capabilities. Ideal for those prioritizing image quality, it's a significant investment in the photography realm.
The medium format camera landscape is ripe with fantastic options, and for quite some time, Fujifilm has had a lot of winners in this space. The brand's medium format range is well-known for its great build quality, as well as superbly sharp images. There's no wonder why they've earned themselves a very loyal audience and passionate fanbase. Lately, Fujifilm has continued to double down on the medium format market.
Their latest entry and addition to the family line-up is the GFX 50s II, a (relatively) more affordable, entry-level alternative amongst pricey digital medium format mirrorless cameras. The goal is simple - bring the world of high-resolution photography to a much wider and broader audience, especially for those who're likely new to this segment, or are finally making the jump and are upgrading from their current set-up.
PLEASE NOTE: ThIS CAMERA WAS ORIGINALLY LOANED TO ME BY FUJI. HOWEVER, I LIKED IT THAT MUCH, I PURCHASED MY OWN VERSION SHORTLY AFTER.
Video Source - Dustin Abbott via YouTube
It's an even more compelling package when you pair the Fujifilm GFX 50s II with the brand's GF 35-70mm lens. Featuring an impressive 51.4MP sensor, as I've experienced thus far with my time using the GFX 50s II, it manages unparalleled image quality and sharpness, capturing every minor detail with an impressive level of fidelity and resolution. From a technical standpoint, it's nearly perfect in every single way.


Moreover, the GFX 50s II's sharp and crisp images are equally easy and great to work with in post. So, for those spending a lot of time in the editing suite, they're a treat to spend time on. For those who value the finest image quality above all else, the Fujifilm GFX 50s II and its accompanying GF 35-70mm lens may be the perfect camera for you, Although, it does warrant a significant investment (more on that later).
What's Unique With The Fujifilm GFX 50s II (And GF 35-70mm Lens)?
So then, what's interesting with the Fujifilm GFX 50s II that should get you hooked? Well, for starters, the sensor is a noteworthy highlight - a massive 51.4MP medium format sensor, whose size is larger than full-frame. In short, it allows you to capture more light and detail from a shot, translating to those impressive pics that I got out of the GFX 50s II during my time with it. Yet, it doesn't compromise on weight.
You will be able to see more sample images in my upcoming blog post from japan :)
Rather, the GFX 50s II (and paired with the GF 35-70mm lens) is wrapped up in a compact and lightweight design, despite being a medium format camera. It's relatively portable, which is great news for those such as myself, who are constantly on the move from one shoot to the next. Additionally, the build quality here is a major plus as well, which not only feels great in the hand, but it has a weather-resistant rating, too.

Another boon for taking shots in low-light conditions, the GFX 50s II has in-body image stabilisation, and it helps quite a bit with reducing camera shake. It's made more practical and versatile when you take the GF 35-70mm lens into account. As an F4.5-5.6 retractable zoom lens, it's flexible enough that it can be suitable for a wide range of photography styles and mediums, such as landscape or studio photography.

On that note, it's worth mentioning once more just how awesome the image quality is. Not only are those pictures already pretty great straight out of the camera, but the dynamic range is just as excellent. This is one of the reasons that editing shots that came out of it are so easy and fun to play with, given that you could brighten dark images or highlight additional details without adding too much noise or visual clipping.
Are There Any Considerations That You Need To Take Into Account?
The Fujifilm GFX 50s II isn't perfect though, and there are certain quirks and oddities that you need to take into account before getting one. The first factor you need to be wary of is the downgrade in its viewfinder when compared to the older GFX 50s. The updated 'II' model has a lower magnification, but it's still rather competitive when you look at the current selection of rivals. Then, we have to talk about the autofocus.
It's arguably one of the biggest flaws and it's no doubt the Achilles Heel of the otherwise terrific GFX 50s II, despite how pleasant it was to shoot with. While it now features an up-to-date processor and it's certainly speedier than the outgoing model, it's still not as good as its bigger brother, the GFX 100s. In general, the autofocus system in the GFX 50s II is quite slow, and the eye tracking and face detection are fairly poor.


Compared to other medium format options, the gfx 50S ii IS A FEATHERWEIGHT!
With that being said, unless your subject happens to be looking directly at you, and for a good amount of time, the eye and face detection is not very reliable. It's even worse when your subject moves about a lot, and the autofocus also does a bad job of re-focusing back on the subject. It's subpar enough that most of you might find it better to simply turn this feature off and rely more on manually focusing on a subject.
Another major omission in Fujifilm's GFX 50s II is the lacklustre video recording feature. Unlike its big brother, the GFX 100s, the GFX 50s II doesn't come with 4K video recording. In fact, the best it could do is 1080p at 30fps. Although, credit where credit is due, it's really good 1080p footage, at least. But then again, many of its competitors in this price point could easily manage 4K recording, so that's worth bearing in mind.
Rounding Up The Pros With The Fujifilm GFX 50s II
To keep it brief, I've thoroughly enjoyed my time shooting with the Fujifilm GFX 50s II and the included GF 35-70mm lens, and here's a TL;DR round-up of the best things about it:

Superb & Sharp Image Quality - Once again, the Fujifilm GFX 50s II produces incredibly sharp images, with excellent dynamic range, as well. A lot of credit also goes out to the accompanying GF 35-70mm lens, and together, there's a lot of detail and highlights captured that's unrivalled by a lot of other cameras in its cost spectrum. In some areas, it's even better than certain full-frame cameras out there. With its great dynamic range and reliable in-body image stabilisation, it really helps you to get the best out of every shot.
Robust Build Quality - In the hand, the Fujifilm GFX 50s II feels solid and confidence-inspiring. It's a regular reminder that you're handling something special, yet it's pretty ergonomic, too. Most of its many switches and buttons could be reconfigured and modified depending on what you think is most important and what could be easiest and most accessible to get at. In addition, the plethora of menu options and easy-to-reach dials are comfortable to use for those long shoots, and there's even a display on the top of the body, where you can quickly check your shutter speed or aperture settings. Plus, the rear screen has a good amount of tilt, which is great for portrait photography.
Great User Experience - As I highlighted earlier, the intuitiveness and ease of use of the GFX 50s II is one of the best in the market, and it makes it a joy to handle during a busy shoot. The two command dials can be customised to additional or alternative functions, if you need to. Even its autofocus joystick is easier to use with precision and accuracy. The physical buttons on the back can be re-mapped, and the touchscreen can further be configured to have quicker and easier access to additional menus and options.
Post-Processing Chops - Built-in, there's already a wide selection of various simulation modes as well as its other processing options. You can certainly have quite a lot of fun with these, and it also helps to add a bit more charm to your shots. Nevertheless, given how stunning the image quality and dynamic range are, you get a lot of flexibility while working on your photos in post. Editing additional highlights or pulling in more details from your images are much more pleasant to work with.
Some Downsides That You Need To Look Out For
While it's a darn near-perfect camera for my use case personally, there are certain aspects about the GFX 50s II that you definitely need to be wary of before splurging for one, such as:

High Cost Of Entry - Yes, when compared to other medium format cameras, Fujifilm's GFX 50s II is a great value for money and arguably a fantastic bargain for what it offers in return. However, it's still a fact that the whole package is still pretty expensive, especially for those who are content with their current setups. Moreover, the GF 35-70mm lens can be a hefty investment for beginners or hobbyists, not to mention the cost of the camera itself. Although, for £3,000+ here in the UK - which will vary a bit depending on where you're shopping and whether or not you could get it for a discount - it's cheaper when you get the lens as bundled in with the camera, rather than getting it separately.
Limited Range Of Lenses - The accompanying GF 35-70mm lens that I was using is of pretty great quality. However, I can't help but notice the range of lenses that Fujifilm offers for the GFX 50s II is pretty limited, and nowhere near the wide selection of lenses that you might see with competing brands, such as Canon or Sony. This wasn't an issue for me, but for photographers who often swap out lenses and shoot images within varying conditions or unique situations, this is something you absolutely need to think about.
Lack Of Video Recording - Just like how I detailed earlier, video recording functionality on the GFX 50s II is seemingly an afterthought, or at least, it wasn't intentionally considered seriously for it, in the first place. It lacks the advanced video features that are found in other brands or even its bigger brother, the GFX 100s. Meanwhile, the GFX 50s II can only manage 1080p recording at 30fps, albeit the footage that came out of it was not too bad. If you do need 4K recording and those missing features, you'll need to cough up the extra cash for the GFX 100s, if you're sticking to the Fujifilm ecosystem.
Autofocus And Face/Eye Detection - When seeing just how impressive autofocus and face/eye detection are in other cameras, and how rapidly the tech is evolving around it, Fujifilm's execution with the GFX 50s II does not really hit the mark. The autofocus is quite slow, and the face/eye detection is nowhere near as reliable or as dependable as the AF systems used by its competitors. And when in C-AF, you don't even get any eye detection! The unreliable and oft random way in which the autofocus works may often demand that your subject remains still and looks directly at you.
So, Is The Fujifilm GFX 50s II And GF 35-70mm Lens A Good Purchase?
For those that prioritise image quality above all else, this Fujifilm GFX 50s II and the GF 35-70mm lens is a pretty outstanding package, overall. Despite a comparatively pocketable form factor, the sharpness, level of detail, and extensive dynamic range are some of the best that you can get with digital, medium-format cameras. In some areas, and thanks to its large sensor, it's even better than pricier full-frame cameras.


Not only is its intuitiveness and ease of use conducive to a great experience while taking your shots, but when you bring all those photos into your preferred editing suite, they're amazing to work with, too. That shouldn't distract you from the GFX 50s II's negatives though, such as the lack of video recording features and the below-average autofocus compared to its many rivals, as well as the face/eye detection system.

It comes Tilly approved!!!
Still, for a premium price tag and point of entry into the medium format world, for those of you who value the very best in photography and maximal image quality, Fujifilm's new GFX 50s II is an option that's very hard to overlook. If you need a camera that can handle video or have more lens options, Canon and Sony are better alternatives. Yet, when it comes to raw and pure image quality, the GFX 50s II holds its own.
Specs And Details


About the Author - Ross Jukes is a professional Photographer and Videographer with over a decade of experience. Working in both Digital and Analogue formats, Ross has worked with international clients, had his worked published numerous times and exhibited his work extensively. With a passion for all things photographic, Ross combines his experience, enthusiasm and dedication to his art form to create engaging and educational content for the photographic community.

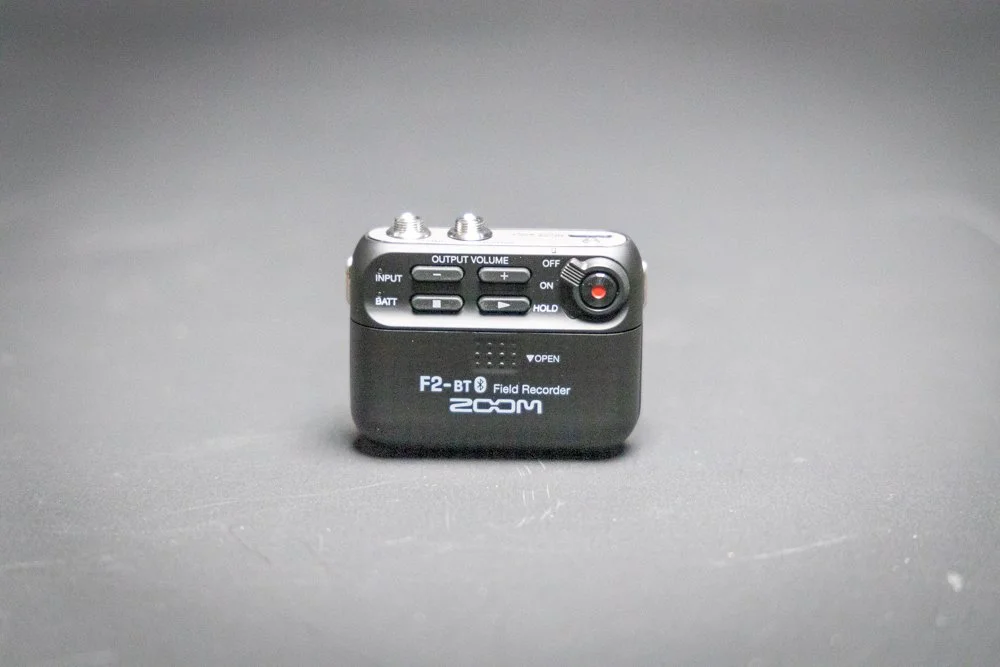
REVIEW: Zoom F2 BT Field Recorder
Zoom's F2 BT field recorder, an upgrade to the already solid F2, introduces Bluetooth controls and features like timecode synchronisation. Touted as the smallest and lightest, it boasts 32-bit float recording technology, ensuring a vast dynamic range and eliminating audio clipping. Ideal for on-the-go creators, its compact design and ease of use make it a standout, though its higher price point and lack of certain features may deter some.
Capturing good audio is a fine art in itself. For podcasters, videographers, journalists, or content creators on the move, a great microphone is a crucial piece of equipment, recording every story and moment with crisp details and absolute clarity. Zoom has long been one of the key players in the world of portable and pocketable field recorders and lavalier microphones, and the F2 BT is their latest addition to the stable.
The F2 was already a solid addition to the Zoom family of highly-regarded field recorders, and with their latest BT variant - standing for 'Bluetooth' - Zoom's improved upon the tried-and-tested formula with its inclusion of Bluetooth controls. When paired with Zoom's mobile app, it unlocks a whole new set of neat creature comforts and conveniences that not only make using your Zoom F2 BT field recorder easier.
PLEASE NOTE: I WAS SENT THIS ITEM FOR REVIEW BUT NO OTHER PAYMENT OR CONTROL WAS EXCHANGED FOR PUBLISHING THIS UNBIASED REVIEW
Video Source - Carey West via YouTube
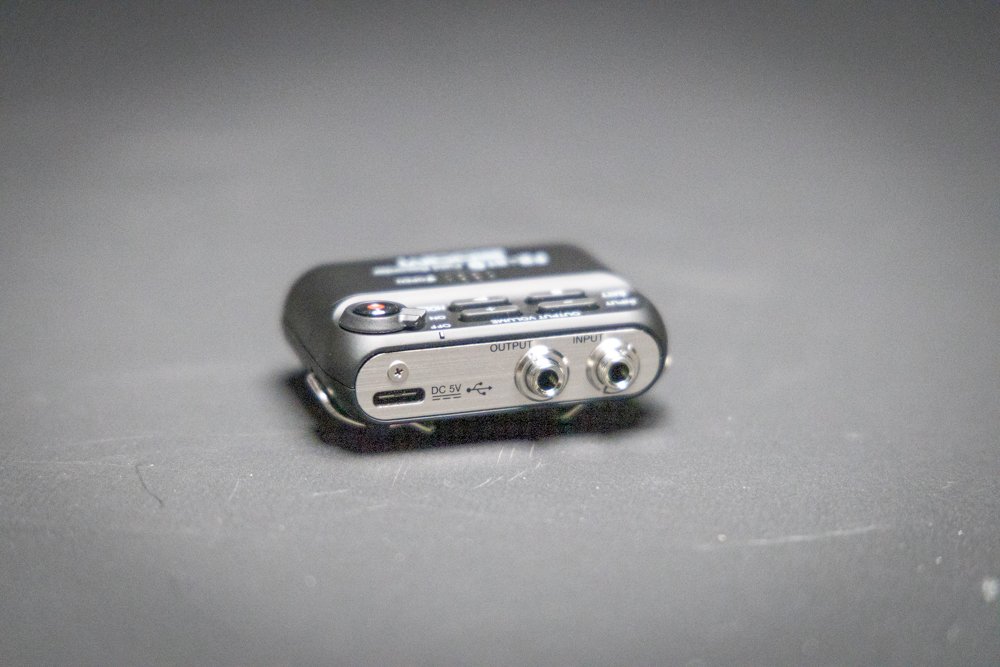
But, it also adds additional functionality, such as timecode synchronisation and remote control functions that you can set simply using your phone. Although, besides those new features, the Zoom F2 BT that I'd been using still carries over all the awesome upsides and pros of the non-Bluetooth F2. Zoom touts them as the smallest and lightest field recorders ever, though that's not to say that it lacks punch for its size.


If anything, it handily punches far above its weight class. One of the standout and noteworthy highlights of the Zoom F2 and F2 BT 32-bit float recording technology. This alone promises unprecedented dynamic range, helping to eliminate the age-old issue of digital audio clipping. When paired with Zoom's set-and-forget intuitiveness and ease of use, could the F2 and F2 BT be the best field recorders on the market?
What Makes The Zoom F2 And F2 BT Field Recorders So Special?
It wouldn't be a proper review of the F2 and the F2 BT without starting off with Zoom's best piece of tech, their 32-bit float technology. Essentially, it enables a massively wide dynamic range of 1,528dB, dwarfing the 144.5 dB offered by 24-bit linear. The latter of which is what you would find on a lot of contemporary field recorders. So, what does this 32-bit float tech really do, and what upsides does it offer in return?

Well, with such a large dynamic range, it ensures that you can capture a broader range of sound, and do so with pristine audio quality without the risk of clipping or input peaking. As a result, no matter if you're recording a quiet whisper in a library or excessively loud shouting and even explosions, Zoom's F2 and F2 BT can record them cleanly and retain sharp audio quality, without even requiring gain adjustments.
This 32-bit float tech further reinforces Zoom's set-and-forget approach to recording audio, and among a field of highly competent rivals in this space, this is a killer feature to have. Moreover, you'd think that it's bigger than actually it is. Yet, Zoom is able to cram all of this into a compact package. The petite size of a Zoom F2 or F2 BT inside your pocket is barely noticeable, and it's perfect for those on-the-go creators.

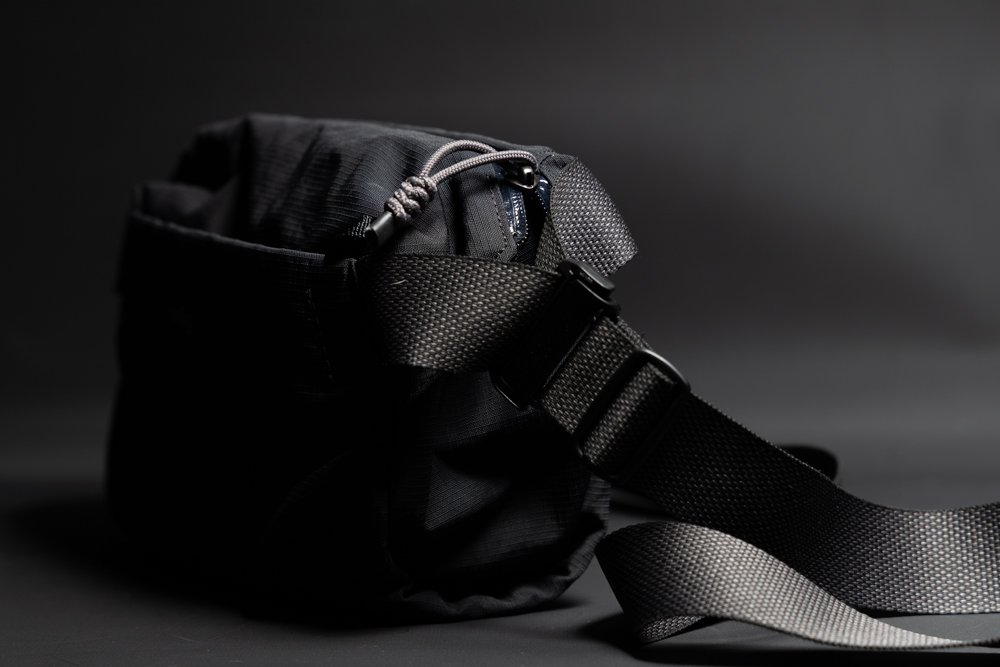
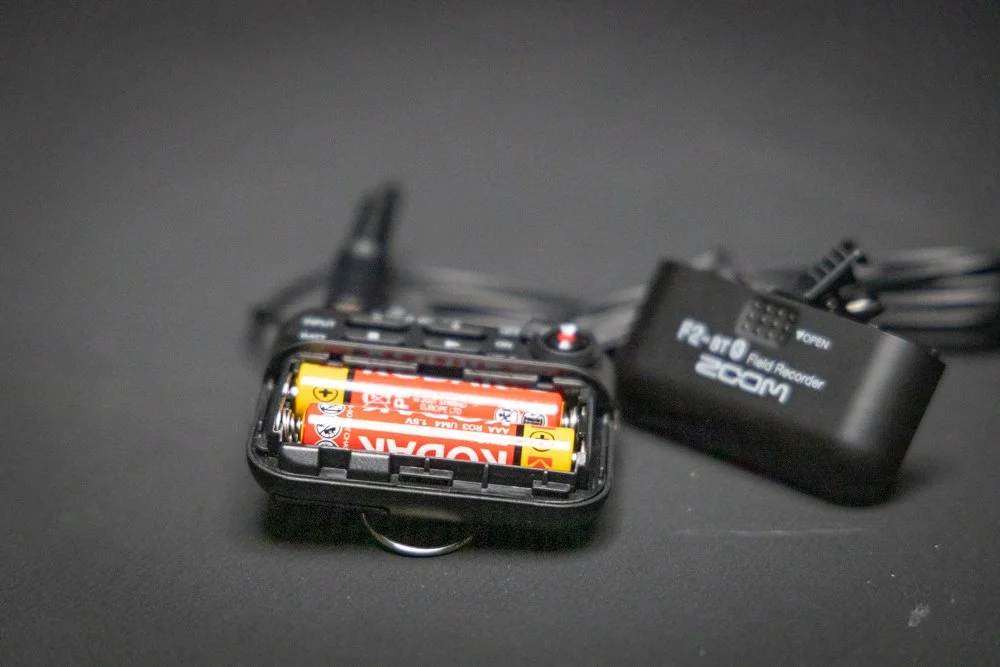
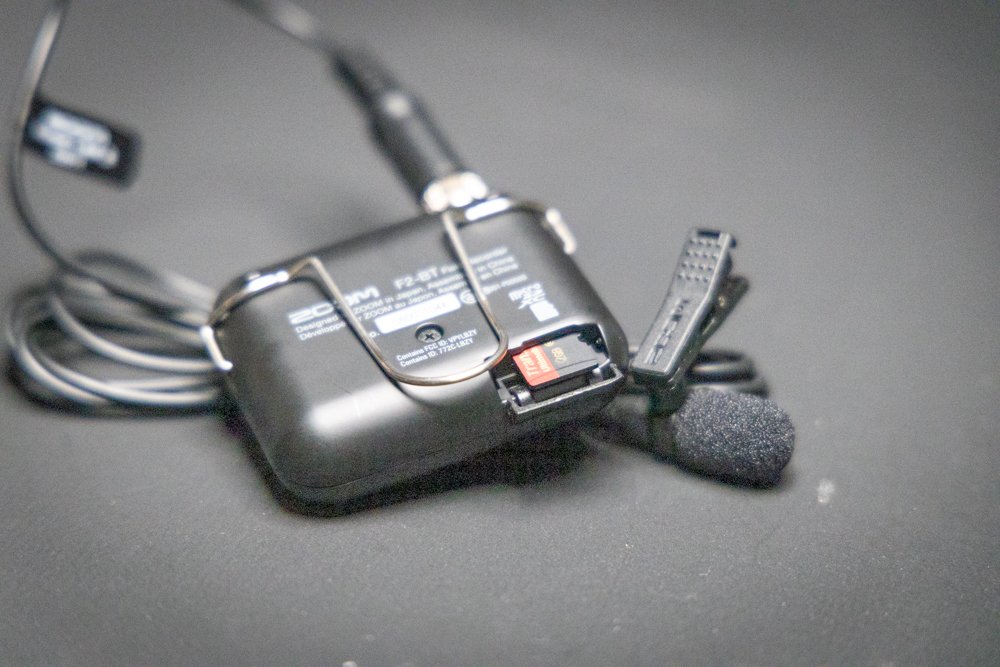
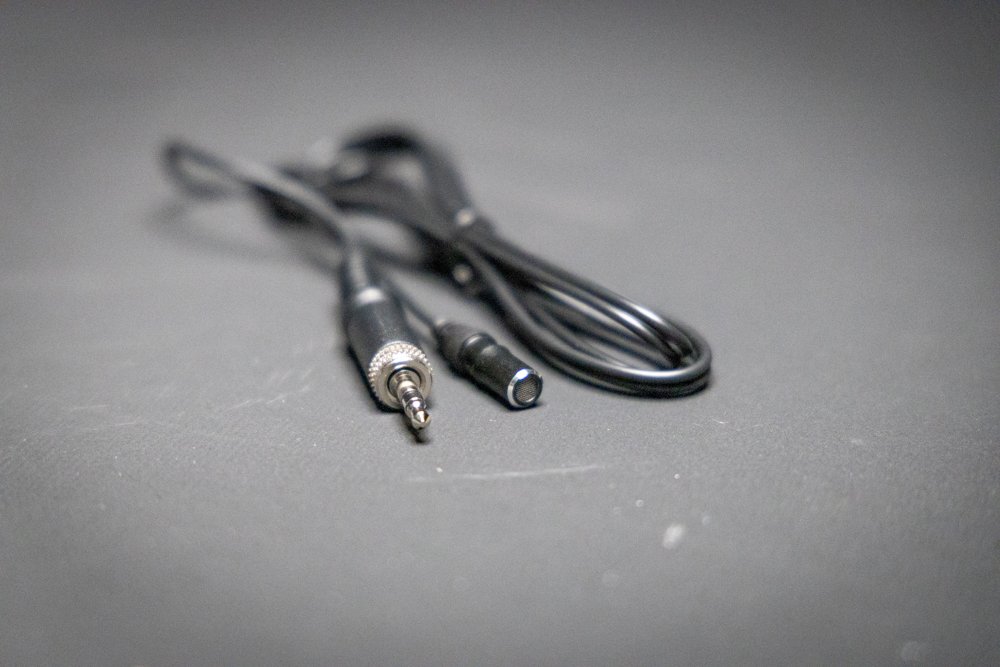
You can clip it onto the included belt, ensuring maximal mobility without compromising on audio quality. If you're looking to get started immediately once you get it out of the box, the F2 and F2 BT both come in addition to a lavalier mic. Pre-included mics that come with a lot of field recorders like these are often an afterthought that's worthwhile replacing down the line. In this case, though, the mic that’s included with the Zoom F2 and F2 BT is pretty great!
What Benefits Do The Zoom F2 And F2 BT Bring To The Table?
Given how I've sung praises for the Zoom F2 and their updated F2 BT thus far, you'd rightfully say that I quite like it. From my time with the F2 BT, here are some of the huge plus points that make the F2 BT a worthwhile expense:
Unparalleled Dynamic Range - I've hyped this up before, and I'll say this again, Zoom's 32-bit float tech is enough of a justification to get the F2 and F2 BT by itself. With the 32-bit float recording, you're virtually immune to digital audio clipping, which makes it a game-changer for field recordings. This could be huge for folks who regularly record audio in varying scenarios, like moving between a quiet building interior to the loud honking of traffic once you step outside, and without needing to constantly adjust the gain.
Ease Of Use - Zoom makes it clear that it wants the F2 and F2 BT to be an effortless recorders to use. That does make sense given the target demographic, which would appreciate the lack of fiddling around that needs to be done before every recording. Instead, the F2 and F2 BT, more so with its absence of any gain controls, help to simplify even a complex recording. All you need to do is hit 'record', and let the F2 and F2 BT handle the rest.
Absolute Versatility - Between its compact design, intuitive controls, and general ease of use, the F2 and F2 BT field recorders are ideal for quite a wide audience of potential users. Even those who might not, at first, ever consider a professional-grade recorder like the F2 or F2 BT, might want to now. It's perfect for podcasters, journalists, videographers, and content creators on the move, alike.

What Are Some Downsides That You Need To Consider?
If you've gone this far, you might assume that the Zoom F2 and F2 BT are faultless, but in reality, there are some downsides that you need to consider. So, before you buy one, here are some factors that you need to think about:
High Price Point - For all its many features and clever innovations, the Zoom F2 and F2 BT aren't the most affordable options on the market. Here in the UK, the price does vary (depending on where you're buying it and whether you're able to get it at a discount), but it's listed for around £200. This could be a threshold far too high for some would-be buyers, especially for enthusiasts and newcomers who might not find the need to get a pro-grade field recorder.
Wireless vs Bluetooth - Although Bluetooth functionality does add quite a lot to the Zoom F2 BT, such as timecode synchronisation (making it a very attractive option for videographers) and being able to control the F2 BT remotely from your phone, the one thing that some might want to be wireless (but isn't) is that included lavalier microphone. There are surely many who would value the extra convenience of a wireless lavalier mic that records directly into your camera, which helps to avoid post-production synching.
Mono Recording & Lack Of Gain Controls - Two more things that the Zoom F2 and F2 BT are missing that might be considered as limitations for some users, is the lack of support for stereo recording (it only has mono recording). On top of that, the F2 and F2 BT have no gain controls. This was somewhat intentional, as I mentioned earlier, for optimal ease of use. However, this would still be off-putting for quite a lot of professionals who are used to having a bit more control over their recordings.
Video Source - Matt WhoIsMatt Johnson via YouTube
So, Should You Consider The Zoom F2 And F2 BT?
In the realm of portable recorders, the Zoom F2 and F2 BT, and mostly led forward by their distinct 32-bit float technology, handily set it apart from the rest. They offer an unparalleled dynamic range that's unrivalled thus far, and they ensure the sharpest and crispest audio quality possible, regardless of which scenario you're recording in. Explosively loud or whisper quiet noises, it'll handle them with no issues.


While that alone is ground-breaking enough, the F2 and F2 BT packages them in a lightweight and small form factor, paired with impressive battery life, and they even include a great lavalier mic in the box. It's definitely not cheap and it might be cost-prohibitive for some, given what it offers, and how it performs, for those who need a reliable audio recording device, the Zoom F2 and F2 BT are worth the investment.
Specs And Details

About the Author - Ross Jukes is a professional Photographer and Videographer with over a decade of experience. Working in both Digital and Analogue formats, Ross has worked with international clients, had his worked published numerous times and exhibited his work extensively. With a passion for all things photographic, Ross combines his experience, enthusiasm and dedication to his art form to create engaging and educational content for the photographic community.

REVIEW: Freewell Mavic Mini 3 Pro Filters
Drone videography faces challenges like overexposure from sunlight. ND filters, like the Freewell Pro Filters for DJI Mavic Mini, mitigate overexposure, ensuring smoother, natural footage. They control the light entering camera sensors, optimise video quality, and offer versatility for various lighting conditions. Freewell's filters are durable, easy to swap, and reasonably priced. However, filter pack selections and non-polarizing options have limitations. Overall, they're essential for drone enthusiasts.
Drone videography and photography have grown by leaps and bounds over the past few years. Whether it's zooming about a metre from the ground, riding bumper-to-bumper alongside drift cars burning rubber like there's no tomorrow, or flying high in the sky to capture those once-in-a-lifetime moments and picturesque scenes that would've been impossible to shoot from the ground. However, it's not without its issues and limitations.
Mainly, and that's particularly so for shooting videos on your drone, the higher up you fly or the faster you move, you're bound to attract a lot of sunlight. Though cameras do need light to capture great photos and videos, too much overexposure is still something to be concerned about. Drone cameras are especially the ones most impacted by this, as not many drones have variable apertures to manage the shutter speed.
PLEASE NOTE: I WAS SENT THIS ITEM FOR REVIEW BUT NO OTHER PAYMENT OR CONTROL WAS EXCHANGED FOR PUBLISHING THIS UNBIASED REVIEW
Vide Source - DM Productions via YouTube
Yet, even those drone cameras that could enable higher shutter speeds; too high of a shutter speed would often make your footage look shaky or have stutters and judders rather than the smooth, seamless videos that you might want out of it. So then, how we fix this? Well, ND filters, such as the Freewell Pro Filters for the DJI Mavic Mini that we have here, can readily help mitigate some of that unwanted overexposure.

Not only would they block out much of that overexposed light from hitting your drone camera's sensors, but they would also help to optimise for a much smoother and natural video footage, adding a bit more of that realistic, smooth motion blur which is more true to life than the shaky drone footage you might sometimes see. As such, let's take a look at why the Freewell Pro Filters for your DJI Mavic Mini 3 are a must-have.
What Do These Freewell ND Filters Actually Do?
As I mentioned earlier, the Freewell Pro Filters are an essential addition for any drone enthusiast (although, specifically for the DJI Mini 3 or the Mini 3 Pro, depending on which specific filter pack you're ordering) and more so if you want to capture high-quality footage from your drone. Neutral Density (ND) filters are made to control and modulate the amount of light that enters a camera's sensors, to prevent overexposure.
Video Source - The Drone Creative via YouTube
Given that Freewell has long developed a good reputation among drone videographers and photographers for their robust and versatile ND filters, they're a go-to choice for many. To really understand what that ND filter can really do, it's ideal for users who want to shoot from their drone in Manual mode (rather than the Auto setting). Manual mode, with these Freewell ND filters, gives you far more control with exposure.
You really do notice the differences when you're filming under really bright daylight or during a cloudy afternoon, or during those occasions when your drone camera catches direct sunlight coming over the horizon. With the Freewell ND filters on hand, you can best optimise and choose the right balance of light for optimal results. However, what really sets apart Freewell's ND filters from the countless other options on the market?

Well, for starters, Freewell offers a wide variety of ND filter levels. The lowest filter they have is ND4, and it could be ideal for duller days when you don't need a strong ND filter. On the opposite end of the spectrum, Freewell also offers ND2000 filters for super-duper, long-exposure shots. Given that Freewell sells these ND filters in specific variety packs, you have the flexibility to get the best out of different lighting conditions.
Time Efficiency, Ease Of Use, And Versatility Come By Default
Besides that, some of Freewell's ND filters even offer a built-in polarizer. Some of the ones that came with my filter pack had a natural polarizing effect, which is a boon to help reduce reflections from those shiny surfaces such as windows, grass, and water. Nonetheless, Freewell also offers non-polarizing ND filters, as they could help cover 2 to 5 stops, or 6 to 9 stops under bright light, providing more variation to users.
Furthermore, Freewell's ND filters are widely known for their quality and durability. This is something that often gets skimped on when you cheap out on drone-specific ND filters. They either fall out easily when it's being flown about, or they lack any solid dustproofing or waterproofing. In almost no time at all, all those cheap ND filters will soon wear out, and there's often mediocre longevity in the lower end of the market.

Freewell, on the other hand, ensures solid waterproofing, dustproofing, scratch-proofing, and oil-proofing with their ND filters. Not only does this mean you can expect them to work reliably all the time, but you won't further get caught out when your video footage looks so bad, due to a non-functioning ND filter. Plus, for the many benefits that Freewell's ND filters offer so far, they're also much easier and less finicky to use.
They've been engineered and designed for rapid and easy swapping from one ND filter to another. I've found that I could change filters in a matter of seconds. Not only does this save me precious battery life on the drone, from not having to fiddle about incessantly, but this also means that when that perfect moment comes to take a shot, I'd be less liable to miss out. This is another common sacrifice on cheaper filters.
What Are The Pros & Benefits Of Freewell's ND Filters?
To quickly summarise, then, what have these Freewell ND filters done well? Here's a quick look at the pros and upsides that you'll experience with these filters:
Improved Video Quality - By being able to control the amount of light that enters the drone camera sensors, these ND filters ensure better video quality. And, that's even under challenging lighting conditions, such as bright sunlight.
Versatility & Flexibility - With a huge range of densities available (from ND4 all the way to ND2000), you can very easily adapt to various lighting scenarios. They're especially useful on bright and sunny days, but with a bit more work, you could adapt these for a diverse array of weather conditions.
Built-In Polarizer - For further tweaks, enhancements, and optimisations that you could do to extract more improved video footage from your drone, Freewell's ND filters have built-in polarizers. This enables you to get more colour saturation and aid in reducing unwanted reflections, leading to footage that looks more vibrant and clear.
Ease Of Use - Compared to a lot of ND filters out there, Freewell's designs are a massive time-saver and a huge battery-saver, as they can be adjusted and swapped out in a pinch. Anytime lighting conditions shift one way or the other, changing these filters is a breeze.
Affordability - Despite the high-quality engineering and design, Freewell's ND filters come at a reasonable price, offering great value for the money. The pack that I had came with 13 different ND filters at varying densities, at a cost of £129.99.

However, What Are The Downsides To Consider?
With that being said, for all its many benefits, the Freewell ND filter pack for your DJI Mavic Mini 3 (and the Mini 3 Pro, depending on which filter pack you opt for) do have its fair share of cons:
Filter Pack Selection - While Freewell's ND filter packs offer a wide variety of densities available, some of these packs are oddly bundled together. You might find that some packs lack higher or lower densities to suit your needs. For instance, one of the other Freewell packs that I bought lacks lower ND2, ND4, and ND8 filters.
Non-Polarizing Filters Options - The non-polarizing ND filters might be available for the DJI Mavic Mini 3 and Mini 3 Pro, these options are not optionable for other DJI drones, like the Mavic Air 2. So, that might limit your options somewhat.
Video Source - UAVisuals via YouTube
Final Conclusion... Are Freewell's ND Filters Worth It?
All in all, Freewell's ND filters are priced competitively, and they offer a fantastic balance between the cost that you pay, as well as the quality and performance that you get out of it. It's worth bearing in mind that Freewell's ND filters come in various packs, such as an all-you-can-shoot 16-pack option, or you could try out the smaller 4 and 6-pack options, too. So, make sure you choose wisely based on your needs.
However, find the right set of ND filters for you (for the DJI Mavic Mini 3 and Mini 3 Pro), and these filters are some of the best that you can get on the market. Freewell's selection here is also a huge upgrade over the more basic set of ND filters that you can get directly from DJI or other brands. And hey, Freewell even throws in a neat little magnetic case to protect your ND filters. For any drone enthusiast, these filters are a must-have.
Freewell's ND filters ought to be a sought-after bit of kit for drone photographers and videographers, and for those just getting started with this ever-popular hobby, they should be highly considered from the get-go, full stop. With its diverse range of densities, built-in polarizer, and ease of use, in addition to all that added versatility and robust engineering, Freewell has something truly special on its hands here.
Still, you should be wary of how Freewell bundles these filters together. Shopping around, you may find a pack where ND filters that you don't want are bundled with those that you do need. Lower densities, such as ND2, ND4, and ND8 filters are much more useful for drone shots. Nevertheless, whether you're a pro or just a casual enthusiast, Freewell's ND filters are going to be a valuable addition to your next shoot.
Specs And Details

About the Author - Ross Jukes is a professional Photographer and Videographer with over a decade of experience. Working in both Digital and Analogue formats, Ross has worked with international clients, had his worked published numerous times and exhibited his work extensively. With a passion for all things photographic, Ross combines his experience, enthusiasm and dedication to his art form to create engaging and educational content for the photographic community.

REVIEW: Fujifilm GSW690III - Big and Wide!
If you're looking for a great medium-format film camera that also happens to shoot in a larger negative, you'll quickly notice how few options there are on the market. It's a niche segment, for sure, and one that is sparsely populated with good examples. Lucky for me, I found this Fujifilm GSW690iii a while back, and on the surface, it seems to meet my needs perfectly. But, how well does it fare through the gauntlet?
If you're looking for a great medium-format film camera that also happens to shoot in a larger negative, you'll quickly notice how few options there are on the market. It's a niche segment, for sure, and one that is sparsely populated with good examples. Lucky for me, I found this Fujifilm GSW690iii a while back, and on the surface, it seems to meet my needs perfectly. But, how well does it fare through the gauntlet?
Well, despite being born in the 90s (which itself is a derivative of its 1980s predecessors), the GSW690iii still holds up as one of the best cameras that you can buy today. Especially, for a bit of landscape, travel, or studio photography. Fujifilm's GW series of medium-format film cameras had numerous variants. You'll find loads of other formats on the second-hand market, but mine here has a distinct 6x9 negative.
UPDATE - I am currently selling this camera. It’s a fantastic camera but unfortunately, I need to sell some of my camera gear. Please read the listing carefully, link below :)
PLEASE NOTE: I PURCHASED THIS WITH MY OWN MOMEY AND NO PAYMENT OR CONTROL WAS EXCHANGED FOR PUBLISHING THIS UNBIASED REVIEW
Video Source - Crunchy Fingers via YouTube
I bought the GSW690iii as I wanted to find something that had a larger negative size... Most of my other film cameras have a 6x6 format, or the biggest among them would be something like the BRONICA GS-1's 6x7 format. But at the same time, I wanted to retain some degree of flexibility and portability that I'd no doubt lose out if I went with a large-format camera. 6x9 is as big as medium-formats go, it seems.

Granted, there are specialist and rare exceptions like panoramic 6x12 and 6x17 cameras. Though, if your needs don't require large negatives, there are other variants within Fujifilm's family of medium-format film cameras that come with a 6x7 and 6x8 negative, among others. Plus, they'd all come with the same (or somewhat similar) lens that's fitted onto this here GSW690iii. So, why did I pick this one, then?
Worth It To Go With Larger Negatives?
A larger negative, of course, allows you to retain greater detail, with enhanced sharpness, and a lot of depth from your shots. The same can be said of the Fujifilm GSW690iii, especially when you pair its large negatives and the super crisp lens (more on that later). What you end up with are a really good camera (by film standards), particularly for, as I've mentioned earlier, nature and landscape photography.
To be clear, it's not really the sort of camera that you'd want to bring with you for casual shooting. For the most part, the GSW690iii is aimed towards professional use and is likely to spend most of its life inside a studio or on a professional photoshoot. What's worth noting is the "S" in the model name. This denotes that it comes with a slightly wider lens than the GW models, which is paired with a 90mm lens.
Video Source - Garrett Ann via YouTube
The latter should equate to a 40mm in the 35mm standard. Meanwhile, the GSW690iii (not the GW) has a 65mm lens, which is a 28mm equivalent in the 35mm standard. Specifically, like the one that I have here, it's a Fujinon f5.6 fixed wide-angle EBC SW lens. It shoots in a 3:2 aspect ratio, is constructed from 4 components, and has 6 elements. The major downside to the GSW690iii is that it's a fixed lens unit.

Still, despite the inclusion of a fixed lens, this 65mm unit is one of the best film lenses of its era, and still is among the best in the business for medium-format film cameras. As far as the aperture is concerned, it'll go anywhere from f5.6 to f32, with half-stop increments in between. More specifically, you have options for f5.6, f8, f11, f16, f22, and f32. In practice, the GSW690iii's lens is a really good bit of kit to shoot with.
“This 65mm unit is one of the best film lenses of its era, and still is among the best in the business for medium-format film cameras”
One Of The Best Lenses In The Business
Personally, I find that the image sharpness can get a tad soft and lacking crispness at f32, though it's still pretty good, even at such high apertures. Ideally, I've found that there's more sharpness to be had at f8 and higher. The Fujifilm GSW690iii is capable of managing shutter speeds between 1 second to 1/500th of a second. Meanwhile, adjusting the shutter speeds as well as the aperture has to be done on the lens.


You can control the latter two with the dual parallel rings, near the retractable lens hood. On top of that, it comes with a T mode - which is Fujifilm's idea of a Bulb mode. While this works well in practice, using this feature does require a bit of getting used to. For starters, you're asked to turn the shutter ring and set it to something other than T when the exposure times out, such as a timed setting that's the closest to you.
Video Source - SignedJody via YouTube
Once you understand the general quirkiness of it, T mode can be handy for long exposure shots. Or, if you can't grasp how it all works, you'll otherwise need to DIY an even odder solution... Such as using a piece of cardboard, or a thick black cloth to block out light going into the lens. Another variable to contend with is the GSW690iii's use of a rangefinder. As expected, there is a bit of parallax to compensate for.

For those who aren't familiar, 'parallax' is an instance where what you're seeing through the rangefinder isn't really what the lens itself is seeing. Nonetheless, from my use case, the parallax on the GSW690iii is not really that bad - most of what I'm seeing and composing through the rangefinder translates well into the final shot. Although, it's definitely something to be wary of when you're composing a good shot.
Some Old-School Charm, Good And Bad
Whenever you're handling the Fujifilm GSW690iii, it's worth remembering every now and then that it's a pretty old slab of hardware. As such, it's a basic camera to use - for better or worse. For example, it has no metering system, nor does it require a battery. In addition, it gives you full manual control. So, it doesn't really match the point-and-shoot style of a modern digital camera, if that's more your style.

Still, at least it does have a hot shoe for a flash. Another interesting addition is a counter on the bottom of the frame that counts how many shots you've taken. It's sort of like an odometer on your car, but this only counts every 10 shots. So, if you see the counter reading 100, it means that 1,000 shots have been taken. The spring mechanism for this counter is what might explain the GSW690iii's loud shutter noises.
Video Source - K Praslowicz via YouTube
Looking around, there aren't a lot of other buttons or dials when compared to modern DSLRs. In fact, the only other dials that you'd have access to (besides the two shutter buttons; one at the top and the other on the front) would be at the top of the camera. This one's dedicated to film selection... 220 film with 16 exposures (but with no backing paper), 120 film with 8 exposures, or 120 film with 4 exposures.

Naturally, shooting with 220 film is out of the question, as they're basically ‘unobtanium’ these days. But, even with more "commonplace' 120 film, you'd only get (at the very most) 8 exposures from a single roll. Given how costly film is to buy and develop, the GSW690iii isn't really the most economical pick of the bunch. So, it does force you to be very careful when lining up a shot - mess up, and it'll cost you!
The Legend Of The "Texas Leica"
Now, depending on what you want to get out of it, those larger negatives may be worthwhile the added expense. Still, at least you don't have to worry (too much) about breaking your GSW690iii. Ergonomically, it feels really good in the hand, though the build quality is decent at best. This is thanks in no small part to its plasticky frame. So much so, that it almost feels brittle, as if it'll break into pieces if you dropped it.
Yet, hold it for long enough, and the GSW690iii gives off an air of robustness and solidity... Sturdy, and is more than capable of standing the test of time. You do require a bit of muscle to carry this around all day, as it is rather big and bulky. Weighing in at approximately 1,510g for the entire package, the GSW690iii is a heavyweight. There's even a cheeky nickname for the Fujifilm GSW690iii, the "Texas Leica".
Video Source - KEH Camera via YouTube
"Texas", because it's overly big, yet it has that dainty old-school charm of classical "Leica" cameras. That's not to say that getting your hands on one is going to be easy. This is undoubtedly the biggest downside of the GSW690iii - trying to find one. As of writing, they're becoming ever more scarce, particularly if you're trying to find one in good nick. Thus far, demand for them is far outstripping diminishing supply.
Prices alone have doubled over the past few years. I paid around £450 for mine a while back. But, if you'd want one now, you're likely going to have to spend closer to £800 for a well-kept example. Additionally, it could keep getting higher. Nevertheless, it's a premium that might be well-worth spending if you value the GSW690iii's larger-than-usual negative size. Not to mention, the sharp, wide 65mm lens.

Specs And Details


About the Author - Ross Jukes is a professional Photographer and Videographer with over a decade of experience. Working in both Digital and Analogue formats, Ross has worked with international clients, had his worked published numerous times and exhibited his work extensively. With a passion for all things photographic, Ross combines his experience, enthusiasm and dedication to his art form to create engaging and educational content for the photographic community.

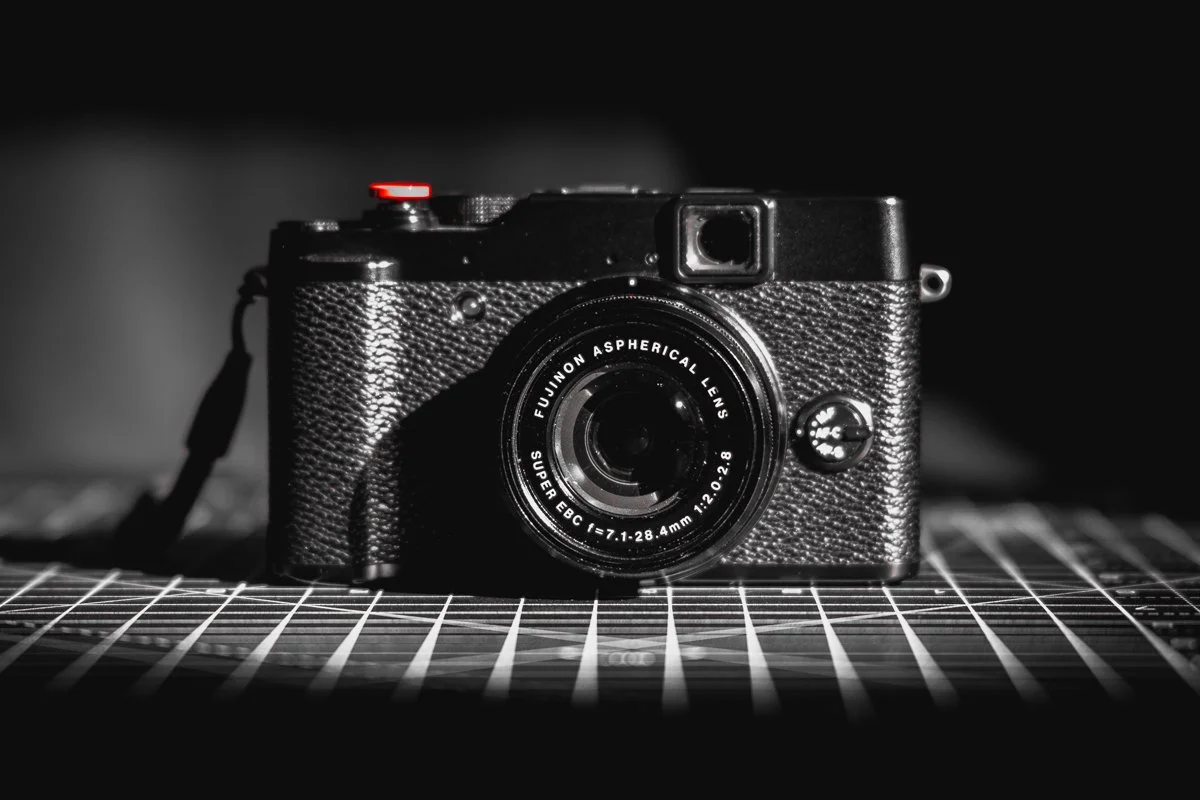

Disclaimer: All links to Amazon UK are affiliated links - you will still pay the same price but I will receive a small commission for providing the link. All information provided in this blog is intended either for educational or entertainment purposes and is accurate to the best knowledge of the author. However, further research/professional advice should be sort before making purchases/implementing any advice given and no responsibility is taken by the author or parties mentioned here within.

A Sunny Sunday Walk with the Leica M8
I reviewed the Leica M8 a little while back and needless to say, I was pretty smitten with it. Now that I’ve spent a bit more time with the camera, I’ve developed some further thoughts and feelings on it, but is it all still as positive as my previous assessment, or is the love affair over?
I reviewed the Leica M8 a little while back and needless to say, I was pretty smitten with it. Now that I’ve spent a bit more time with the camera, I’ve developed some further thoughts and feelings on it, but is it all still as positive as my previous assessment, or is the love affair over?
Now this doesn’t warrant a full review, it was more the coming together of two increasingly rare things - a sunny day and me having some free time! So I quickly grabbed the M8, who had started to gather dust and hit the streets with no real plan. The one thing I did have in-mind, was I wanted to capture colour and not necessarily go to the most obvious locations.
Watch a recent video I made about using the Leica M8 in 2024!
PLEASE NOTE: I PURCHASED THIS WITH MY OWN MOMEY AND NO PAYMENT OR CONTROL WAS EXCHANGED FOR PUBLISHING THIS UNBIASED REVIEW
I left the house with the Leica in-hand - not even a case or bag, literally just a wrist strap and that’s it! Now my first observation about this camera is ‘it’s a bit of a looker’ - it definitely gets attention and for those in the know, that little red dot really turns heads! However, that attention isn’t always wanted so I would highly recommend being careful where you whip your prized possession out.
As you can probably tell from the images, I had decided to venture into some of the less photographed areas of Birmingham. I took my chances on the streets being quiet on a Sunday morning and this leads me on to another one of my, let’s say, very subtle annoyances with this camera - the size.
Don’t get me wrong, this is not a big camera by most modern DSLR or even mirrorless standards. Then again, it’s not exactly pocketable. I have added a very small grip to the front of the body that improves the ergonomics somewhat and always have a wrist strap attached - but there is no getting away from the fact that after a while, it can feel a little awkward to carry. Most users will have a neck strap or bag so it really isn’t an issue, just one of my observations.
Another thing that jumped out at me in using this camera for a few hours is how much I enjoy the viewfinder. It’s big, it’s bright and even with my lack-lustre eyesight, shooting is a pleasure. Framelines are clear and for the most part, you feel confident in what you're seeing will be how the shot looks. Reviewing your images is a different matter though, the LCD is - and I really am trying to be generous - adequate at best.
I should also mention that I was shooting with the Voigtlander 28mm Ultron II lens - a great lens that has been pretty much permanently attached to the M8 and is more than a fitting companion for the camera. The lens itself is somewhat compact, well made and performs great. My only issue with the glass is not actually the problem with the glass, it’s the camera, again…
You see, for reasons that I’m not going to dwell on, you are best served by adding an IR Cut filter to the front of your lens when shooting on the M8. That’s fine but I like to shoot with a Black Pro-mist filter on most of my cameras in an attempt to dampen the ‘digital’ feel (I appreciate the irony of wanting sharp lenses, amazing sensors and then intentionally ruining them! But that’s how I roll).
The added bulk on the front of the lens makes this setup even less (potentially) pocketable and makes adding a lens hood, well a bit ridiculous as it all just protrudes so far! Fortunately, I’ve not really experienced anything too negative in the lens flaring department and even with filters and step-up-rings and what-not attached, the camera still feels good in the hand and is pretty manageable.
Enough of the camera talk though, this was a leisurely walk after all! I had so much fun just following my nose, shooting whatever jumped out at me and not having any real care for the final results - this was the kind of photographic experience that I had been missing. The best part though, I didn’t find myself yearning for another camera that I’d left at home, the little(ish) Leica was great for this kind of relaxed photography.
It would be appropriate to call the M8 a fair-weather photography camera - it really does not perform well in low light conditions. However, on a beautifully sunny morning, this camera bursts to life and the image, albeit with not the most awe-inspiring subject matter, speaks for itself. Colours pop off the screen and there is a beautiful detail in the modestly sized files.
I’ve fallen into the trap of searching for and saying that certain cameras have a ‘film like’ feel before. I don’t honestly believe that a digital camera can give you what shooting film does. To coin the phrase of a much better ‘Ross’ - it’s the ‘Happy little accidents’ that make film what it is. However, there is no doubting that the colours out of this camera and the achingly classic Leica body, all contribute to the feeling of something much more, analogue.
As I strolled the streets, barely with a thought in my head, I would say the only thing that could really improve the shooting experience would be a manual shutter lever, Epson R-D1 style! I’ve pined for an R-D1 for many years but they will remain out of my price range for the foreseeable future. However the thought of physically interacting with the M8 in the same way you would a (dare I say it!) M6 - but with CCD colour goodness and none of the chemicals - well that’s a combo hard to beat in my book!
“I got home and couldn’t wait to get the images into Lightroom and apply my own not-so-subtle edit to them”
I got home and couldn’t wait to get the images into Lightroom and apply my own not-so-subtle edit to them. Just as much as I had enjoyed my walk in the sun with my best M8 (sorry!!) I loved seeing the images come to life. There’s enough dynamic range that if you expose something correctly, protecting the highlights, you can make some wonderful images. The thing that will really please you though are the colours - no whacking the vibrance slider half way off your screen here, the M8 provides colour in abundance.
So, the question remains - does the M8 live up to my initial high praise? Yes, yes and then some. I only realised when I got home how much I had missed shooting with this camera and how I must take it out more often! It might not have escaped your attention that I have posted this on the same day that I posted my review of the Sigma DP2 Merrill - another camera that needs good light but is a colour monster!
Now, comparing the CCD sensor Leica to the Foveon masterpiece that is the Merrill is no easy task, both are amazing. However, the Merrill makes you work for it and the satisfaction is when it hits. With the M8 though, this is just a more pleasurable experience with the same gratifying rewards. I would be hard pressed to pick another camera over the Leica M8 for sheer photography enjoyment and that, on a sunny Sunday is what it’s all about. I love this camera.
About the Author - Ross Jukes is a professional Photographer and Videographer with over a decade of experience. Working in both Digital and Analogue formats, Ross has worked with international clients, had his worked published numerous times and exhibited his work extensively. With a passion for all things photographic, Ross combines his experience, enthusiasm and dedication to his art form to create engaging and educational content for the photographic community.
Disclaimer: All links to Amazon UK are affiliated links - you will still pay the same price but I will receive a small commission for providing the link. All information provided in this blog is intended either for educational or entertainment purposes and is accurate to the best knowledge of the author. However, further research/professional advice should be sort before making purchases/implementing any advice given and no responsibility is taken by the author or parties mentioned here within.

REVIEW: Sigma DP2 Merrill - A Diamond in the Rough
If there's a singular phrase to summarise the Sigma DP2 Merrill, it would be "it cuts both ways". In that, I mean it's a very, very flawed camera, with a lot of peeves and annoyances, and you almost wonder why not get any other camera. Yet, in the right circumstances, with enough patience and determination, the DP2 Merrill is one of the most impressive cameras that you can buy, especially if you're care about colours.
If there's a singular phrase to summarise the Sigma DP2 Merrill, it would be "it cuts both ways". In that, I mean it's a very, very flawed camera, with a lot of peeves and annoyances, and you almost wonder why not get any other camera. Yet, in the right circumstances, with enough patience and determination, the DP2 Merrill is one of the most impressive cameras that you can buy, especially if you're care about colours.
And we'll get into that in just a second. But to start off with, we can't overlook the highlight of the Sigma DP2 Merrill - its Foveon X3 sensor. It's a 46-megapixel sensor (capturing 44.3 million effective pixels) with a resolution of 4,704 x 3,136. Besides all those flashy numbers, what's most unique about that sensor is the '3' in 'X3'. This notes that the sensor has not 1, but 3 layers stacked on top of one another.
PLEASE NOTE: I PURCHASED THIS WITH MY OWN MOMEY AND NO PAYMENT OR CONTROL WAS EXCHANGED FOR PUBLISHING THIS UNBIASED REVIEW
When this camera hits, it really hits…
In most other cameras, the layers that record RGB data (basically, red, green, and blue colour spectrums) lie adjacent to each other within the same layer of the sensor. But not in the DP2 Merrill, as that Foveon sensor lays every layer on top of each other, which theoretically, should allow it to capture mesmerising colours. True to their word, the images that come out of mine showcase some gorgeous colour work.
Additionally, the shots that I was able to pull off were highly detailed and crisp, with colours that render it almost true to life. And, with a good amount of vibrancy, avoiding the sometimes dull colours that digital cameras sometimes capture. It should be noted that although the sensor is a 46-megapixel unit, the final images that come out of the DP2 Merrill are processed into (just a tad over) 15-megapixel photos.
Some (Very) Good, Some (Quite) Bad
The idea of the 15-megapixel photos is that each of the three sensors processes 5 megapixels each, with as much of the RGB data as it can take in and process. While this might not be as impressive in 2023, where 15-megapixels can be considered commonplace, the colours and details you get in each shot are mightily impressive. This is made even better thanks to the snappy autofocus and intuitive controls.
The most commonly-used dials - aperture, shutter speed, and ISO - are within easy reach and are always accessible. Before we forget, that 30mm f2.8 Sigma lens (which is a 45mm equivalent in 35mm speak) is also deserving of much praise. The image comes up super sharp, even at f2.8, and I've found that there's still room for improvement once you stop it at f4. This makes up for the fact that it's a fixed lens.
Video Source - Hifi Huff via YouTube
With that being said, Sigma's DP2 Merrill isn't really all sunshines and rainbows. For all its capabilities in colour rendering and processing, the Foveon sensor underneath (and the camera itself) has many distinct flaws. Chief among which is the general slowness at which it takes photos - the number one thing that cameras are supposed to do. Snap on the shutter button, and there's always a lengthy delay before the final image appears.
Sometimes, it could literally take you several seconds of waiting! It feels even more lethargic thanks to the lack of a bust mode setting. This is partly thanks to the added processing required by the Foveon X3 sensor to capture and process all that RGB data to best highlight and accentuate the colours. This could naturally lengthen the delay between shots, as well as writing the final image onto your SD card.
“Yet, with enough patience and in the right lighting conditions, you can get some truly breath-taking shots”
A Mighty Double-Edged Sword
Personally, I'm not too bothered by this, given that I'm used to taking photos with older film cameras, as the latter has a similar delay to finalise each shot. However, if you're accustomed to the snappy shots on modern digital cameras - or even your smartphone - this can be quite a frustrating experience. You ought to treat it like film cameras... Rather than spray and pray, aim for calculated, precise shots each time.
Speaking of film cameras, the Sigma DP2 Merrill is just as incapable of taking good photos in any low-light situation. I personally only use this for taking photos in the daytime, with a lot of light to work with. Seeing how bad the low-light performance is, I wouldn't go anywhere above 400 ISO. And, simply stick to its base 100 ISO setting. Beyond that, you'll get weird effects with colours along the darker spots - even with slower shutter speeds.
Video Source - Mattias Burling via YouTube
Nonetheless, it could still be okay for you to crank it up to 800 ISO if you're taking black-and-white photos, albeit with a slight loss in sharpness and a hint of added noise. This here is the Achilles Heel of the Foveon sensor - terrible low-light shots. Therefore, you should ideally avoid any night-time photography. I've even tried setting up the DP2 Merrill atop a steady tripod and set with a long exposure, but with no changes.
In fact, the low-light performance is so abysmal, that even relying on indoor fluorescent lights, or a bit of street photography under street lights, as well as trying to take a photo when it's sundown... Could really take away and sap out those vibrant colours from earlier. In short, the best conditions to take photos on the Sigma DP2 Merrill would be under bright sunlight, in the middle of the day, and possibly outdoors.
Many Quirks And Features
While we're discussing the downsides, there's also the issue of software. The DP2 Merrill - as with a lot of other Sigma cameras - requires that you use Sigma's own proprietary software if you want to export your images. This is due to the fact that the DP2 Merrill writes images in an odd file format. So extreme is this, that Lightroom and a lot of other editing applications can't even read the files out of your camera.

Going through the process feels a little bit like dealing with film, but without the chemicals and added cost!
Thus, only once you've had it exported through the Sigma Photo Pro app that you can use those images however you wish. While it doesn't sound like much, it does add an unnecessary extra layer of work and complication to your workflow. It's not helped, by the way, that the Sigma Photo Pro software can be a bit counter-intuitive at times, which isn't really ideal as your only and singular gateway for exporting images.
Video Source - Matt Jacobs via YouTube
Although not really downsides, there are other quirks and oddities that you need to know before using a DP2 Merrill. For example, it lacks any viewfinder, whatsoever. As a result, you're left trying to compose each shot through the 3-inch LCD display. This won't just look awkward to passers-by, but it's also hard to use under bright sunlight. You know... The one time of day when you want to use your DP2 Merrill.
Strange things happen in the dark…
Not to mention, an LCD display, by nature, doesn't really do a great job of showcasing exposure and focus settings. Then, there's the DP2 Merrill's battery life. Between the need to continuously run the LCD screen and operate the power-hungry Foveon sensor, you'll run out of juice fairly quickly. While it might be a fun camera to shoot with when the solar systems align properly, it's no doubt a compromise anywhere else.
A Flawed Diamond In The Rough
Another thing that I've yet to touch upon is the build quality of the Sigma DP2 Merrill. It's pretty compact and lightweight, making it a great camera to bring along day-to-day. Aside from that, it's also built very well, offering you a solid feel in the hand, as though you're holding a brick. Even though the construction is mostly made from plastic, I do like the monolithic all-black looks of the DP2 Merrill.

In summary, Sigma's DP2 Merrill is a very flawed camera... Unapologetically bad low-light performance, super-slow image processing and write speeds, the lack of a proper viewfinder, as well as the need to use Sigma's clunky software. Yet, with enough patience and in the right lighting conditions, you can get some truly breathtaking shots, with eye-pleasing colours and photos that feel very much true-to-life.
Video Source - Tetsujin via YouTube
It's a really great camera, even if it's highly compromised in more ways than one. Admittedly, I'd wished I could whip out the DP2 Merrill more often, but it's hard to find the ideal scenario for it... Bright and sunny weather, which for us here in the gloomy old UK, such sunlight is a rare commodity to attain. So, for any of you who are keen to try, Sigma's DP2 Merrill can put out stunning pictures that are hard to beat.
The only major obstacle now is getting your hands on one. As it was fairly recently put out of production, you might be able to find a few stragglers on camera store shelves, yet to be sold. Otherwise, a trip over to eBay might yield well-kept examples that are still good for many more years to come. Values, it seems, are still on the higher end of the price bracket, so perhaps others are seeing its potential, too.
A NOTEWORTHY UPDATE…
When I came to edit my photos for this review, I noticed about three (from 150+) images were, let’s just say a bit broken… I get the feeling that this is a sensor read-out issue or a processor problem rather than a physical issue with the camera. However, it’s probably worth noting that, with any camera of this age - they are prone to producing issues. I’ll be sure to keep an eye on this and will, of course, do an update post if it gets worse but - buyer beware…
After posting this, a reader kindly got in touch and suggested it may be an issue with using third-party batteries. Being honest, I didn’t even notice what battery was in the camera but after checking, it was indeed a third-party. I have now changed it to a native battery and will see if that clears the problem up.
Specs And Details


Image gallery


About the Author - Ross Jukes is a professional Photographer and Videographer with over a decade of experience. Working in both Digital and Analogue formats, Ross has worked with international clients, had his worked published numerous times and exhibited his work extensively. With a passion for all things photographic, Ross combines his experience, enthusiasm and dedication to his art form to create engaging and educational content for the photographic community.
Disclaimer: All links to Amazon UK are affiliated links - you will still pay the same price but I will receive a small commission for providing the link. All information provided in this blog is intended either for educational or entertainment purposes and is accurate to the best knowledge of the author. However, further research/professional advice should be sort before making purchases/implementing any advice given and no responsibility is taken by the author or parties mentioned here within.